Here’s my EFCore RC2 Demo on Github
The long-awaited 2nd release candidate came out earlier this week (here is the team’s announcement: Announcing ASP.NET Core RC2).
I have been sticking with RC1 and avoiding mucking with the nightly builds as Microsoft evolved this stack towards RC2 because so much was changing. Others were braver such as Shawn Wildermuth, the beardy Shane Boyer and the sad people who have been building products and tools dependent on ASPNET Core.
So as soon as the new bits were released I sat down to finally update the sample application I’ve been using at conferences since March that were still on RC1. Although it’s all cross-platform, I’ve been working on this sample on my MacBook directly in OSX and using only the CoreCLR just to prove to myself that this stuff is truly cross-platform. I’ve even set Mono aside.
I had two tiers of problems to attack: first getting the new CoreCLR (and the CLI that gives us dotnet commands, replacing dnx, dnvm and dnu) onto my Macbook, second was updating my sample which was dependent on a variety of technologies and APIs.
I’ve pushed the updated version of the application to github and renamed it: https://github.com/julielerman/EFCore-RC2-Demo. But I want to share some of the things I did to get this all working. Shawn wrote a great post on updating his app and the aspnet documentation has a doc on updating from RC1 to RC2 as well. I would start with these. I will focus on some of the changes I had to make that either aren’t covered in those posts, aren’t as obvious or just gave me extra heartache.
I would definitely recommend looking at my repository though since it does have working code so if you’re stuck on something and it happens to be something I already did, you might find an example to borrow within my app.
Getting the RC2 CLI onto My MacBook
For most, it should be easy. Just follow the instructions on Microsoft’s .NET Core page (there are different pages for different platforms).
It seemed to work. But I quickly ran into some problems when I was tryingi to convert my code and those led me to a few threads that said I may not have the correct version. There is some question about how much needs to be removed from your system so that you don’t have leftover older bits of CoreCLR hanging around causing conflicts. In fact, a key element of the update is to run an uninstall script (on the instruction page linked to above). There was a pull request to update that script to do a better job of cleaning the old version out before installing the new version. (Since then that PR has been modified and merged and is now what you will get from the instruction page.)
I grabbed the existing pull request version of the script and ran it then re-ran the installer. So began a bunch of lost and frustrating hours because suddently the dotnet command was gone. I kept getting “dotnet command not found” errors. (See next section about that). Keep in mind that I’m still fairly new to OSX so some of my lost time was due to things like being told to go to the “usr” path and my windows brain translating that to users/julielerman. I made the mistake of going to the latter. That wasted a lot of time. But I eventually got it sorted out.
Because I did not have a straight path to success, it is difficult to say what exactly was wrong and what was right. Hopefully the new uninstall script will do the trick. If not I suggest looking at ideas in this thread: dotnet command can’t be found on osx with RC2 bits
Dotnet command not found on OSX?
There are two important takeaways in solving the problem of dotnet not showing up on OSX.
1) For those using zsh as the default commandline instead of bash:
“There is an issue in the way path_helper is working with zsh on OSX. The easiest way for you to get unblocked is to simply symlink the dotnet binary to /usr/local/bin using the following:
ln -s /usr/local/share/dotnet/dotnet /usr/local/bin
This may eventually not be necessary. See this issue for a conversation about making the uninstaller smarter on zsh.
2) Problem with dotnet command on bash
Another user had the same problem but on bash so the symlink was not the answer. Eventually he discovered that some app had installed the following into his ~.bash_profile file:
export PATH=/usr/local/bin:/usr/bin:/bin:/usr/sbin:/sbin:/usr/local/bin:/Applications/GitHub.app/Contents/Resources/git/bin:/Applications/GitHub.app/Contents/Resources/git/libexec/git-core
He removed it completely and got success although Zlatko K (from the cli team) made this suggestion:
You can actually keep that and just have the following:
export PATH=$PATH:/usr/local/bin:/usr/bin:/bin:/usr/sbin:/sbin:/usr/local/bin:/Applications/GitHub.app/Contents/Resources/git/bin:/Applications/GitHub.app/Contents/Resources/git/libexec/git-core
I don’t know who did that to your .bash_profile but that is the reason why it is happening. And yes, they should not be doing this. They should be adding your path as well.
Updating Visual Studio Code and (yippee) Debugging!
Since I’m doing this on a mac, I don’t have all the benefits of Visual Studio, but Visual Studio Code is pretty awesome. And with it’s limitations, it really forces me to learn my lessons more deeply & memorably, whereas with VS, I can get away with more thanks to all of the extra support. If I was on my regular computers (read: Windows) I would absolutely be using VS, not VSCode). So doing all of this on the Mac gives me some advantages in having to comprehend everythnig I do more clearly. And, it’s fun using the Mac after only using Windows for so long. But I’m not trying to tell anyone they should do all of their .NET coding on a Mac.
So with that out of the way … 🙂 With RC1, VS Code did not have debugging support. So I had to let errors happen and then read the stack output to figure out what was wrong. Again, much harder, but good lessons for me. 🙂 But please do be sure to update VS Code and the C# extension to their latest versions. VS Code will help you create a default launch.json file so that the debugger knows how to launch your app and a tasks.json for the defining the build task that’s specifed in the launch file.
This happens when you debug if there is no launch.json yet. Notice the box to the right of DEBUG and green arrow. It says “<none> ” since no launch file was found. I’m being prompted to create a new one and to select from either Node.js, VS Code EXtension Dev, .NET Core or Chrome. .NET Core is the one you want.

It will create and display the new file in the edit window.
There is one change you need to make to the default which is to point to the dll of your app that gets built by build. I failed at that because I had not noticed a left-over angle bracket from the place holder.
Here is the original line that you get with the placeholder:
"program": "${workspaceRoot}/bin/Debug/<target-framework>/<project-name.dll>",
The target framework is (currently) netcoreapp1.0. My project name is src because I’m a dope and never changed that folder name. So the dll is in the /src/bin/Debug/netcoreapp1.0/ folder. Therefore the new value is:
"program": "${workspaceRoot}/src/bin/Debug/netcoreapp1.0/src.dll",
Updating the Code
Once I had this sort out, it was time to modify my code. Again, I would start by following through Shawn’s and the teams posts (links above) about the obvious and not so obvious things to hit. This will get things like namespaces covered, an updated main method in startup etc. I will call out changes that were significant to me. But please do look at the commits and history of my github repository for more details.
Wiring up EF and ASPNET Core’s Services for Dependency Injection in Startup.cs
This code looks a lot different. We used to explicitly AddEntityFramework, then Add[dbprovider] then set up the context for injection providing options. Here is the old code
services.AddEntityFramework().AddNpgsql()

.AddDbContext

(options => options.UseNpgsql

(Configuration["Data:PostgreConnection:ConnectionString"]));
With the new code, you just add the DbContext and that signals the obvious dependency on EntityFramework. Similarly, the Use[dbprovider] method triggers the obvious dependency on the provider. Much more succinct.
services.AddDbContext

(options =>options.UseNpgsql

(Configuration["Data:PostgreConnection:ConnectionString"]));
Changes in my DbContext Class
I was using an overloaded constructor of DbContext that allowed me to pass in an ASPNetCore service provider. This was to enable a fancy way of letting my integration tests leverage the IoC services and the dependency injection. The DbContext overload that took in a servicePRovider has disappeared because there is a better way.
So I deleted that constructor of my weathercontext class.
I have some hack code in my context class to ensure that my database table names are “pluralized” since that does not exist yet in EFCore. I read somewhere about at least making the table names align with DbSet names but a) I didn’t see that kick in yet and b) I typically don’t create DbSets for every entity that maps to a database table. So I’ve left the hack code in. You can see it in the WeatherContext class. It just iterates through the entities known by the context and specifies that the relevant talbe should have the name of the entity plus an “s” . I got that from a gist shared by Rowan Miller (EF program manager).
Use of ServiceProvider in an Integration Test
More interestingly, the changes to how to user the service provider allowed for cleaner code in my test class. Note that I have two version of the test class. One is simple where I instantiate the context directly and pass in options specifying to use the InMemory provider. The other is built to take advantage of aspnet core’s IoC/DI services. That’s the one that I’m changing.
Originally in that test class’ constructor I had to create a servicecollection (that ties back to aspnet core services) and to that, specify that I want to use EF and the InMemory database. This is similar to the original code in Startup that I changed above.
_serviceCollection = new ServiceCollection();

_serviceCollection.AddEntityFramework().AddInMemoryDatabase();
The change to this code is similar to the change I made in the startup file:
_services = new ServiceCollection();

_services.AddDbContext(options => options.UseInMemoryDatabase());
(Note that I changed the variable name to _services)
Next in the setup code where I create the context instance and populate it, I was using the services to create a ServiceProvider and passing that into the WeatherContext constructor. That is how the context got the info about the database. I copied this code from the MusicStore sample and am now scratching my head about it because I’m still instantiating the WeatherContext and I still have that options parameter. So it makes no sense. Nevertheless, that code is gone and I’m now using the _services to do their job :
 var serviceProvider = _services.BuildServiceProvider();

var serviceScope = serviceProvider.GetRequiredService().CreateScope();

context = serviceScope.ServiceProvider.GetService();
The provider will now to instantiate the context for me and the _services is aware of the InMemory provider. I wonder if I could have written it that way before. But thankfully the fact that the DbContext can no longer even take a ServiceProvider as a parameter so I got forced into the path of writing a better version of this code. 🙂
Speaking of Testing: Changes for xUnit APIs
My tests use xUnit. Brad Wilson and team have updated xUnit to work with RC2. This requires some changes to the project.json used in your test project. I looked at the documentation and focused my gaze on the dependencies section, missing an important detail just above it.
Please do look at the doc “Getting started with xUnit.net (.NET Core / ASP.NET Core)“. While all the info is there, let me just highlight the critical stuff, especially the one I overlooked!
The bit I overlooked is that there’s a new parameter called testRunner and it’s value is, surprise, xunit.
The names of the packages in dependencies are the same but their versions are updated. Here is what I had to change in my project.json for my test project:
"testRunner": "xunit",

"dependencies": {

"xunit": "2.1.0",

"dotnet-test-xunit": "1.0.0-rc2-build10015"

},
Equally important is to update the location of the nuget package. That goes in the new Nuget.config file where you list the package sources.
Here is the line in my Nuget.config that specifies the source where the RC2 version of the xunit packages live:
<add key="xunit" value="https://www.nuget.org/api/v2/" />
Updating Refs to PostgreSQL
When I’m in my app proper (as oppsed to tests), I’m using PostgreSQL. The RC2 package has a different name than RC1. And it, too, has moved to a stable package source.
In project.json I switched out:
“EntityFramework7.Npgsql”: “3.1.0-rc1-3”,
for
“Npgsql.EntityFrameworkCore.PostgreSQL”: “1.0.0-*”,
Note that Microsoft is asking all of the providers to follow this naming pattern using EntityFrameworkCore.
The package source has also moved to a stable location. Here is the relevant listing in my Nuget.config file:
<add key=”NuGet.org” value=”https://api.nuget.org/v3/index.json” />
I had to be sure to get rid of cached packages on my computer. Because I’d been trying and retrying things and not always doing it right, I found myself clearing out the cache where the package lists live on my computer (remember I’m on a mac)
~/.local/share/nuget/v3-cache/ then find the folder that contains the name of the source e.g. “****api.nuget.org.v3”.
Also I had to get rid of the actual packages. Those are in
~/.nuget/packages/[nameofpackage]
Again because I’m an OSX newbie, I’ll clarify that the “~” represents your home folder as a user. I wish I’d had help with this, but everyone presumes you know what that ~ means. Here’s my File system. MacintoshHD is my computer. I’ve done a trick to display the hidden files & folders .. those are the ones that are gray, not black. Ive drilled into Users, then me (julialerman). That’s ~. That’s the starting point. Antyhing after that is in the next column. You can see the .local folder where the . I’ve chopped it off in the screenshot but the .nuget folder is just below.

That should help you be sure you’re getting the right packages.
Dont forget to keep restoring the packages. At some point (when I had more and more of the right things in place, e.g. the launch.json, etc), Visual Studio Code’s prompt to do a restore finally switched over to running the “dotnet restore” command instead of the old “dnu update”. But for a while I was just running dotnet restore at the command line and you can see the difference between when it’s finding the right packages and when it’s not.
It’s a process
I should remind you that this did not happen in one smooth sitting. Working in the code I had to get the packages to restore without errors. Then I had to modify the code and build and look at the list of errors and then fix them and build again and fix an dbuild and fix and build and fix and build.
Once I got build down to 0 errors, then I could try to run. I was back and forth from running at the command line (dotnet run) and debugging in Visual Studio Code when I needed to really see step by step where an error was coming from.
The Controller Class
I didn’t really have to do anything to the controller class. I had stopped using the special EF change tracking parameter that the team was experimenting with (a parameter of Add/Update/Remove) because I knew it was going away.
I knew that a nice change to MVC in RC2 was that you don’t have to explicitly inherit from the Controller class if you are following one of the conventions that alert .NET that this is a controller class. So I removed it from WeatherController and ValuesController but then added it back in to the first since I didn’t feel like adding Dispose into the class. 🙂
Seeding Data
EFCore does not have a built in way to seed data yet like we’re used to with Code First. For RC1, I borrowed an example from the MusicStore sample for seeding data and modified it to suit my needs. That’s the SeedData class in my repository. This class is called by the web api’s startup and takes advantage of the asp.net services (the IoC stuff) so I can interact with EF and save the seed data into the database. I had to modify my RC1 version to align with the changes I’ve talked about already with respect to how to work with the context “out of band”. So the changes I made here are similar to the changes that I made in the controller class that I mentioned above. Essentially, I have it use the SErviceProvider to instantiate the WeatherContext for me using the defaults already defined in startup. Since I showed that change above for the test class, I won’t bother repeating it here. Because this sample is a demo, I use EF’s EnsureDatabaseDeleted and EnsureDatabaseCreated in the seed class to drop and recreate (and reseed) the database every time I run the app.
EF Migrations
My demo also uses migrations so I had to get all of that working again as well. Most of that change is related to the project.json file.
Up through RC1, the migrations commands were found in the EntityFramework.Commands package. Additionally every provider came with a second package with the name .Design appended to it, that you needed to have in order to use the EF commands.
So my RC1 project.json for the app (not the tests) had these in the dependencies:
"EntityFramework7.Npgsql": "3.1.0-rc1-3",

"EntityFramework7.Npgsql.Design": "3.1.0-rc1-5",

"EntityFramework.Commands": "7.0.0-rc1-final",
EntityFramework commands have been wrapped into what is now considered the tooling for CoreCLR. So it’s package has the name tools now and also all of the tooling is in a different path to being ready. Their verson indicates that. This is the new package name alongside the new package for Postgres that I showed before:
"Npgsql.EntityFrameworkCore.PostgreSQL": "1.0.0-*",

"Microsoft.EntityFrameworkCore.Tools": "1.0.0-preview1-final",
Notice that the Design package is not there. I forgot to add it in and my migrations worked so it turns out that they may not be needed (at least not for what I’ve done so far with migrations). That was even a surprise to Shay Rojansky who has built the provider. 🙂
However there is another important piece to getting migratons to work and its a big change to project.json. There is a new tools section you must add. The Kestrel server for IIS integration also has to be added into tools so I’ll show you the entire tools section from my project.json file:
"tools": {

"Microsoft.AspNetCore.Server.IISIntegration.Tools": {

"version": "1.0.0-preview1-final",

"imports": "portable-net45+win8+dnxcore50"

},

"Microsoft.EntityFrameworkCore.Tools": {

"version": "1.0.0-preview1-final",

"imports": [

"portable-net45+win8+dnxcore50",

"portable-net45+win8"

]

}

}
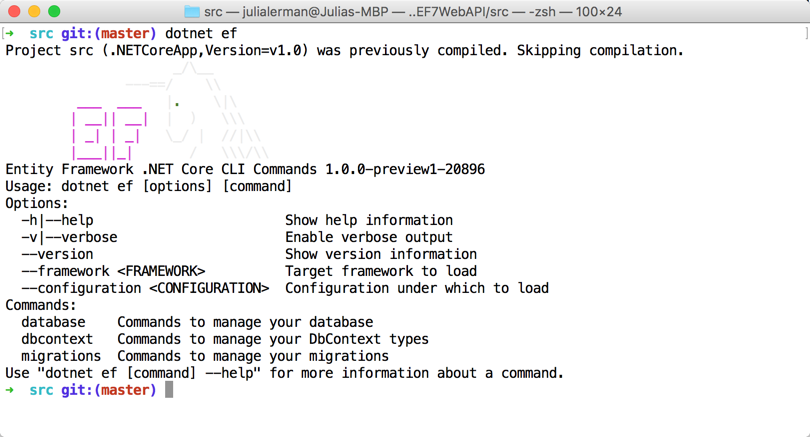
In RC1, we also added in shortcuts for the commands. To use the kestrel server, we could type dnx web at the command line and “web” was a shortcut for the IISIntegration. To use migrations we started with “dnx ef”. EF was a shortcut to the EntityFramework.Commands assembly. Commands no longer exist. Instead we list the tools. But how do we specify the shortcuts? Yes I was wondering. Well for entity framework, its built in. I was able to type “dotnet ef” and get the happy little magic unicorn along with the listing of the commands available for ef migrations.
I’ve written an extensive article on the new migrations commands for EFCore if you want to learn about the commands. That article also includes the powershell versions of the commands that you may be familiar with in Windows e.g. add-migration.
There were more changes, but none that stand out in my memory as much as these. You can see the working code in my repository and look through its history to see how its evolved. Unfortunately isn’t just one commit that brought me from RC1 to RC2 so you may need to look at a few bits of historical commits to see the old vs new code.


