The Secret to Running EF Core 2.0 Migrations from a NET Core or NET Standard Class Library

I have had two people that watched my Pluralsight EF Core Getting Started course (which will soon be joined by an EF Core 2: Getting Started course) ask the same question, which mystified me at first.

The were running migrations commands which caused the project to compile, but the commands did not do anything. For example, add-migration didn’t add a migration file. get-dbcontext did not return any information. The most curious part was there was no error message! I was able to duplicate the problem.

With EF6 it was possible to use migrations from a class library with no exe project in sight. EF Core migrations can run from a .NET Framework or .NET Core project but not .NET Standard. It needs a runtime. A common workaround is that even if you haven’t gotten to the UI part of your app yet, to just add a .NET Core console app project to the solution, add the EF Core Design Nuget package to it and set it as the startup project. But it’s still possible to do this without adding in a dummy project.

We already knew about the multi-targetting fix which solved an error when you try to run migrations from a .NET Standard library. But even with that fix in place, we were getting the mysterious nothingness.

The answer to the question was buried in a GitHub issue and in comments for the Migrations document in the EF Core docs. This same solution solved a problem I was having when trying to use migrations in a UWP app (again, not .NET Core or .NET Framework) that used a separate class library to host its DbContext.

I’m writing this blog post to surface the solution until it is resolved.

The solution that we used with EF Core 1.0 in order to run migrations from a .NET Standard library was to multi-target for .Net Standard (so you can use the library in a few places) and .NET Core (so you can run migrations).

That means replacing

<PropertyGroup>       
  <TargetFramework>netstandard20</TargetFramework>
</PropertyGroup>

with

<PropertyGroup> 
  <TargetFrameworks>netcoreapp2.0;netstandard2.0</TargetFrameworks>
</PropertyGroup>

Notice that the attribute name is now plural and there is a semi-colon between the two SDKs.

But there’s one more secret which is not in the documentation.

For .NET Standard 2.0 (and EF Core 2.0), you also need to add the following to csproj.

<PropertyGroup>
 <GenerateRuntimeConfigurationFiles>true</GenerateRuntimeConfigurationFiles></PropertyGroup>

Now with the DbContext project set as the startup and ensuring that the package manager console (or command line) are pointing to the same project, your migration commands will work.

Thanks to Christopher Moffat who found the solution in the GitHub issues and shared it in the comments on the EF Core Package Manager Console Tools document.


Screenshot for Tony ..see my comment in reply to your comment below.

Domain-Driven Design Europe 2018 in Amsterdam

I’m excited to be attending and speaking at DDD Europe 2018 in Amsterdam on Feb 1-2 2018. It’s an honor to be on the speaker roster with so many DDD gurus and other people with amazing DDD experiences stories to share.

The lowest early-bird ticket prices can still be bought through Nov 30 at €599 (+21% VAT =  €724 (app. ~$860US +). The ticket will go to €699 (+VAT) from Dec 1-Dec31 and then to €749 (+VAT) until the conference.

Prior to the conference,  there are also 10 amazing workshops ranging from 1/2 day to 2 days across January 30 – 31st.

I’ll be doing a 2  hour workshop during the conference proper on using EF Core 2 to map DDD patterns in your domain. It will be a hands-on workshop and my intention is to build some koans for attendees to work with. Although the flavor of hands-on may shift as I continue to percolate ideas.

Watch my Domain-Driven Design Fundamentals course on Pluralsight

Copying an Azure Function App using the Portal, GitHub and Cloud Shell

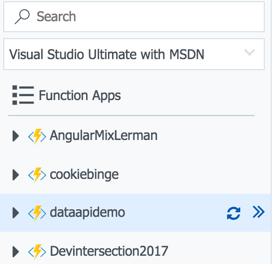
I’ve got an Azure Function App with some functions that I built for a demo for a conference session. I first used this at AngularMix and had named the function app AngularMix2017. Then when I did it for DevIntersection this past week, I recreated it as DevIntersection2017 because you can’t rename a function app. I’m doing it yet again next week at another conference (NetConf.co) and decided it was time to create it as a reusable name: DataApiDemo.

While you can’t flat out copy a function app if you are working strictly in the portal (which is how I’ve been working during my first learning stages of building function apps), you can easily enough duplicate it by downloading and uploading it again.

Keep in mind that if you are developing functions in VS 2017 or VS Code (combined with the Azure CLI) you can just use the tooling to publish the function apps along with the settings. But I don’t like to take the easy path. I learned a lot of new tricks and tools by going this route. Even if I leverage the tooling on my next go round, I’ve learned a lot which gives me a better understanding overall, more control and troubleshooting skills.

My first step was to create the new function app (dataapidemo).

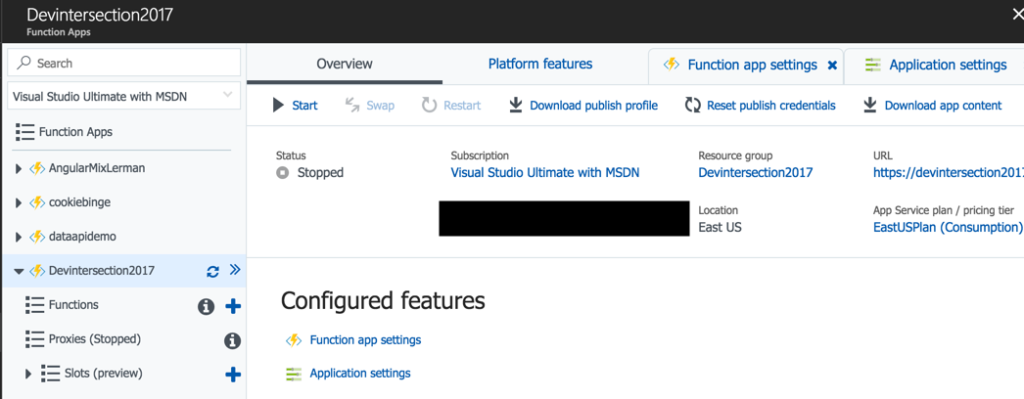
The Overview blade of an Azure function app has a “download app content” option. That will pull down all of the relevant files onto your machine. So next, I go to the overview of the DevIntersection2017 function app and click on the download app content link.

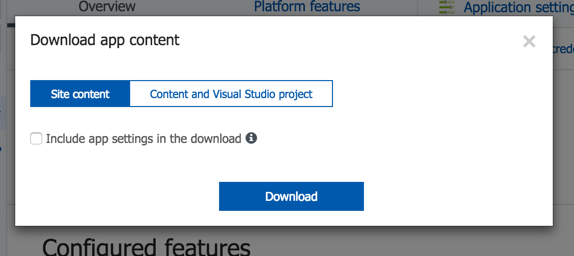
When downloading the app content, you have an option to also grab the app settings. I have a number of secrets stored in my settings ..things like keys to my databases , account ids and more. If you check that, the settings will get downloaded to a local settings file. If you were using this feature to continue your development locally, e.g. in VS2017, then you’ll want them. But for my scenario, they are not useful and even potentially a security issue (you’ll see shortly) so I’m going to leave that unchecked.

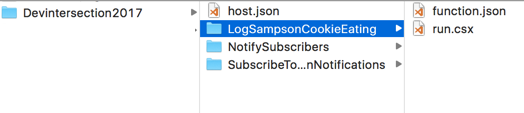
I can see the files in the designated folder on my computer.

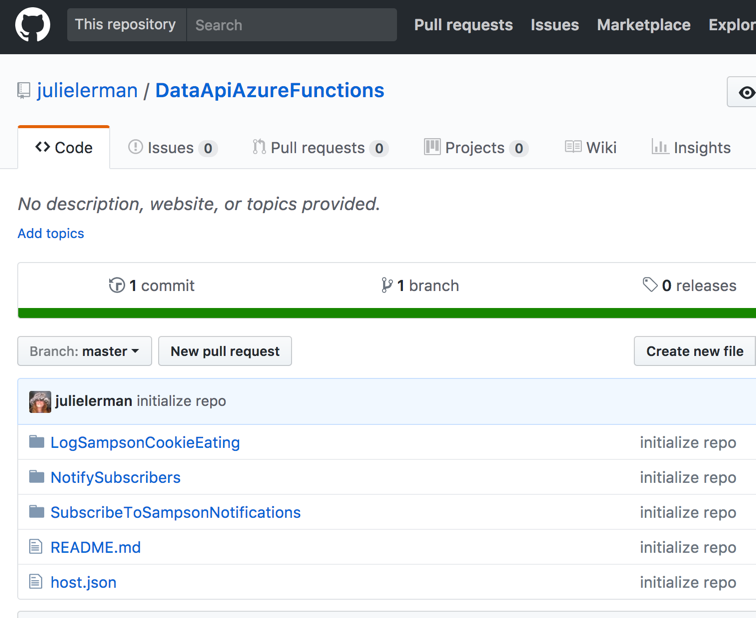
I’ve already created a Github repository to store these files in: https://github.com/julielerman/DataApiAzureFunctions.

At the command line in the new folder, I’ll git init, add all of the files into the local repo and commit them. Then I can run the git commands to connect that folder to my GitHub repo and then push my local repository into the online repository.

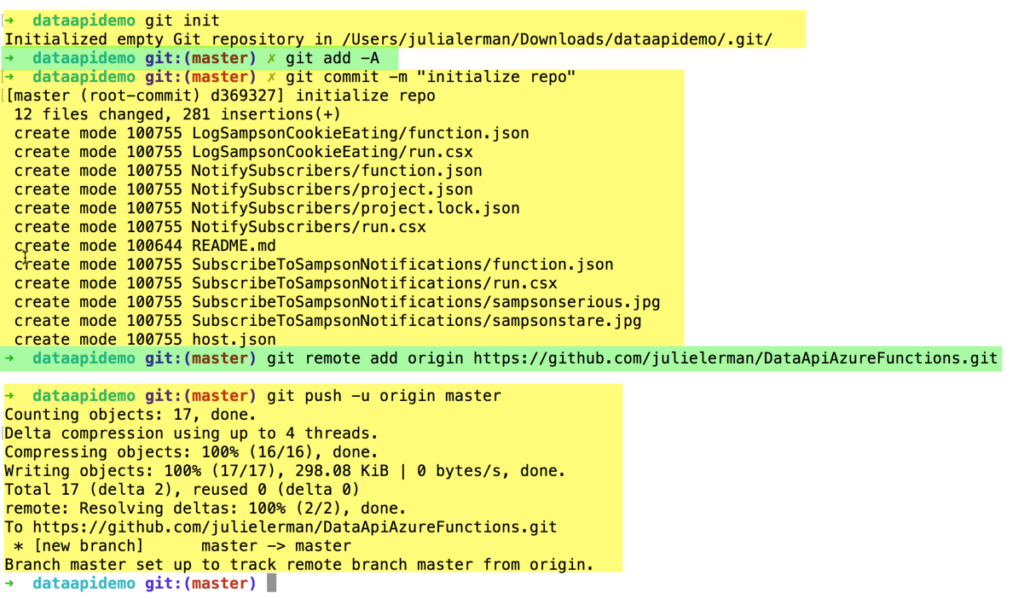
When that’s complete, the files are all in my GitHub repo.

Since I’m using a public repository, this is why I didn’t want the local.settings.json file filled with my secrets to download. Of course I could have deleted it locally or told Git to ignore that file. A few other points about this. If I were developing this locally, then I can have that file locally and use VS2017 or Azure CLI tools to publish my app along with the settings to the portal. But that is not my goal here.

Now I can take advantage of a long-time feature of the Azure Portal: connect it to a repository to auto-deploy from the repository to my app (in the case to my function app).

Back in the portal, I select the new function app again, then from its Platform Features page, open the Deployment Options. Choose Setup new deployment and follow the steps to connect the function app to your repository. When you’ve completed the setup, you can use the Sync button to force the deployment to happen. All of the files are now in my new dataapidemo function, including the function.json files that contain the function setting (e.g. integrations etc) and any other files I may have added to my functions.

Because I am using Twilio, one of my functions has a reference to Twilio in a project.json file and I need to restore that package to this function app. I did that by opening up the project.json and making a small mod to it..adding or removing a blank line, then saving it. That triggers the package restore to happen.

What’s not there however are the function app settings. These are settings that are defined to the app and used by one or more of the functions. There are some default settings created by Azure but I also have some others …those secrets, such as the account and telephone number for my Twilio integration as well as a key for the function.

Some of these settings are my own custom settings that I want in the new function. I could add them in via the portal app settings interface, but I don’t like that path when I have a slew of settings.

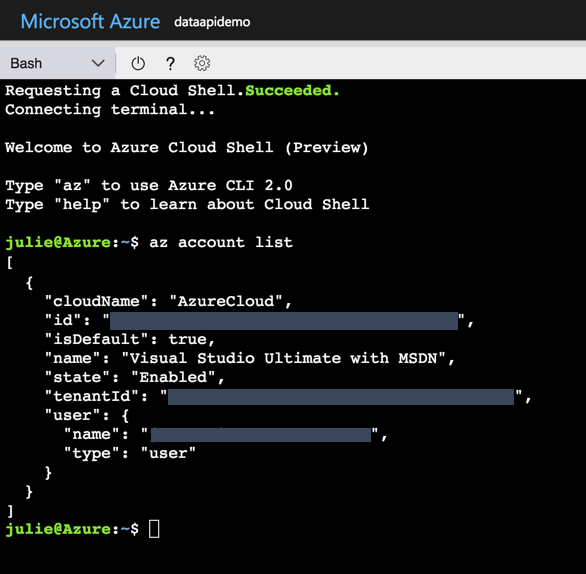
That means moving on to yet another amazing tool in the Azure Portal — Cloud Shell. Here you can run Bash or Powershell commands from the Azure CLI directly on services in your subscription. You can also do this locally on your machine with the extra caveat that there you must provide credentials and other metadata.

In the portal, open the Cloud Shell. This is gives you an interactive terminal window.

If you have multiple subscriptions, you want to be sure that it’s set to the one where your app function is stored.

You can do this by listing the subscriptions with the az account list command.

If the one you want is not default, then set it with:

az account set -s [ID]

This shell can do auto-complete so if the id starts with a123, you can type

az account set -s a123

then hit the tab and the id will get finished . Hit enter and it becomes the default subscription to work in.

I’ll use the azure functionapp commands to get the settings into my function app.

First I’ll list the existing settings. You do this with the command

az functionapp config appsettings list --name [functionname] --resource-group [resource name]

The parameter shortcuts for name and resource-group are -n and -g. Mine are both the same name: dataapidemo. Here’s what the command looks like (except for the wrapping that my blog is forcing):

az functionapp config appsettings list -n dataapidemo -g dataapidemo

The appsettings are listed out as JSON by default although you can affect the output format with the output parameter.

I’ll need to see the settings I want to copy from the other function app so I run:

az functionapp config appsettings list -n devintersection2017 -g devintersection2017 -o tsv

which give me the list of settings from which to choose.

In addition to listing the settings, you can add new ones with the set verb and delete with delete verb. Both would go in place of the verb list.

You use SET by combining the SET command and the –settings parameter. After the –settings parameter, you can list one or more setting with this format:

az functionapp config appsettings set -n dataapidemo -g dataapidemo --settings "property1name=value", "property2name=value"

Note that this is wrapping here on the blog post but not in the shell window.

So I added the handful of settings I wanted to add which looked more like:

az functionapp config appsettings set -n dataapidemo -g dataapidemo --settings "TwilioSID=myvalue", "TwilioAccount=myvalue"

There were others I had to add. For example, my function needs to know how to get to my Cosmos DB document database, so it has a setting that uses the db name as the property name and the dbs account endpoint as the value.

Once I had done that, I was able to get rid of the function apps that were named for each conference and use a common one no matter where I am sharing it.

And boyohboy did I learn a lot of new things!

Another Use Case for DbContext.Add in EFCore (and a DDD win)

If you are like me and design your classes following Domain-Driven Design principals , you may find yourself with code like this for controlling how objects get added to collections in the root entity.

public class Samurai {

  public Samurai (string name) : this()
  {
     Name = name;
  }

  private Samurai ()
  {
    _quotes=new List<Quote>();
  }

  public int Id { get; private set; }
  public string Name { get; private set; }
  private readonly List _quotes = new List ()
  private IEnumerable Quotes => _quotes.ToList ();
  public void AddQuote (string quoteText) {
      var newQuote=new Quote(quoteText,Id);
      _quotes.Add (newQuote);
  }

I have a fully encapsulated collection of Quotes. The only way to add a new quote is through the AddQuote method. You can’t just call Samura.Quotes.Add(myquote).

Additionally, because I want to control how developers interact with my API, there is no DbSet for Quotes. You have to do all of your queries and updates via context.Samurais.

A big downside to this is that if I have a new quote and I know the ID of the samurai, I have to first query for the samurai and then use the AddQuote. That really bugs me. I just want to create a new quote, push in the Samurai’s ID value and save it. And that requires either raw SQL or a DbSet<Quote>. I don’t like either option. Raw SQL is a hack in this case and DbSet<Quote> will open my API up to potential misuse.

I was thinking about this problem while laying in bed this morning (admit it, that’s the first thing you do when you wake up, too, right?) and had an idea.

In EF Core, we can now add objects directly to the context without going through the DbSet. The context can figure out what DbSet the entity belongs to and apply the right info to the change tracker. I thought this was handy for being able to call

myContext.AddRange(personobjectA, accountobjectB, productObjectC);

Although I haven’t run into a good use case for leveraging that yet.

What occurred to me is that if DbContext.Add is  using  reflection, maybe EF Core can find a private DbSet.

So I added a private DbSet to my DbContext class:

private DbSet<Quote> Quotes { get; set; }
 And tried out this code (notice I’m using context.Add, not context.Quotes.Add):
static void AddQuoteToSamurai () 
{
  using (var context =newSamuraiContext ()) 
  {
    var quote=newQuote("Voila",1);
    context.Add(quote);
    context.SaveChanges();
  }
}
And it worked! But this isn’t complete yet. I’m breaking my rule of ensuring that only my aggregate root can manage quotes. So this is “dangerous” code from my DDD perspective. However, I was happy to know that EF Core would support this capability.
Currently, Samurai.AddQuote does not have any additional logic to be performed on the quote. What if I were to add in a “RemoveBadWords” rule before a quote can get added?
public void AddQuote (string quoteText) 
{
 Utilities.RemoveBadWords(quoteText);
 var newQuote=new Quote(quoteText,Id);
  _quotes.Add (newQuote);
}
 Now I have an important reason to use Samurai to do the deed. I can add a second, static AddQuote method that also takes an int. Because it’s static, it’s a pass through method.
public static Quote AddQuote(string quoteText,int samuraiId)
{
  Utilities.RemoveBadWords(quoteText); 
  var newQuote=newQuote(quoteText,samuraiId);
  return newQuote;
}

This works and now I don’t have to have an instance of Samurai to use it:

staticvoid AddQuoteToSamurai () 
{
  using (var context =newSamuraiContext ()) {
    context.Add(Samurai.AddQuote("static voila",1));
    context.SaveChanges();
}

One thing I was worried about was if I had an instance of Samurai and tried to use this to add a quote to a different samurai. That would break the aggregate root…it’s job is to manage its own quotes only. It shouldn’t know about other Samurais.

But .NET protects me from that. I can’t call the static method from an instance of Samurai.

I still think that there’s a little bit of code smell from a DDD perspective about having this static, pass-through method in an aggregate root so will have to investigate that (or wait for any unhappy DDDers in my comments). But for now I am happy that I can avoid having to query for an instance of Samurai just to do this one task.

Next Up: Devintersection, Las Vegas Oct 30-Nov 2

I have been away from home more than at home this fall! I have two trips behind me:

Trip 1: London for ProgNet, Salt Lake City for Pluralsight Live and Denver for Explore DDD.

Trip 2: Orlando for AngularMix then a side trip to Miami to visit friends and relatives

I’m home again for a bit then off again to Las Vegas for Devintersection. If you are still thinking about going (you should, really) you can still get a small discount using the code “LERMAN” when you register.

I will be giving 3 talks, participating in a panel and of course attending talks.

One for SURE that I’ll attend is on EF Core by two members of the team (and my friends!) Diego Vega and Andrew Peters on Tuesday.

I’m also doing an EF Core 2 talk which will be complementary to their session (not redundant) . That talk is on Wednesday morning.


Later on Wednesday I’m doing a session (should be FUN) for developers to take advantage of SQL Server in containers for quick dev environments. There I will show setting up and using a docker container with SQL Server for Linux (on my mac) and then a windows container for SQL Server Developer. For a dev or testing environment these are such fast and easy ways to spin up a SQL Server.

In my last session, which is on Thursday, I’m going to mostly code (yay! What is more fun that that?) to build up a data api and provide some design guidance at the same time as letting you get MORE eyeballs full of EF Core 2.0. And for a bonus, I finally got my hands on Azure Functions so I get to show off what I built on there as well.

After that, I’ll be on the closing panel. One NEVER knows what to expect there. Should be fun.

And also how cool is this graphic that the conference created, just for me to share just with you! 


New Pluralsight Course: Interacting with SQL Server data in Visual Studio Code on Win, Mac, Linux

imageMy latest course on Pluralsight, Cross-platform SQL Server Management for Developers using VS Code, went live earlier this month (just as I was about to hop on a plane for 2 weeks of conference travel!)

This is a course on a Visual Studio Code extension that I enjoy using so much that I wanted to share it with you. It is the mssql extension which lets you interact with SQL Server in a fairly rich way that belies the lightness of the IDE which it extends. Because VS Code is cross-platform, so are all of its extensions. So you can use this while you are coding on Windows, Mac or Linux and want to do some basic interaction with a SQL Server database.

As SQL Server examples, I used SQL Server LocalDb on Windows, SQL Server for Linux in a Docker container on a Mac and Azure SQL in the cloud. The course starts not only y showing you how to install VS Code (and some VS Code basics) and the extension but also by walking you through how to set up each of the database servers. That means it also has a lesson on Docker , installing and running an image as well as a quick start on creating a new SQL database in the Azure portal.

Once everything is set up, I dig through the features and functionality of the mssql extension. And I turned over ever possible stone to make sure you don’t miss helpful features which is the norm if you just start using such a tool without any preparation.

The course is mostly demos and very light on Powerpoint slides and I do work in Windows, on my Macbook and even in a Linux virtual machine.

imageWhat I’m also proud about this course is that if you’ve never used VS Code before, you’ll learn how to get around this amazing editor. If you’ve never used Docker before, I provide a really helpful and gentle introduction and you’ll be able to work with it. I had some great support from the team responsible for this extension as they were so happy to have this kind of attention paid to it.

So whatever language you code in, whatever O/S you work on, if you are using SQL Server (or interested in using it), this course should be a great help in mastering this very handy extension!

Below is the Table of Contents for the course.

If you need a 30-day free trial to the Pluralsight library so that you can watch this, send me a note!


Module 1: Introducing and Installing VS Code and the mssql Extension

In this module you’ll get a short introduction to the cross-platform and free developer IDE, Visual Studio Code and its mssql extension, The extension allow you to perform some key interactions with a SQL Server database without leaving the IDE. You’ll also walk through installing both the IDE and the extension on Windows and macOS

  • Module and Course Overview
  • Introducing Visual Studio Code and the mssql Extension
  • Installing Visual Studio Code on Windows
  • Installing Visual Studio Code on macOS
  • Introducing Visual Studio Code’s Coding Super Powers
  • Installing the mssql Extension in VS Code


Module 2: Preparing SQL Server for Any Platform, Locally and in the Cloud

In this module, you’ll learn how to set up a variety of SQL Servers. All of them are quick to install. You’ll learn to install SQL Server LocalDb on Windows, create an Azure SQL Database in the cloud and use a Docker image of SQL Server for Linux to quickly spin up SQL Server in a container on macOS. This will ensure that you have a SQL Server database to interact with in the rest of the course.

  • SQL Server LocalDB: The Simplest SQL Server
  • Setting Up an Azure SQL Database in the Cloud
  • Verifying the New Azure SQL Database
  • Setting Up the Last Details of Your Azure SQL Database
  • Using a Docker Container to Host SQL Server for Linux on Any O/S
  • Installing Docker and Getting the SQL Server Container Running
  • Verifying the Containerized Database
  • Understanding Persistence and Lack of Persistence in Containers
  • Pulling a Custom Image with the Sample Database in Place


Module 3: Connecting to the Various SQL Servers From Various Platforms

In this module, you’ll learn the ins and outs of connecting to a variety of local, cloud and containerized SQL Servers with the mssql extension. You’ll learn how to use the commands and shortcuts, how connection profiles and passwords are stored and even how to create a handy shortcut for getting mssql started.

  • mssql’s Commands and Execution Engine
  • Connecting to LocalDB While Learning More About mssql Connections
  • Connecting to Azure SQL from Windows and macOS
  • Demonstrating How mssql Securely Stores Your Passwords
  • Using ADO.NET Connection Strings to Connect
  • Connecting to the Database in the Docker Container
  • Connection Keyboard and Status Bar Shortcuts
  • Creating a Keyboard Shortcut to Start up mssql and Connect

Module 4 : Learning the mssql Basics to Connect, Query and Create

In this module you’ll start interacting with the database, executing queries and commands, and exploring  result sets. You’ll learn about the snippets and also learn about attaching to existing database files and creating new databases from scratch. Most importantly  you’ll learn about the great SQL editor and result view support that the mssql extension brings to you.

  • Attaching an Existing Database File
  • Interacting with the Results of Your First Query
  • The Intelligent Editor Window
  • Using Snippets to Speed Up Command Building
  • Exploring Multiple Result Sets Further
  • Using Snippets to See Database Metadata
  • Creating Databases, Tables and Data

Module 5: Leveraging Advanced Tips & Tricks

This module will dig deeper into mssql and provide tips that take advantage not just of mssql features, but also capabilities of Visual Studio Code to make using mssql easier.

  • Exporting Results to CSV, JSON or Excel
  • Localization of mssql’s Messages
  • Controlling Behavior Through VS Code’s Settings
  • Formatting Code in the Editor Window
  • Results Window Tricks, Shortcuts & Settings
  • Checking Out the Last Few Settings
  • Creating Your Own SQL Snippets in VS Code
  • Looking Ahead to Integrated Authentication on Mac and Linux

First Foray into .NET Core 2.0

I have to start somewhere so I started wtih super baby steps. Downloading the .NET Core 2 nightly build and trying to create a simple console app. Right away I failed miserably. The reason? The nightly builds have already jumped the shark! They are working on 2.1.0 and I accidentally grabbed that. And that was a little too bleeding edge for me.

There is a docker image that you can use quite easily but I wanted to try CLI, VS Code and Visual Studio. Therefore I wanted to just install the bits right on my machine.

What I’ll show you are  my first tests I did on macOS and on Windows 10. I like to do this just to make sure things are actually running properly. Note that on macOS, I just installed this new version directly on my machine where I have other versions of .NET Core. Key is that there is no production work on there dependent on other versions, so I won’t mess up anything important. The versions can live side by side. It’s just that for someone like me who “knows enough to be dangerous”, it’s easy to get tangled up with the versions even though I know tricks like creating a local nuget.config file and also specifying a version in global.json. On Windows, however, I am using a clean VM that has no other versions of .NET on it. That’s the smart way anyway. Although I did try the not smart way of installig it on my machine that already has all kinds of versions of all kinds of frameworks on it and even with my versioning tricks, I could not get 2.0.0 to do a restore or build.

I mentioned above that I originally downloaded the wrong version of the SDK. (Note that the typical SDK install also includes the runtime….so I got the wrong versoins of both. You can read the gory details of that in this GitHub issue which I kept updating as I sorted the problem out.) I want to stick with .NET Core 2.0.0. The installer for that is tucked away in a branch of github.com/dotnet/cli rather than grabbing the absolute latest from the master. Instead go to https://github.com/dotnet/cli/tree/release/2.0.0. There is a solid 2.0.0 version — 2.0.0-preview2-006391. That’s the one I’m using on Windows and macOS.

2017-06-11_12-23-16.jpg

Make Sure NuGet Knows Where to Find Packages

You can update your global NuGet.Config before creating projects. Alternatively, you can create a project and then add a local NuGet.config file to it.

On Mac, the global config file at [user]/.nuget/NuGet. Here s a screenshot if like me, macOS is not your primary platform and you still struggle with these things.

2017-06-11_12-32-15.jpg

In Windows, it’s at %APPDATA%\NuGet\.

I keep a link to the “Configuring NuGet behavior” doc handy for when I forget where to find that.

I added these two keys to my PackageSources section:

<add key="nuget.org" value="https://api.nuget.org/v3/index.json" protocolVersion="3" />

<add key="dotnet-core" value="https://dotnet.myget.org/F/dotnet-core/api/v3/index.json"/>

 Now it’s time to create a project

I’m on the Mac, so, to Terminal we will go.

I’ve created a new folder called EFCore20 – I know this is .NET Core, but eventually I plan to add in EF Core 2.0 as well.
My plan is to create a .NET Core console app (this will rely on netcoreapp2.0) and a library. The libray will be based on the netstandard2.0 library . That means its a library I’ll be able to use from a huge variety of apps, including .NET 4.6.1 based apps. EF Core 2.0 will also rely on .NET Standard 2.0, so any app or API that can consume netstandard, can also consume EF Core 2.0. Read more about that in this EF Core 2.0 announcement on GitHub.

I created one folder for each inside the EFCore20 folder:

netcore2console
netstandard2lib

Then I cd’d into the netcore2console app to create that app with the command:

dotnet new console.
That’s all it takes. This creates a tiny little Hello World app. The dotnet new command will also perform a dotnet restore after creating the files. This is the first moment you will see if things are wokring again. If the restore fails, it will tell you immediately.
This is the message I got when had things misaligned:
Error message: error MSB4236: The SDK ‘Microsoft.NET.Sdk’ specified could not be found.
The “specified” SDK is the currently installed version of whatever SDK you are referencing. In my case, the default for dotnet enw console is “dotnetcore” with the version being whatever version is installed.
Most likely the problem is that  you haven’t provided the correct URI for dotnet to find the proper NuGet packages.
If you don’t want to mess with the global config, you can create a local NuGet.config file in the folder with the app. In it’s entirety, it would look like:
<?xml version="1.0" encoding="utf-8"?>
 <configuration>
  <packageSources>
   <addkey="nuget.org"value="https://api.nuget.org/v3/index.json"protocolVersion="3"/>
   <addkey="dotnet-core"value="https://dotnet.myget.org/F/dotnet-core/api/v3/index.json"/>
  </packageSources>
</configuration>
Even though dotnet new will call restore, I like to call
dotnet restore
explicitly. (Control freak)
If it restored correctly, then the next step for validation is
dotnet build
And hopefully that gives you no errors as well. It shouldn’t.
Finally,
dotnet run
should result in spitting out
Hello World!
And now I know it’s working. Silly little bit but I want to verify this before I waste my time writing a bunh of code that isn’t going to run because I don’t even have .NET Core installed properly.
Another point of interest is what files were created by dotnet new console.
It’s easier to see them if I open them up in Visual Studio Code which I can do by typing
code .
There are only 2 files. The csproj with the project metadata and a program file.  The csproj file says that the target framework is netcoreapp2.0.

2017-06-11_14-09-46

The program file just spits out Hello World when it starts up.
2017-06-11_14-10-17
Here is a screenshot of all of the steps at the command line from dotnet new console to the Hello World! output including my extra dotnet restore. Another thing I like about the explicit restore is that it’s showing me more detailed info about the restore.
2017-06-11_14-03-19
Next I want to make sure I can get a .NET Standard library also working.
Still in the terminal (or console or PS if you’re on Windows), I now get into the 2nd sub folder, EF Core2/netstandardlibrary. dotnet new library defaults to using netstandard for the library. So that makes it easy.
dotnet new library
The library is created and the packages it needs are restored.
Here are the default contents of this new library, again, shown in VS Code.
Ntice that its csproj says the target framework is netstandard2.0.2017-06-11_14-16-09
And there’s an empty class file.
2017-06-11_14-18-12
I’ll modify the class to add a public method that returns a string: “Why, Hello There!”.
2017-06-11_14-22-01

Now I’ll go into the csproj for the console app and give it a project reference to the library. The intellisense does not (yet?) help me with this and my memory sucks*, so I head to Nate McMaster’s handy project.json to csproj mind mapper aka Project.json to MSBuild conversion guide to remind myself the syntax of a project reference. I add this below the property group section in the console app’s csproj file


<ItemGroup>
  <ProjectReference Include="..\netstandard2lib\netstandard2lib.csproj"/>
</ItemGroup>
Running dotnet restore and dotnet build again will help identify if you’ve got a typo in there. I often do.
Now I’ll modify the Program.cs file to also call output the resultls of caling the HiYa method from my library:
2017-06-11_14-31-39

And then back out to my terminal window (though I can also do it inside VS Code’s built-in terminal). I dotnet build the library and then change to the console folder. Rebuild that and run it and …voila

  netcore2console dotnet run

Hello World!

Why, Hello There!

  netcore2console

So now I know that .NET Core 2 (preview from a nightly build) is running properly on my machine and that I can create and use a .NET Standard 2.0 library. That means I can go ahead and confidently start creating a .NET Standard 2.0 library to host some EF Core 2.0 logic.

I also repeated this entire thing on my Windows machine. Not only does that let me know I can use this version of .NET Core there, but I will also do some work from within Visual Studio with the .NET Core 2.0 preview.

*(duh, I should just make myself a snippet in VS Code!)

What’s in that sqlservr.sh file on the mssql-sqlserver-linux docker image anyway?

Update June 3, 2017: The team has revised the docker image and the bash file is gone, presumably with its logic broken up in to various locations. Still I’m glad I grabbed this when I did to satisfy my curiosity!

Microsoft has created 4 official Docker images for SQL Server: SQL Server for Linux, SQL Server Developer Edition, SQL Server Express and (windows) SQL Server vNext) . They can be found on the Docker hub (e.g. https://hub.docker.com/r/microsoft/mssql-server-linux/) and there is also a Github repository for them at github.com/Microsoft/mssql-docker. Some of the files that go along with that image are not on Github. The Dockerfile files for each image run some type of startup script. The Windows images have a PowerShell script called start.ps1. You can see those in the Github repo. The Linux image runs a bash file called sqlservr.sh. That’s not included in the repo though and I was curious what it did.

Note: I wrote a blog post about using the SQL Server for Linux container (Mashup: SQL Server on Linux in Docker on a Mac with Visual Studio Code and I’m also writing an article about using the containers for my July MSDN Magazine Data Points column (watch this space).

Still a bit of a bash noob, I learned how to read a file from a docker container on ..you guessed it…StackOverflow.  Following those instructions, I created a snapshot of my running container

MySqlServerLinuImage git:(master) docker commit juliesqllinux  mysnapshot

sha256:9b552a1e24df7652af0c6c265ae5e2d7cb7832586c431d4b480c30663ab713f0

and ran the snapshot with bash:

  MySqlServerLinuImage git:(master) docker run -t -i mysnapshot bin/bash

root@2a6f950face2:/# 

Then at the new prompt (#), used ls to get the listing

root@2a6f950face2:/# ls

SqlCmdScript.sql  SqlCmdStartup.sh  bin  boot  dev  entrypoint.sh  etc  home  install.sh  lib  lib64  media  mnt  opt  proc  root  run  sbin  srv  sys  tmp  usr  var

then navigated to  folder where the bash file is and listed its contents:

root@2a6f950face2:/opt/mssql/bin# ls

compress-dump.sh  generate-core.sh  mssql-conf  paldumper  sqlpackage  sqlservr  sqlservr.sh

Once I was there I used the cat command to list out the contents of the sqlservr.sh file and see what it does. Here is the secret sauce in case, like me, you NEED to know what’s going on under the covers!

root@2a6f950face2:/opt/mssql/bin# cat sqlservr.sh 

#!/bin/bash

#

# Microsoft(R) SQL Server(R) launch script for Docker

#

ACCEPT_EULA=${ACCEPT_EULA:-}

SA_PASSWORD=${SA_PASSWORD:-}

#COLLATION=${COLLATION:-SQL_Latin1_General_CP1_CI_AS}

have_sa_password=""

#have_collation=""

sqlservr_setup_prefix=""

configure=""

reconfigure=""

# Check system memory

#

let system_memory="$(awk '/MemTotal/ {print $2}' /proc/meminfo) / 1024"

if [ $system_memory -lt 3250 ]; then

    echo "ERROR: This machine must have at least 3.25 gigabytes of memory to install Microsoft(R) SQL Server(R)."

    exit 1

fi

# Create system directories

#

mkdir -p /var/opt/mssql/data

mkdir -p /var/opt/mssql/etc

mkdir -p /var/opt/mssql/log

# Check the EULA

#

if [ "$ACCEPT_EULA" != "Y" ] && [ "$ACCEPT_EULA" != "y" ]; then

 echo "ERROR: You must accept the End User License Agreement before this container" > /dev/stderr

 echo "can start. The End User License Agreement can be found at " > /dev/stderr

 echo "http://go.microsoft.com/fwlink/?LinkId=746388." > /dev/stderr

 echo ""

 echo "Set the environment variable ACCEPT_EULA to 'Y' if you accept the agreement." > /dev/stderr

 exit 1

fi

# Configure SQL engine

#

if [ ! -f /var/opt/mssql/data/master.mdf ]; then

 configure=1

 if [ ! -z "$SA_PASSWORD" ] || [ -f /var/opt/mssql/etc/sa_password ]; then

 have_sa_password=1

 fi

# if [ ! -z "$COLLATION" ] || [ -f /var/opt/mssql/etc/collation ]; then

# have_collation=1

# fi

 if [ -z "$have_sa_password" ]; then

        echo "ERROR: The system administrator password is not configured. You can set the" > /dev/stderr

        echo "password via environment variable (SA_PASSWORD) or configuration file" > /dev/stderr

        echo "(/var/opt/mssql/etc/sa_password)." > /dev/stderr

 exit 1

 fi

fi

# If user wants to reconfigure, set reconfigure flag

#

if [ -f /var/opt/mssql/etc/reconfigure ]; then

 reconfigure=1

fi

# If we need to configure or reconfigure, run through configuration

# logic

#

if [ "$configure" == "1" ] || [ "$reconfigure" == "1" ]; then

 sqlservr_setup_options=""

# if [ -f /var/opt/mssql/etc/collation ]; then

# sqlservr_setup_options+="-q $(cat /var/opt/mssql/etc/collation)"

# else

# if [ ! -z "$COLLATION" ]; then

# sqlservr_setup_options+="-q $COLLATION "

# fi

# fi

 set +e

 cd /var/opt/mssql

 echo 'Configuring Microsoft(R) SQL Server(R)...'

 if [ -f /var/opt/mssql/etc/sa_password ]; then

 SQLSERVR_SA_PASSWORD_FILE=/var/opt/mssql/etc/sa_password /opt/mssql/bin/sqlservr --setup $sqlservr_setup_options 2>&1 > /var/opt/mssql/log/setup-$(date +%Y%m%d-%H%M%S).log

 elif [ ! -z "$SA_PASSWORD" ]; then

 SQLSERVR_SA_PASSWORD_FILE=<(echo -n "$SA_PASSWORD") /opt/mssql/bin/sqlservr --setup $sqlservr_setup_options 2>&1 > /var/opt/mssql/log/setup-$(date +%Y%m%d-%H%M%S).log

 else

 if [ ! -z '$sqlservr_setup_options' ]; then

 /opt/mssql/bin/sqlservr --setup $sqlservr_setup_options 2>&1 > /var/opt/mssql/log/setup-$(date +%Y%m%d-%H%M%S).log

 fi

 fi

 retcode=$?

 if [ $retcode != 0 ]; then

 echo "Microsoft(R) SQL Server(R) setup failed with error code $retcode. Please check the setup log in /var/opt/mssql/log for more information." > /dev/stderr

 exit 1

 fi

 set -e

 rm -f /var/opt/mssql/etc/reconfigure

 rm -f /var/opt/mssql/etc/sa_password

 echo "Configuration complete."

fi

# Start SQL Server

#

exec /opt/mssql/bin/sqlservr $*