Tag Archives: visual studio

Using Azure Active Directory Accounts with a Subscription Tied to a Personal (aka Live) Account

This blog post is about a very particular problem you might have with some Azure services if your Azure subscription is tied to a personal account and not an Office 365 or Microsoft 365 identity. And the set of Azure services is not random. It is a set of Azure services that rely an Azure Active Directory for credential management – referred to as Managed Identity.

I ran into this when working with the Azure Key Vault, but you might hit it with Azure Blob Storage or some other services.

I want to first describe how my Microsoft and Azure accounts are set up and how I encountered the problem then share how I was able to solve it.

I have also written an article on using Azure Key Vault from an ASP.NET Core application but I chose a simpler path for the article which was to use an Azure Subscription that was tied to an Office 365 account. That article is in the Code Magazine May/June 2021 issue. (I’ll share the link when it’s live). In this blog post I am going to focus on the problem of the personal account. You can find details about accessing the Key Vault from the application in the article.

My Microsoft and Azure Accounts

My Azure Subscriber account is my personal Microsoft account that is associated with live.com. It’s not a live.com email address. You see the big difference when you log into a Microsoft property. You enter your email address and then specify that it’s either a work/school account or a personal account. Mine is one of those personal accounts.

I log in to visualstudio.com, my Visual Studio subscription and my Microsoft MVP account with that same personal account.  I’ve been working this way for a very long time.

Working with an Azure Active Directory dependent service: Azure Key Vault

I was writing a small ASP.NET Core app and wanted to store its secrets– some connection strings – in an Azure Key Vault to keep them out of my source code.

I started by creating a key vault in Azure. Key vaults are accessed through an access policy — a combination of an Azure Active Directory user and a selected set of permissions. When you create a new Key Vault and your Azure subscription account is an O365 account, a new access policy will be automatically be created giving the subscriber account’s identity broad access to that key vault.  Because my subscription was not tied to an O365 identity, I had to manually create an access policy for the user that is the subscription owner.

Back in Visual Studio, I wove the Azure.Extensions.Aspnetcore.Configuration.Secrets package into my application to let it  read from the key vault. This also requires referencing the  Azure.Identity NuGet package.

The secrets API asks the identity API to discover any managed identities on your machine if they are not fed directly to the application.

Here’s the critical code for accessing the key vault that I added into my app:

config.AddAzureKeyVault(
   new Uri("https://fourtwentyfive.vault.azure.net"),
   
new DefaultAzureCredential());

This tells my app to communicate with my particular Azure Key Vault and use whatever credentials it can find. In my case, debugging in Visual Studio, that is the credentials I used to log in to Visual studio.

The Error of My Ways

And this is where the problem begins! When the debugger attempts to access the key vault with those credentials it throws an error.                 

Azure.Identity.AuthenticationFailedException: 'SharedTokenCacheCredential authentication failed: AADSTS9002332: Application ‘[application’s id]'(Azure Key Vault) is configured for use by Azure Active Directory users only. Please do not use the /consumers endpoint to serve this request.

That’s because even though the key vault created an access policy with my Live account, it’s a trap. It won’t work. Azure Active Directory cannot manage Live accounts. It can only manage Office 365 or Microsoft 365 accounts. Full stop.

I do have an O365 account. But I didn’t want to change my subscriber account to one of my two identities tied to my O365 account for fear of messing up everything that’s dependent on my old Live login–my MVP access, my visualstudio.com access, etc.

Therefore I needed to add one of my Office 365 identities into my Azure Active directory.

Tying an O365 Identity to my Azure Subscription

I have two identities in my O365 account – julia and jlerman. The jlerman account has the same exact email address as my Live account. Let me help you avoid suffering through another failure. Don’t try to add in an O365 identity that has the same email address as the personal identity. This was the first path I chose. The code failed in the same place but this time I got an HTTP 401 error result — Unauthorized client access.

But I was successful when using my other identity: julia.

How to do this was complicated and I would never have figured it out on my own. I’m grateful for guidance from a fellow Microsoft Regional Director, Joe Homnick, (rd.microsoft.com/en-us/joe-homnick) who is a lot more experienced with Azure security than I ever want to be! In fact, I didn’t understand the problem very well and I’m sure my explanation to him was very misleading, but he was able to figure out what I was trying to describe. Unfortunately, Joe couldn’t just point me to a document because apparently none exists. He documented the steps for me in an email along with screenshots. That’s a pal!

So the rest of this blog post is simply relaying what Joe taught me.

Also, I’m doing this via the Azure portal rather than a lot of mysterious Azure CLI commands. But you can achieve the same using the Azure CLI or PowerShell.

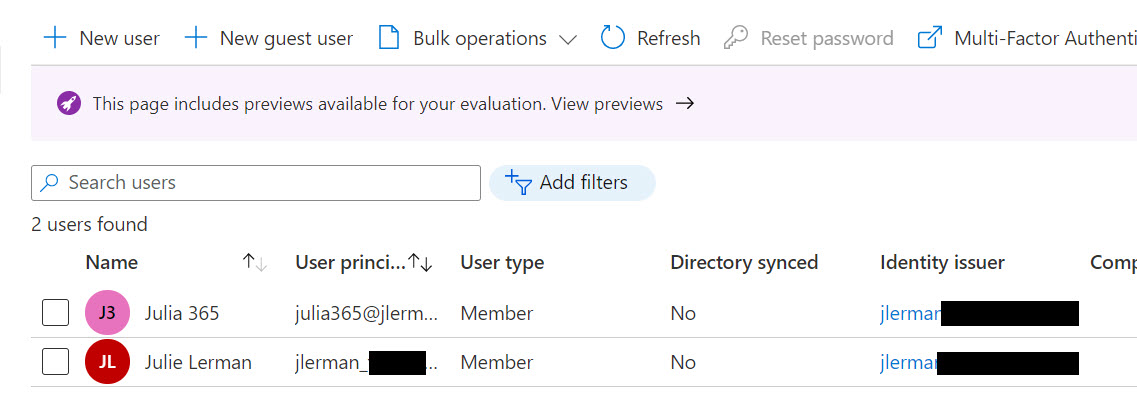
Step 1: Adding the O365 email address as a guest user with Global Administrator privileges

In the portal, go the Azure Active Directory, then Users.

  • Select New guest user
  • Select Create user. (Not “invite user”).
  • Under identity, add a user name. I called mine julia365. Azure will populate the domain name tied to your subscription’s Azure Active Directory.
  • Give your user a name. Mine is “Julia 365”. Xoru5917
  • Set a password for this user. You can let the portal auto-generate or supply your own.
  • The only other task (an important one) on this page is to set a role for this user. Click on User next to Roles and filter on global to select Global Administrator.

Then you can create the user.

The user principal name will be funky looking. It is formatted as an email address with the name of the user (with no spaces) and the domain is a compressed version of the identity for the subscription and then onmicrosoft.com.

So if my subscriber identity is [email protected], the new user’s principal name will be [email protected]. It’s not an email address, just an identity.

The identity issuer is also jlermansomedomain.onmicrosoft.com.


Step 2: Adding the new guest as a secondary subscription owner on the account

Having the user is not enough for the authentication to take place though. The user has to be recognized as a subscription owner. Azure allows you to set up secondary subscription owners.

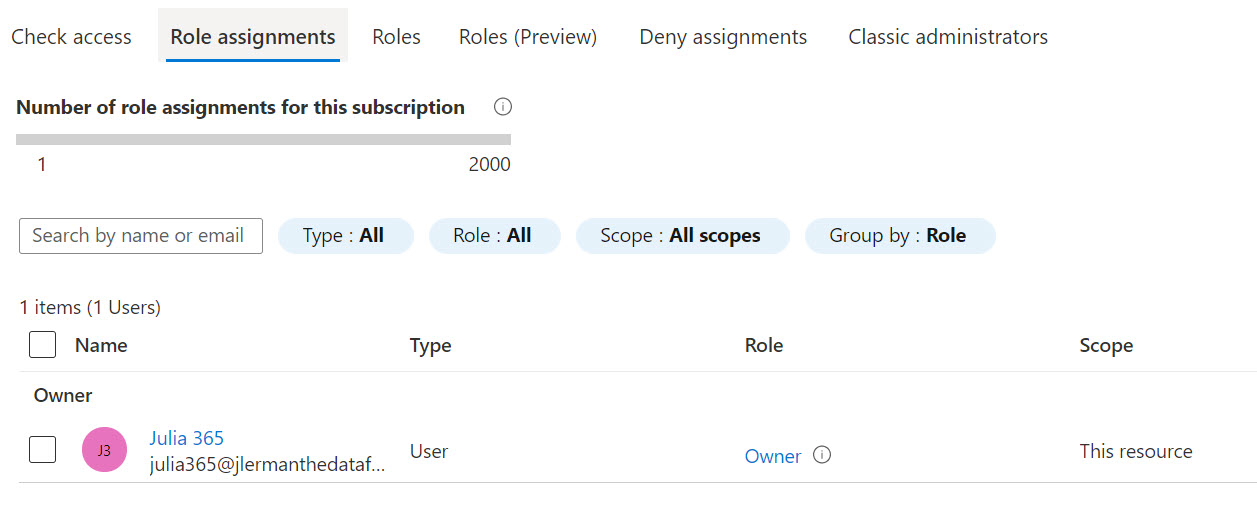
You’ll need to start by going to the subscription properties. You can find Subscriptions in the search bar if needed. If you have multiple subscriptions, be sure to select the one you intend to use for your application. Once in the subscription properties, select the Access control (IAM) option. Then from it’s menu, Role assignments and then Add.

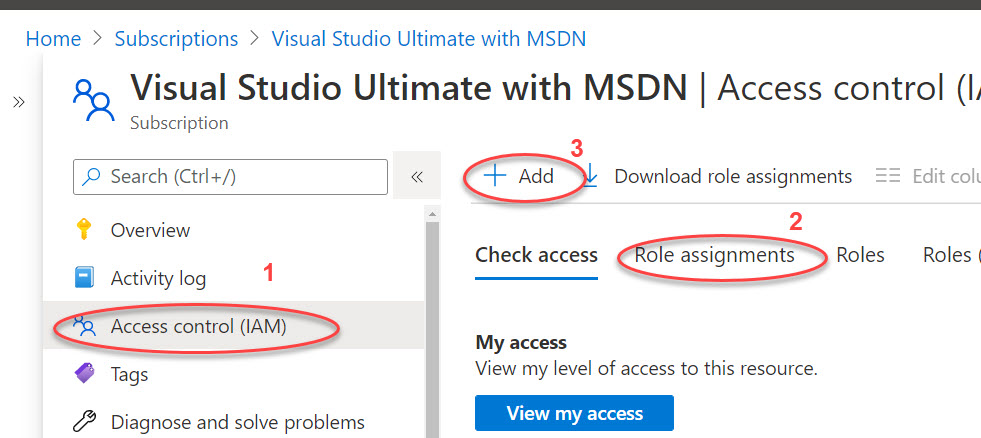
In the Add role assignment form, select Owner from the Role drop-down. Leave the Assign access to option at its default (User, group, or service principal). You’ll see all of the users listed. Select the newly created one and then save. It will get added very quickly.

Step 3: Log in to the portal with the new identity

If you click on your login info on the top right corner of the portal, you may already have an easy option available for switching to the new account for logging in.

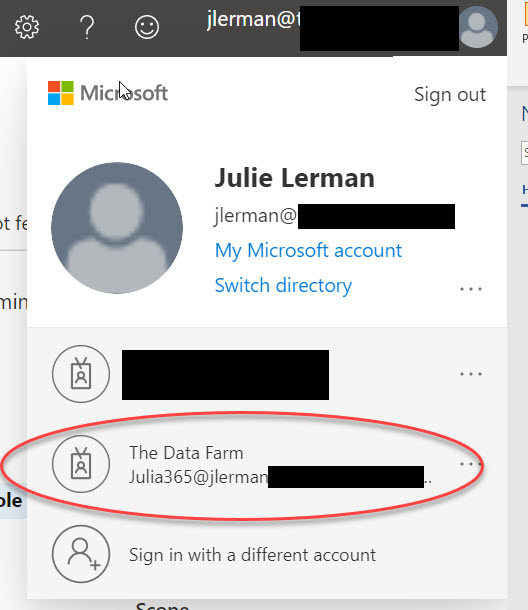
Otherwise, you’ll need to sign out then sign in with the new credentials.

Step 4: Add the new identity to the service’s access policies.

In my case, I returned to the key vault and created a new access policy for the new identity.

Step 5: Switch Visual Studio user to the new identity in order to run/debug from VS

This is important since remember that when running or debugging from Visual Studio, the Azure Managed Identities API will read that login as a possible credential source. You’ll first need to sign out and then sign in again with the clunky identity you created in AAD. With my example, that would be [email protected].

With these changes, not only did I finally get past that failing line of code, but the app accessed the key vault and read my secrets (a database connection string in my case) and was able to use the secret to connect to the database.

I hope this helps someone else down the road!


New Pluralsight Course: Interacting with SQL Server data in Visual Studio Code on Win, Mac, Linux

imageMy latest course on Pluralsight, Cross-platform SQL Server Management for Developers using VS Code, went live earlier this month (just as I was about to hop on a plane for 2 weeks of conference travel!)

This is a course on a Visual Studio Code extension that I enjoy using so much that I wanted to share it with you. It is the mssql extension which lets you interact with SQL Server in a fairly rich way that belies the lightness of the IDE which it extends. Because VS Code is cross-platform, so are all of its extensions. So you can use this while you are coding on Windows, Mac or Linux and want to do some basic interaction with a SQL Server database.

As SQL Server examples, I used SQL Server LocalDb on Windows, SQL Server for Linux in a Docker container on a Mac and Azure SQL in the cloud. The course starts not only y showing you how to install VS Code (and some VS Code basics) and the extension but also by walking you through how to set up each of the database servers. That means it also has a lesson on Docker , installing and running an image as well as a quick start on creating a new SQL database in the Azure portal.

Once everything is set up, I dig through the features and functionality of the mssql extension. And I turned over ever possible stone to make sure you don’t miss helpful features which is the norm if you just start using such a tool without any preparation.

The course is mostly demos and very light on Powerpoint slides and I do work in Windows, on my Macbook and even in a Linux virtual machine.

imageWhat I’m also proud about this course is that if you’ve never used VS Code before, you’ll learn how to get around this amazing editor. If you’ve never used Docker before, I provide a really helpful and gentle introduction and you’ll be able to work with it. I had some great support from the team responsible for this extension as they were so happy to have this kind of attention paid to it.

So whatever language you code in, whatever O/S you work on, if you are using SQL Server (or interested in using it), this course should be a great help in mastering this very handy extension!

Below is the Table of Contents for the course.

If you need a 30-day free trial to the Pluralsight library so that you can watch this, send me a note!


Module 1: Introducing and Installing VS Code and the mssql Extension

In this module you’ll get a short introduction to the cross-platform and free developer IDE, Visual Studio Code and its mssql extension, The extension allow you to perform some key interactions with a SQL Server database without leaving the IDE. You’ll also walk through installing both the IDE and the extension on Windows and macOS

  • Module and Course Overview
  • Introducing Visual Studio Code and the mssql Extension
  • Installing Visual Studio Code on Windows
  • Installing Visual Studio Code on macOS
  • Introducing Visual Studio Code’s Coding Super Powers
  • Installing the mssql Extension in VS Code


Module 2: Preparing SQL Server for Any Platform, Locally and in the Cloud

In this module, you’ll learn how to set up a variety of SQL Servers. All of them are quick to install. You’ll learn to install SQL Server LocalDb on Windows, create an Azure SQL Database in the cloud and use a Docker image of SQL Server for Linux to quickly spin up SQL Server in a container on macOS. This will ensure that you have a SQL Server database to interact with in the rest of the course.

  • SQL Server LocalDB: The Simplest SQL Server
  • Setting Up an Azure SQL Database in the Cloud
  • Verifying the New Azure SQL Database
  • Setting Up the Last Details of Your Azure SQL Database
  • Using a Docker Container to Host SQL Server for Linux on Any O/S
  • Installing Docker and Getting the SQL Server Container Running
  • Verifying the Containerized Database
  • Understanding Persistence and Lack of Persistence in Containers
  • Pulling a Custom Image with the Sample Database in Place


Module 3: Connecting to the Various SQL Servers From Various Platforms

In this module, you’ll learn the ins and outs of connecting to a variety of local, cloud and containerized SQL Servers with the mssql extension. You’ll learn how to use the commands and shortcuts, how connection profiles and passwords are stored and even how to create a handy shortcut for getting mssql started.

  • mssql’s Commands and Execution Engine
  • Connecting to LocalDB While Learning More About mssql Connections
  • Connecting to Azure SQL from Windows and macOS
  • Demonstrating How mssql Securely Stores Your Passwords
  • Using ADO.NET Connection Strings to Connect
  • Connecting to the Database in the Docker Container
  • Connection Keyboard and Status Bar Shortcuts
  • Creating a Keyboard Shortcut to Start up mssql and Connect

Module 4 : Learning the mssql Basics to Connect, Query and Create

In this module you’ll start interacting with the database, executing queries and commands, and exploring  result sets. You’ll learn about the snippets and also learn about attaching to existing database files and creating new databases from scratch. Most importantly  you’ll learn about the great SQL editor and result view support that the mssql extension brings to you.

  • Attaching an Existing Database File
  • Interacting with the Results of Your First Query
  • The Intelligent Editor Window
  • Using Snippets to Speed Up Command Building
  • Exploring Multiple Result Sets Further
  • Using Snippets to See Database Metadata
  • Creating Databases, Tables and Data

Module 5: Leveraging Advanced Tips & Tricks

This module will dig deeper into mssql and provide tips that take advantage not just of mssql features, but also capabilities of Visual Studio Code to make using mssql easier.

  • Exporting Results to CSV, JSON or Excel
  • Localization of mssql’s Messages
  • Controlling Behavior Through VS Code’s Settings
  • Formatting Code in the Editor Window
  • Results Window Tricks, Shortcuts & Settings
  • Checking Out the Last Few Settings
  • Creating Your Own SQL Snippets in VS Code
  • Looking Ahead to Integrated Authentication on Mac and Linux

EF Core CLI Commands with VS2017 RC3

Visual Studio 2017 RC3 was released yesterday but unfortunately an install issue has take it back off the shelf for a brief period. Watch this space for the return of RC3!

But I did manage to get it installed and wanted to show you that the EF Core CLI commands are now working. If you’ve been playing with VS2017 RC and EF Core you may have run into the problem that the EF Core tooling package was not in sync yet with the MSBuild tooling for .NET Core. That’s fixed now and not only does it work but there’s a change that I’m really happy to see.

As always, I have my dbcontext in its own project. Here are the csproj contents for that project:

image


Notice that the DotNetCliToolReference is pointing to Microsoft.EntityFrameworkCore.Tools.DotNet . The dotnet and PowerShell commands are exposed in separate packages. With “.DotNet” is the package that has the CLI commands. Without “.DotNet” is the package that contains the PowerShell commands.

More importantly, the package version went from “1.1.0-preview4” to “1.0.0-msbuild3-final”. I can’t explain why we went from 1.1.0 down to 1.0.0 but this is the newer and correct package.

With that in place,  I then open up a command prompt. I can use a regular one but I’m using a PowerShell command for a single benefit…that I can shorten the prompt. Here’s the command I did to trim most but not all of the path:

Quora: How do I get just the current folder name in my Windows Powershell prompt function?

Remember that I’m pointed to the path of a class library. DotNet EF requires you to point to a path containing an executable in order to run the commands. However with the latest bits, you can get HELP without having to point to the executable. Thank you Brice Lambson. It was a little meta to have to figure that out because rather than just getting help from the command, you had to googlebing for help on how to get help. So here are a simple dotnet ef command to get top level dotnet ef help, followed by dotnet ef dbcontext to get help on the dbcontext sub-commands.

image

To run commands that depend on the APIs, you still have to point to a startup-project if you are running the commands from a class library. Here I’ve run the command to list the migrations in my project. I’ve only got one, sqlite-init.

image

Visual Studio Code Snippets to Make Coding EF Core a Little Simpler

I’ve been using the user snippet feature of Visual Studio Code to make it easier to get some of the code I commonly use for EF Core into my files. For example I have C# snippets for DbContext to create a constructor overload that takes in a DbContextOptions parameter, OnConfiguring or OnModeling . I have json snippets to add in the EFCore Commands dependency and the Tools section with EF Core tools.

github.com/julielerman/EFCoreSnippetsForVSCode

I finally created a github repository to share them. Since you’ll need to add the csharp snippets into your existing csharp snippets and the same with the json, i have put them into separate csharp.json and json.json files from which you can copy and past my snippets into your own.

Although the instructions are on the user defined snippets page I just linked to, the TL;DR is:

From menu, choose Code, Preferences then User Snippets

2016-10-30_11-56-58

That will open a list of snippet files. Choose C# for the C# snippets and Json for the Json snippets. Paste in my snippets!

2016-10-30_11-57-25