I’ve been using the Azure Functions for Visual Studio Code for some time now and they continue to evolve in great ways. The latest shift threw me for a loop so I thought I would document some of it for those who may not have started yet. I should also state that for the past year or so I have focused on writing my functions with JavaScript just because I like to mix things up a bit and it also makes it easier to share Azure Functions with devs who are not .NET focused.
I’ve also written about creating Azure Functions with VS Code in MSDN Magazine but again, this has changed since I wrote about it. I’ve been using the version 2 APIs for a while so I’m not talking (well, writing) about that change from v1 to v2 here but the change in the experience using the Azure Functions extension.
Also notable is that the Azure Functions team actually recommends using Visual Studio for building C# based apps and VS Code for JavaScript. But I’m so often on my MacBook and love using VS Code so I am going down this path with C# anyway.
Having revisited the docs enough times to finally notice some key information, I realize why the experience has changed with the extension working with C#. Previously, I’d worked with C# script functions (.csx) which is the same as what you use when you work directly in the portal. But the extension templates now drive you to C# project functions and there’s a big difference. C# script functions are more like the javascript functions. They depend on a manually created function.json file to define the bindings and can install the appropriate extension packages based on the bindings. The csx files are compiled at run time. With a C# class library, you develop as you would other C# class libraries – installing the relevant packages and then using attributes to identify methods as Azure Functions as well as trigger, input and output bindings. When you compile the library, the Azure Functions tooling will generate a function.json file for you that gets deployed.
Because I was used to creating functions with JavaScript or the C# script path, the new default for the Azure Function extension that uses C# class libraries instead really threw me for a loop. So I decided to document walking through this workflow as I has to learn it. I think I still prefer the lighter weight C# script (.csx) or JavaScript flow but that might align with my preference in many scenarios for VS Code over Visual Studio.
Preparing Visual Studio Code
So first things first: you’ll need to install the Azure Functions and Azure Account extensions into VS Code, Azure Functions extension relies on the Azure Functions Core Tools. The extension installation instructions will help you get all that you need and the extension does check for updates and prompt you to update those tools as needed. In fact, I got this prompt last night.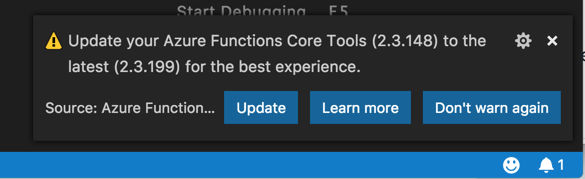
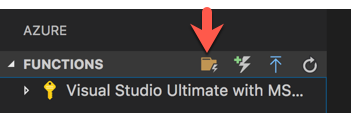
With the extensions installed, it is time to create a function app project. You should already have a folder created to house your project and you might as well have it open in VS Code. Mine is named AzureFunctionProj.
Then you can click on the “Create New Project” icon on the function bar (the icons show up when you hover over the bar) to create a new Function App project inside your folder.
This part of the workflow has not changed.
- It will ask you to point to a folder and the open folder should be there as a default to select.
- It will then have you select a language you’ll use in your app. From the options (C#, JavaScript, Python (still a preview) and Java (also a preview), I’ll choose C#.
As a result a new .NET Core project will be created using the template and you’ll see the following in the folder explorer:
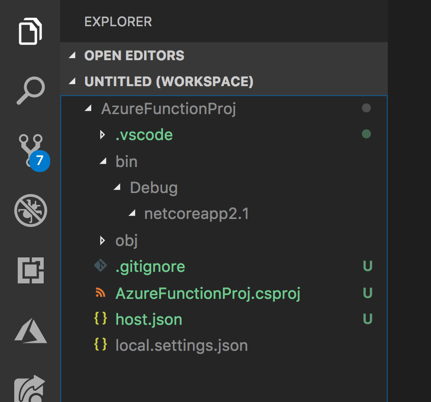
All of these files inside AzureFunctionProj folder were created by the template. Most importantly the csproj file where I’ve highlighted some of the most relevant settings.
<Project Sdk="Microsoft.NET.Sdk">
  <PropertyGroup>
    <TargetFramework>netcoreapp2.1</TargetFramework>
    <AzureFunctionsVersion>v2</AzureFunctionsVersion>
  </PropertyGroup>
  <ItemGroup>
   <PackageReference Include="Microsoft.NET.Sdk.Functions"
                     Version="1.0.24" />
  </ItemGroup>
  <ItemGroup>
    <None Update="host.json">
      <CopyToOutputDirectory>PreserveNewest</CopyToOutputDirectory>
    </None>
    <None Update="local.settings.json">
     <CopyToOutputDirectory>PreserveNewest</CopyToOutputDirectory>
     <CopyToPublishDirectory>Never</CopyToPublishDirectory>
    </None>
  </ItemGroup>
</Project>
Creating a function in the function app is where things are quite a bit different.
You begin as always with the “add a function” icon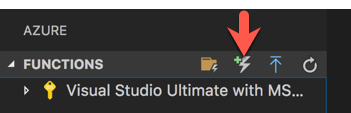
The first step is familiar, selecting which folder has the function app that the function should be in:

I’ll choose AzureFunctionProj.
Then there are a number of trigger templates to choose from which is nice but more interesting are the three options at the bottom:
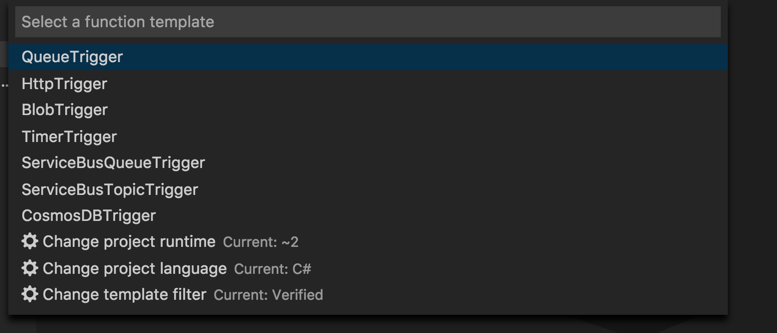 First is the project runtime and I definitely want v2 (“~2”). You can use different languages for different functions in the function app. This is showing the default I chose already: C#. And finally, the list of trigger templates is filtered to “Verified”.
You can change these options by clicking on them.
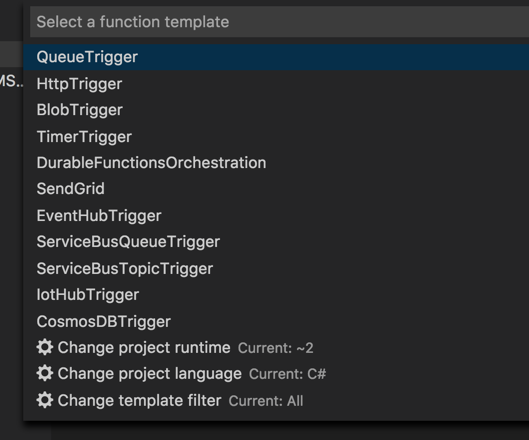
The filter options are Verified, Core and All. Core and All currently reveal the same list, which includes a few extra preview triggers: DurableFunctionsOrchestration, SendGrid, EventHubTrigger and IotHubTrigger.
Now in the past I was creating JavaScript functions inside my .NET Core Function App but now I am going to continue with C# because this is where things really surprised me. I’ll choose HttpTrigger and am then prompted to provide a name. I’ll just leave the default: HttpTriggerCSharp. I’m then asked to provide a namespace name for the class that will be created. Default is “Company.Project”. I’ll change it to FunctionTests.HttpTest1. The final bit of info to be collected is that you need to choose the security for the function. Of the options, I will select Anonymous because its a demo and I don’t want to have to deal with credentials.
That’s it. The function is created.
Some More Class Library Project Differences
My past experience gave me the expectation that a new folder is created inside the app function folder with the name of the function and inside there, would be a class file for the function and a function.json file to contain the binding configurations. the class file was there (though not in its own folder). But there was no function.json file. Also interesting and new to me were the FunctionName attribute on the Run method and the HttpTrigger attribute on the HttpRequest in the Run method’s signature. Also, I’m not used to having all of those using statements when using csx script.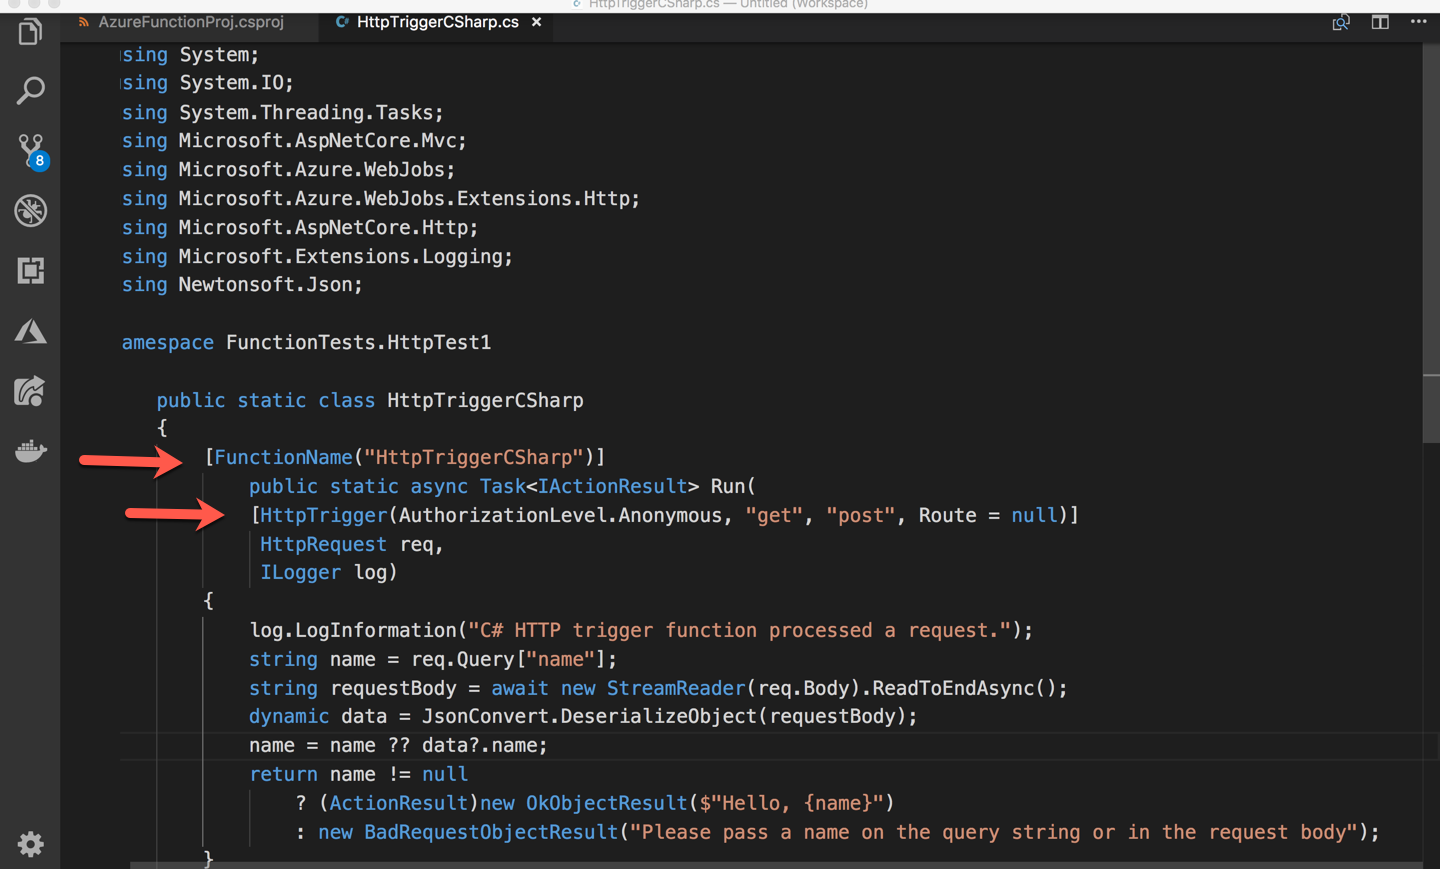
When building the project, .NET Core reads that attribute and builds a function.json that goes in the bin folder for deployment. 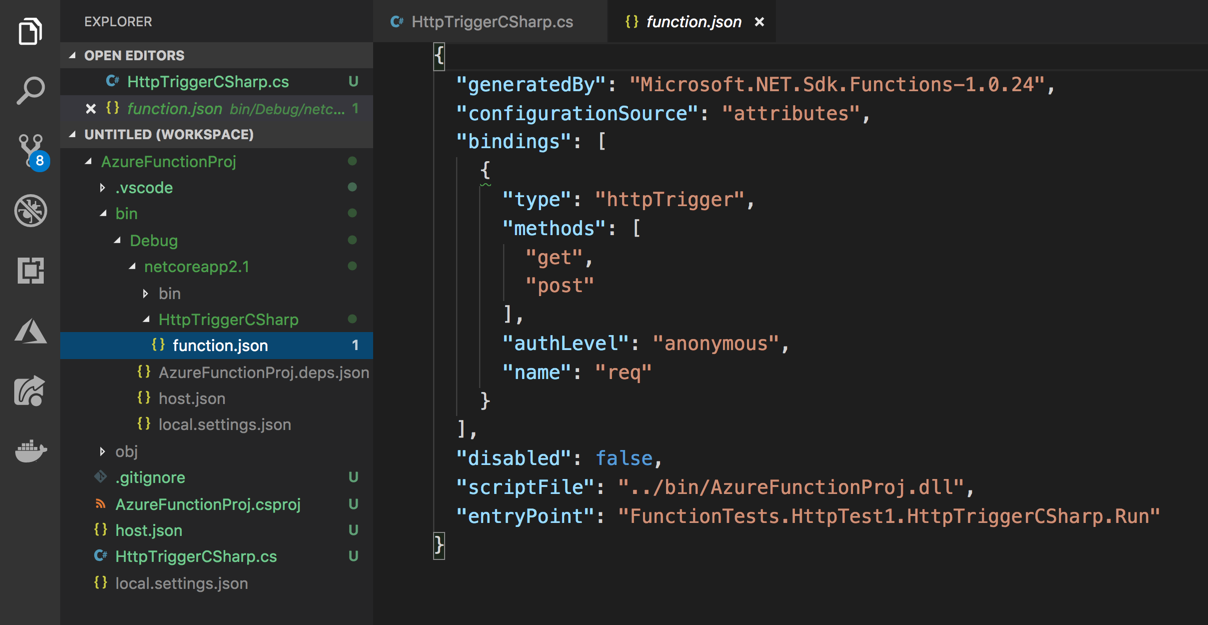
But it’s more than just the familiar bindings. Notice the generatedBy , configurationSource , scriptFile and entryPoint tags.
So the first binding, the httpTrigger binding, looks familiar to me. The function will respond to httpTrigger.
You can test out this default either by running or debugging. To run, you can use VS Code’s CTRL-F5 keyboard combo or, if you prefer using the CLI, you use Azure Function CLI command:
func host start
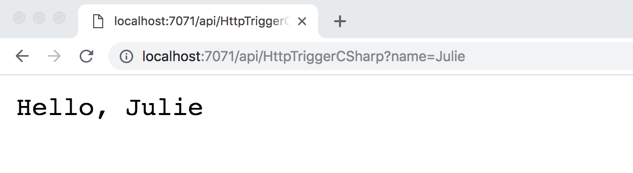
That will run the function and provide a url to try out. The template “stake-in-the-ground” method is written to accept either a query parameter or JSON in the body. I’ll just use a query parameter:
http://localhost:7071/api/HttpTriggerCSharp?name=Julie
And the browser outputs
Adding an Output Binding to
Azure Cosmos DB
What if I wanted to add an output binding? I’m used to doing that by editing function.json. But since I’m on this path of attribute defined bindings, I will add the binding that way. Let’s add an output binding for Azure Cosmos DB. That way this function will respond to an HTTP Request and insert some data into a Cosmos DB database. I already have an Azure Cosmos DB account, so I will define this to target a new collection in a new database in the existing account.
In order to use work with a Azure Cosmos DB binding, I need to add the relevant package to my project. Because I’m building my function using a C# class library, I can just do this as I would for any other Nuget package…by adding it directly to csproj or adding the package with the dotnet core CLI:
But now I’m just writing a C# class library so I can add the package either with the dotnet CLI or just add it manually into .csproj. I’ll use the CLI:
dotnet add package Microsoft.Azure.WebJobs.Extensions.CosmosDB --version 3.0.3
Note that if I were building the function with JavaScript or C# script, I would need to register the package using the tools CLI (func extensions install -p packagename).
Now the package is in csproj:
<ItemGroup>
  <PackageReference
    Include="Microsoft.Azure.WebJobs.Extensions.CosmosDb"
    Version="3.0.3"/>
  <PackageReference
    Include="Microsoft.NET.Sdk.Functions"
    Version="1.0.24"/>
</ItemGroup>
[FunctionName("HttpTriggerCSharp")] public static ActionResult Run( [HttpTrigger(AuthorizationLevel.Anonymous, "get", "post",Route = null)] HttpRequest req, [CosmosDB(databaseName: "CSharpDatabase", collectionName: "CSharpCollection", ConnectionStringSetting = "MyCosmosDBConnection", CreateIfNotExists=true)] out dynamic document, ILogger log)
{
"IsEncrypted": false,
"Values": {
"AzureWebJobsStorage": "",
"FUNCTIONS_WORKER_RUNTIME": "dotnet",
"MyCosmosDBConnection": "this is where my connection string goes",
}
}
using System;
using Microsoft.AspNetCore.Mvc;
using Microsoft.Azure.WebJobs;
using Microsoft.Azure.WebJobs.Extensions.Http;
using Microsoft.AspNetCore.Http;
using Microsoft.Extensions.Logging;
namespace FunctionTests.HttpTest1
{
public static class HttpTriggerCSharp
{
[FunctionName("HttpTriggerCSharp")]
public static ActionResult Run(
   [HttpTrigger(AuthorizationLevel.Anonymous, "get", "post",                 Route = null)]
   HttpRequest req,
   [CosmosDB(databaseName: "CSharpDatabase",
             collectionName: "CSharpCollection",
             ConnectionStringSetting = "MyCosmosDBConnection",
             CreateIfNotExists=true)] out dynamic document,
   ILogger log)
{
log.LogInformation("C# HTTP trigger function processed a request.");
string name = req.Query["name"];
document=new { Name = name, Added = DateTime.Now };
return name != null
? (ActionResult)new OkObjectResult($"Hello, {name}")
: new BadRequestObjectResult("Please pass a name on the query string");
}
}
}
func host start
![]() Sign up for my newsletter so you don't miss my conference & Pluralsight course announcements!
Sign up for my newsletter so you don't miss my conference & Pluralsight course announcements! ![]()
Thanks for this extremely helpful post, Julie! I am about to get back into developing a v1 Function App which I started in VS2017 a year or so ago. Do you know whether it’s possible to pick up that kind of project in VS Code? Or do I need to be in .Net Core land? Thanks again!
VS Code can’t support plain old .NET Framework projects. If you upgrade your project to use v2 (which is based on .NET Core), then definitely you can use it with VS Code (on windows or Mac or linux). Sorry for the delayed reply. This didn’t come through to my email.
Can someone please explain how “Azure Functions Core Tools” get installed into VS Code? All the docs I have found via Google and MS skip this step, assuming that the reader, knows someone, who knows someone, who magically has this info. And if the answer is that I must install NPM in VS Code, can anyone explain, [1] why that is the case, and then [2] how can one do this. There are lots of vague instructions (all are invalid) on how to install NPM using this and that VS Code extension, but no real docs. VS Code is off to a pretty bad start as far as I can tell – like Eclipse, but actually worse. I am having flashbacks to spending a week configuring Eclipse 10+ years ago.
Great post. I am going through some of these issues as well..