Tag Archives: Azure

Using Azure Active Directory Accounts with a Subscription Tied to a Personal (aka Live) Account

This blog post is about a very particular problem you might have with some Azure services if your Azure subscription is tied to a personal account and not an Office 365 or Microsoft 365 identity. And the set of Azure services is not random. It is a set of Azure services that rely an Azure Active Directory for credential management – referred to as Managed Identity.

I ran into this when working with the Azure Key Vault, but you might hit it with Azure Blob Storage or some other services.

I want to first describe how my Microsoft and Azure accounts are set up and how I encountered the problem then share how I was able to solve it.

I have also written an article on using Azure Key Vault from an ASP.NET Core application but I chose a simpler path for the article which was to use an Azure Subscription that was tied to an Office 365 account. That article is in the Code Magazine May/June 2021 issue. (I’ll share the link when it’s live). In this blog post I am going to focus on the problem of the personal account. You can find details about accessing the Key Vault from the application in the article.

My Microsoft and Azure Accounts

My Azure Subscriber account is my personal Microsoft account that is associated with live.com. It’s not a live.com email address. You see the big difference when you log into a Microsoft property. You enter your email address and then specify that it’s either a work/school account or a personal account. Mine is one of those personal accounts.

I log in to visualstudio.com, my Visual Studio subscription and my Microsoft MVP account with that same personal account.  I’ve been working this way for a very long time.

Working with an Azure Active Directory dependent service: Azure Key Vault

I was writing a small ASP.NET Core app and wanted to store its secrets– some connection strings – in an Azure Key Vault to keep them out of my source code.

I started by creating a key vault in Azure. Key vaults are accessed through an access policy — a combination of an Azure Active Directory user and a selected set of permissions. When you create a new Key Vault and your Azure subscription account is an O365 account, a new access policy will be automatically be created giving the subscriber account’s identity broad access to that key vault.  Because my subscription was not tied to an O365 identity, I had to manually create an access policy for the user that is the subscription owner.

Back in Visual Studio, I wove the Azure.Extensions.Aspnetcore.Configuration.Secrets package into my application to let it  read from the key vault. This also requires referencing the  Azure.Identity NuGet package.

The secrets API asks the identity API to discover any managed identities on your machine if they are not fed directly to the application.

Here’s the critical code for accessing the key vault that I added into my app:

config.AddAzureKeyVault(
   new Uri("https://fourtwentyfive.vault.azure.net"),
   
new DefaultAzureCredential());

This tells my app to communicate with my particular Azure Key Vault and use whatever credentials it can find. In my case, debugging in Visual Studio, that is the credentials I used to log in to Visual studio.

The Error of My Ways

And this is where the problem begins! When the debugger attempts to access the key vault with those credentials it throws an error.                 

Azure.Identity.AuthenticationFailedException: 'SharedTokenCacheCredential authentication failed: AADSTS9002332: Application ‘[application’s id]'(Azure Key Vault) is configured for use by Azure Active Directory users only. Please do not use the /consumers endpoint to serve this request.

That’s because even though the key vault created an access policy with my Live account, it’s a trap. It won’t work. Azure Active Directory cannot manage Live accounts. It can only manage Office 365 or Microsoft 365 accounts. Full stop.

I do have an O365 account. But I didn’t want to change my subscriber account to one of my two identities tied to my O365 account for fear of messing up everything that’s dependent on my old Live login–my MVP access, my visualstudio.com access, etc.

Therefore I needed to add one of my Office 365 identities into my Azure Active directory.

Tying an O365 Identity to my Azure Subscription

I have two identities in my O365 account – julia and jlerman. The jlerman account has the same exact email address as my Live account. Let me help you avoid suffering through another failure. Don’t try to add in an O365 identity that has the same email address as the personal identity. This was the first path I chose. The code failed in the same place but this time I got an HTTP 401 error result — Unauthorized client access.

But I was successful when using my other identity: julia.

How to do this was complicated and I would never have figured it out on my own. I’m grateful for guidance from a fellow Microsoft Regional Director, Joe Homnick, (rd.microsoft.com/en-us/joe-homnick) who is a lot more experienced with Azure security than I ever want to be! In fact, I didn’t understand the problem very well and I’m sure my explanation to him was very misleading, but he was able to figure out what I was trying to describe. Unfortunately, Joe couldn’t just point me to a document because apparently none exists. He documented the steps for me in an email along with screenshots. That’s a pal!

So the rest of this blog post is simply relaying what Joe taught me.

Also, I’m doing this via the Azure portal rather than a lot of mysterious Azure CLI commands. But you can achieve the same using the Azure CLI or PowerShell.

Step 1: Adding the O365 email address as a guest user with Global Administrator privileges

In the portal, go the Azure Active Directory, then Users.

  • Select New guest user
  • Select Create user. (Not “invite user”).
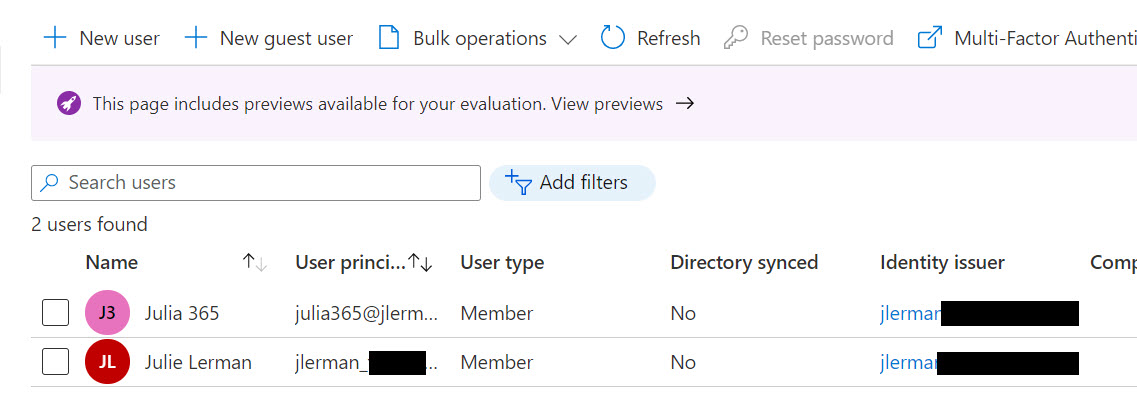
  • Under identity, add a user name. I called mine julia365. Azure will populate the domain name tied to your subscription’s Azure Active Directory.
  • Give your user a name. Mine is “Julia 365”. Xoru5917
  • Set a password for this user. You can let the portal auto-generate or supply your own.
  • The only other task (an important one) on this page is to set a role for this user. Click on User next to Roles and filter on global to select Global Administrator.

Then you can create the user.

The user principal name will be funky looking. It is formatted as an email address with the name of the user (with no spaces) and the domain is a compressed version of the identity for the subscription and then onmicrosoft.com.

So if my subscriber identity is [email protected], the new user’s principal name will be [email protected]. It’s not an email address, just an identity.

The identity issuer is also jlermansomedomain.onmicrosoft.com.


Step 2: Adding the new guest as a secondary subscription owner on the account

Having the user is not enough for the authentication to take place though. The user has to be recognized as a subscription owner. Azure allows you to set up secondary subscription owners.

You’ll need to start by going to the subscription properties. You can find Subscriptions in the search bar if needed. If you have multiple subscriptions, be sure to select the one you intend to use for your application. Once in the subscription properties, select the Access control (IAM) option. Then from it’s menu, Role assignments and then Add.
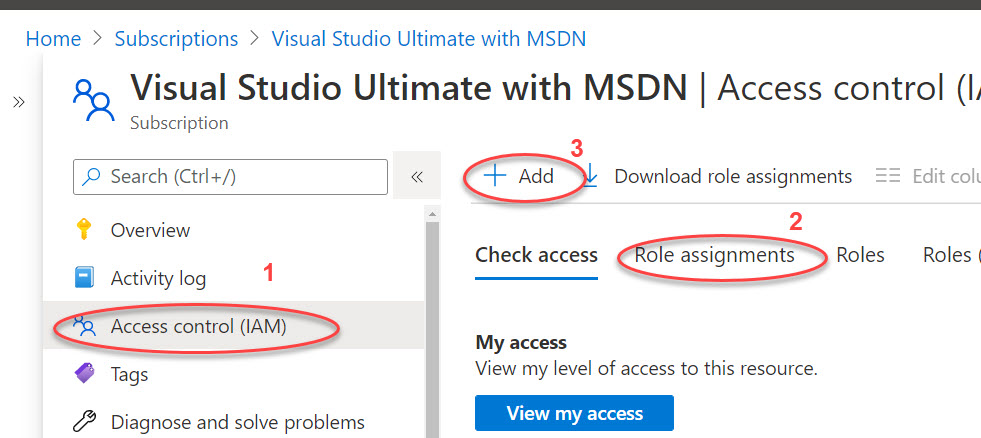
In the Add role assignment form, select Owner from the Role drop-down. Leave the Assign access to option at its default (User, group, or service principal). You’ll see all of the users listed. Select the newly created one and then save. It will get added very quickly.
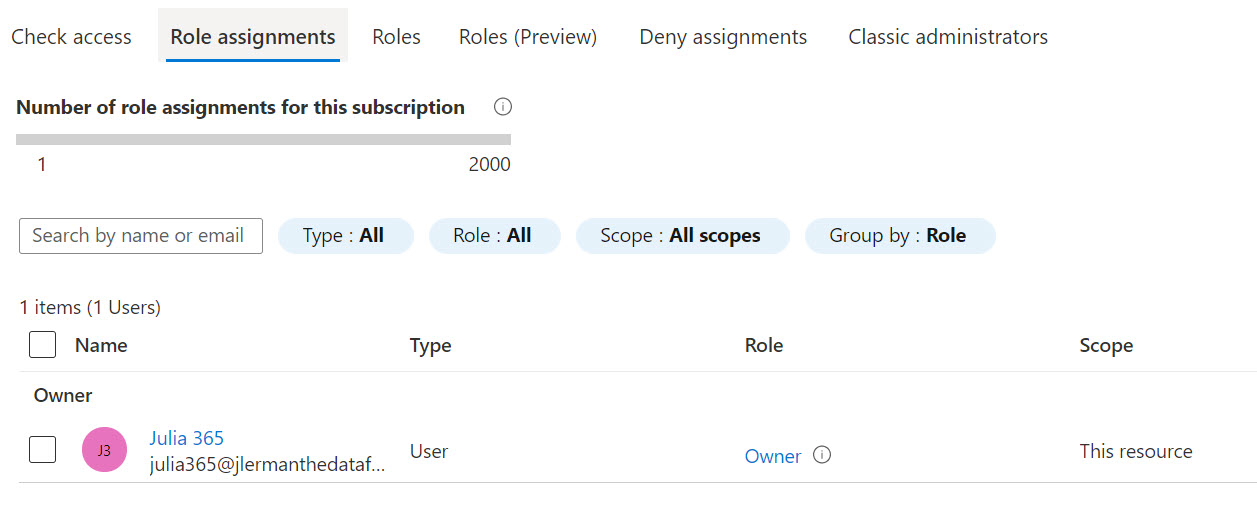
Step 3: Log in to the portal with the new identity

If you click on your login info on the top right corner of the portal, you may already have an easy option available for switching to the new account for logging in.
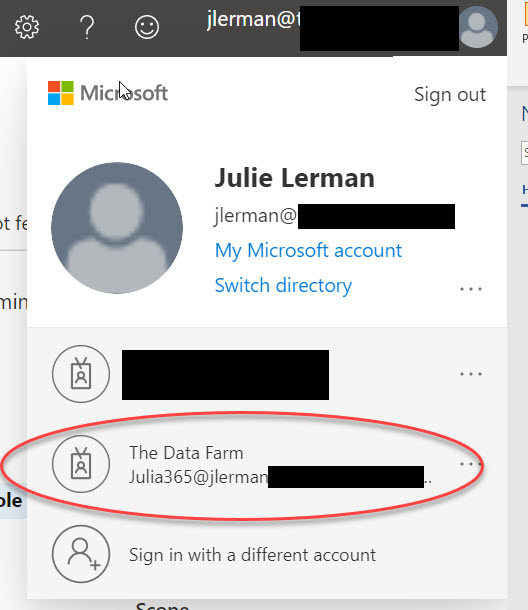
Otherwise, you’ll need to sign out then sign in with the new credentials.

Step 4: Add the new identity to the service’s access policies.

In my case, I returned to the key vault and created a new access policy for the new identity.

Step 5: Switch Visual Studio user to the new identity in order to run/debug from VS

This is important since remember that when running or debugging from Visual Studio, the Azure Managed Identities API will read that login as a possible credential source. You’ll first need to sign out and then sign in again with the clunky identity you created in AAD. With my example, that would be [email protected].

With these changes, not only did I finally get past that failing line of code, but the app accessed the key vault and read my secrets (a database connection string in my case) and was able to use the secret to connect to the database.

I hope this helps someone else down the road!


Copying an Azure Function App using the Portal, GitHub and Cloud Shell

I’ve got an Azure Function App with some functions that I built for a demo for a conference session. I first used this at AngularMix and had named the function app AngularMix2017. Then when I did it for DevIntersection this past week, I recreated it as DevIntersection2017 because you can’t rename a function app. I’m doing it yet again next week at another conference (NetConf.co) and decided it was time to create it as a reusable name: DataApiDemo.

While you can’t flat out copy a function app if you are working strictly in the portal (which is how I’ve been working during my first learning stages of building function apps), you can easily enough duplicate it by downloading and uploading it again.

Keep in mind that if you are developing functions in VS 2017 or VS Code (combined with the Azure CLI) you can just use the tooling to publish the function apps along with the settings. But I don’t like to take the easy path. I learned a lot of new tricks and tools by going this route. Even if I leverage the tooling on my next go round, I’ve learned a lot which gives me a better understanding overall, more control and troubleshooting skills.

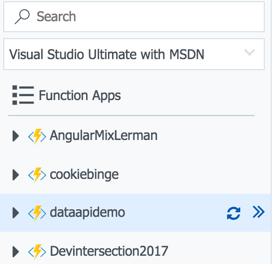
My first step was to create the new function app (dataapidemo).

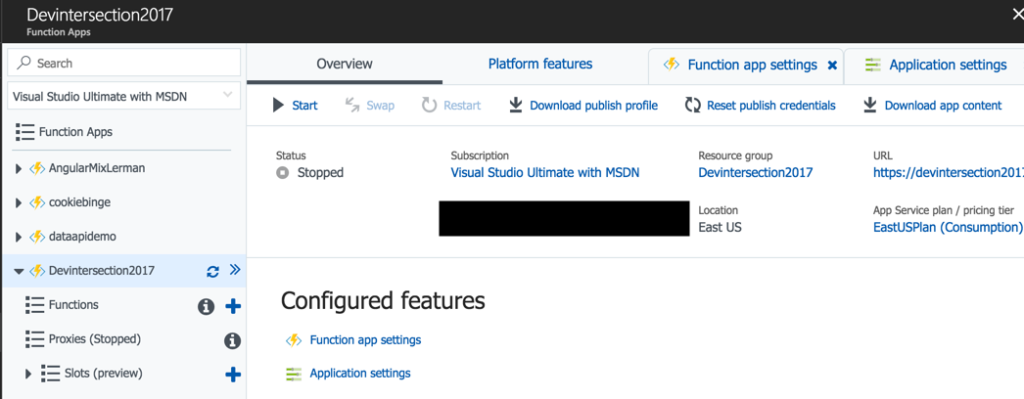
The Overview blade of an Azure function app has a “download app content” option. That will pull down all of the relevant files onto your machine. So next, I go to the overview of the DevIntersection2017 function app and click on the download app content link.

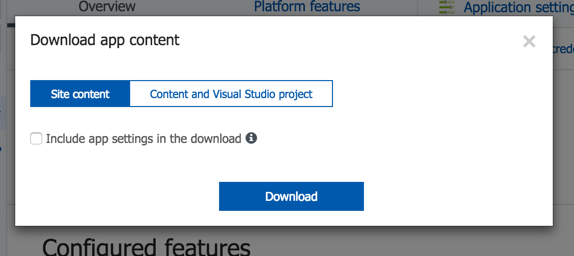
When downloading the app content, you have an option to also grab the app settings. I have a number of secrets stored in my settings ..things like keys to my databases , account ids and more. If you check that, the settings will get downloaded to a local settings file. If you were using this feature to continue your development locally, e.g. in VS2017, then you’ll want them. But for my scenario, they are not useful and even potentially a security issue (you’ll see shortly) so I’m going to leave that unchecked.

I can see the files in the designated folder on my computer.

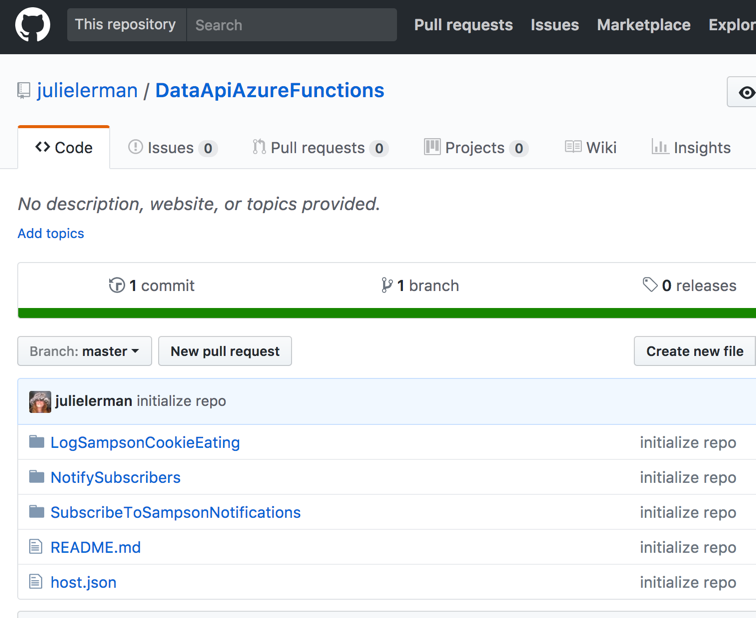
I’ve already created a Github repository to store these files in: https://github.com/julielerman/DataApiAzureFunctions.

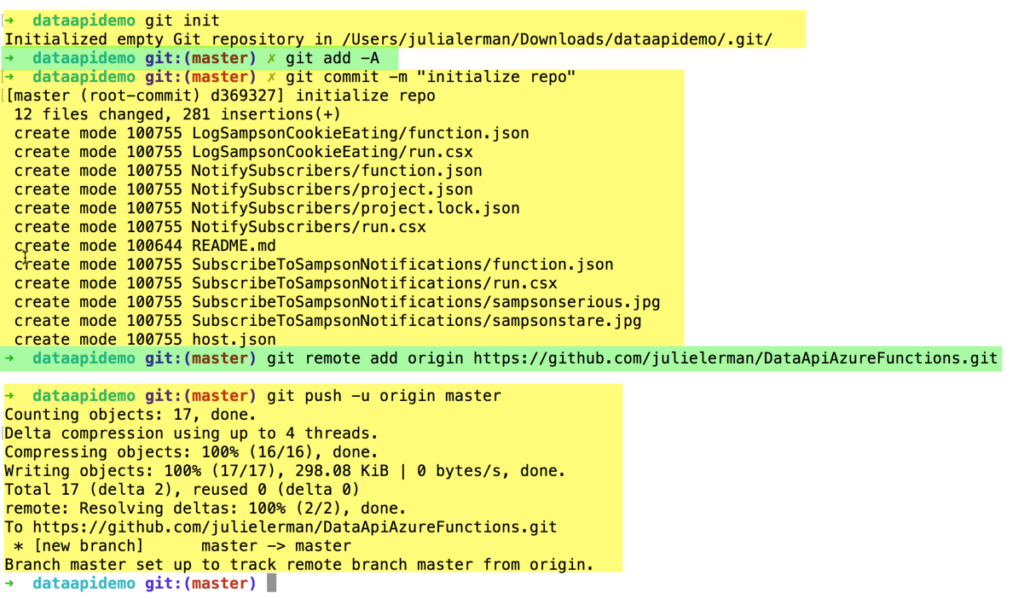
At the command line in the new folder, I’ll git init, add all of the files into the local repo and commit them. Then I can run the git commands to connect that folder to my GitHub repo and then push my local repository into the online repository.

When that’s complete, the files are all in my GitHub repo.

Since I’m using a public repository, this is why I didn’t want the local.settings.json file filled with my secrets to download. Of course I could have deleted it locally or told Git to ignore that file. A few other points about this. If I were developing this locally, then I can have that file locally and use VS2017 or Azure CLI tools to publish my app along with the settings to the portal. But that is not my goal here.

Now I can take advantage of a long-time feature of the Azure Portal: connect it to a repository to auto-deploy from the repository to my app (in the case to my function app).

Back in the portal, I select the new function app again, then from its Platform Features page, open the Deployment Options. Choose Setup new deployment and follow the steps to connect the function app to your repository. When you’ve completed the setup, you can use the Sync button to force the deployment to happen. All of the files are now in my new dataapidemo function, including the function.json files that contain the function setting (e.g. integrations etc) and any other files I may have added to my functions.

Because I am using Twilio, one of my functions has a reference to Twilio in a project.json file and I need to restore that package to this function app. I did that by opening up the project.json and making a small mod to it..adding or removing a blank line, then saving it. That triggers the package restore to happen.

What’s not there however are the function app settings. These are settings that are defined to the app and used by one or more of the functions. There are some default settings created by Azure but I also have some others …those secrets, such as the account and telephone number for my Twilio integration as well as a key for the function.

Some of these settings are my own custom settings that I want in the new function. I could add them in via the portal app settings interface, but I don’t like that path when I have a slew of settings.

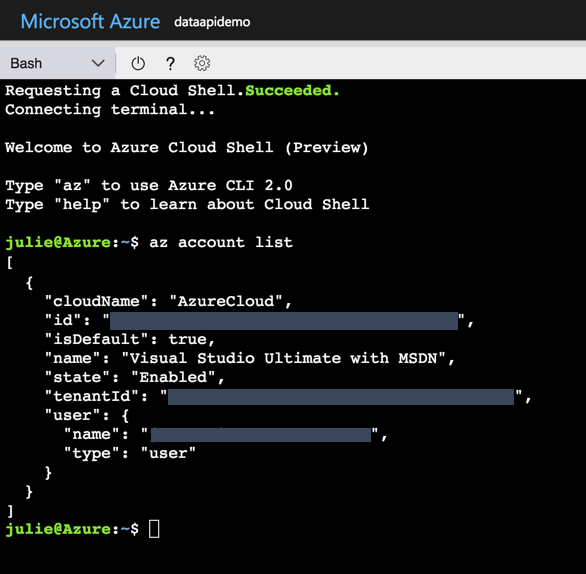
That means moving on to yet another amazing tool in the Azure Portal — Cloud Shell. Here you can run Bash or Powershell commands from the Azure CLI directly on services in your subscription. You can also do this locally on your machine with the extra caveat that there you must provide credentials and other metadata.

In the portal, open the Cloud Shell. This is gives you an interactive terminal window.

If you have multiple subscriptions, you want to be sure that it’s set to the one where your app function is stored.

You can do this by listing the subscriptions with the az account list command.

If the one you want is not default, then set it with:

az account set -s [ID]

This shell can do auto-complete so if the id starts with a123, you can type

az account set -s a123

then hit the tab and the id will get finished . Hit enter and it becomes the default subscription to work in.

I’ll use the azure functionapp commands to get the settings into my function app.

First I’ll list the existing settings. You do this with the command

az functionapp config appsettings list --name [functionname] --resource-group [resource name]

The parameter shortcuts for name and resource-group are -n and -g. Mine are both the same name: dataapidemo. Here’s what the command looks like (except for the wrapping that my blog is forcing):

az functionapp config appsettings list -n dataapidemo -g dataapidemo

The appsettings are listed out as JSON by default although you can affect the output format with the output parameter.

I’ll need to see the settings I want to copy from the other function app so I run:

az functionapp config appsettings list -n devintersection2017 -g devintersection2017 -o tsv

which give me the list of settings from which to choose.

In addition to listing the settings, you can add new ones with the set verb and delete with delete verb. Both would go in place of the verb list.

You use SET by combining the SET command and the –settings parameter. After the –settings parameter, you can list one or more setting with this format:

az functionapp config appsettings set -n dataapidemo -g dataapidemo --settings "property1name=value", "property2name=value"

Note that this is wrapping here on the blog post but not in the shell window.

So I added the handful of settings I wanted to add which looked more like:

az functionapp config appsettings set -n dataapidemo -g dataapidemo --settings "TwilioSID=myvalue", "TwilioAccount=myvalue"

There were others I had to add. For example, my function needs to know how to get to my Cosmos DB document database, so it has a setting that uses the db name as the property name and the dbs account endpoint as the value.

Once I had done that, I was able to get rid of the function apps that were named for each conference and use a common one no matter where I am sharing it.

And boyohboy did I learn a lot of new things!

Recent Data Points Columns: Aurelia, Azure DocumentDB, Scriptcs, EF6, EF7, ASP.NET 5

Data Points – Aurelia Meets DocumentDB:
A Matchmaker’s Journey
(Part 1)

*Part 2 will be in Dec 2015 issue

Nov 2015

After exploring both DocumentDB and the new Aurelia framework, Julie Lerman decided it was time to use them together, but that proved more difficult than expected. Learn how she finally found the path to the correct solution.

Read article

Data Points – Revisiting JavaScript Data Binding — Now with Aurelia

Sep 2015

Julie Lerman has long been a fan of the Knockout JavaScript framework and its data binding talents. Here she explores the new Aurelia framework, which is quickly gaining momentum with Web developers, and finds that it offers a lot to like for data-oriented programmers.

Read article

Explore Entity Framework Behavior at the Command Line with Scriptcs

Jul 2015

Julie Lerman learns how to explore Entity Framework behavior interactively using Scriptcs.

Read article

An Overview of Microsoft Azure DocumentDB

Jun 2015

Julie Lerman takes a first look at the Microsoft entry into the document database field—Azure DocumentDB.

Read article

The EF6, EF7 and
ASP.NET 5 Soup

May 2015

Julie Lerman discusses the difference between the next version of .NET and what ASP.NET 5 apps will run on, then explains how Entity Framework 6 and Entity Framework 7 fit into the mix.

Read article

EF6 Code First Migrations for Multiple Models

Apr 2015

The new support for Code First Migrations in Entity Framework 6 makes it easier to store data for multiple models in a single database. But that support may not be what you imagine. Julie Lerman explains what this feature does and doesn’t do, and how to use it.

Read article

Looking Ahead to
Entity Framework 7

Jan 2015

In this first look at EF7, Julie Lerman discusses what EF7 will bring to developers, the motivations behind decisions being made about the framework, and what this version means to existing apps that use EF6 or earlier.

Read article