Tag Archives: dotnet

Exploring docker compose watch in Visual Studio Code

Docker’s compose watch feature was first released in Sept 2023 as part of docker compose v 2.22.0 (https://docs.docker.com/compose/release-notes/#2220)

Here are some tips and behaviors to be aware of when using compose watch in Visual Studio Code as well as how they relate to compose up.

While it shouldn’t make a difference, note that I’m using MacOS Monterey, latest VS Code (1.90.2) and latest (official Microsoft) Docker extension for VS Code (v1.29.1).

My app is a tiny dotnet web app using a minimal API. I’ve also performed the same experiments using a more complex app (with a database and FlywayDB containers and using controllers instead of minimal API). In the minimal API,  one of the mapgets is defined in the program.cs file, the other is in a endpoints file and connected using a method to add those to the API. I did this to see if that made a difference in recompiling. More on that further on.

With a combination of “instructions” in your docker-compose file and the watch command, Docker will keep an eye out for code changes in the relevant container(s) that you have specified for watching , then update and rebuild the container on-the-fly. It’s an incredible improvement over having to explicitly take down the container (whether you stop or remove) then spin it up again to try out the changes. And thanks to the efficient caching in docker compose (the v2 compose, not the older docker-compose command) it can do so very quickly. Sounds magical, right?

Container updates? What?

How do I know the container with my app got updated? Two ways. The docker terminal in VS Code outputs all of the rebuild details and  I leave the web page open after calling my API Get the first time and refresh the page after the container is rebuilt to see the new response data.

The Repo

The solution I’m using for testing can be found at https://github.com/julielerman/DockerComposeWatchDemoMinimalAPI.

Setting up docker-compose for watching

The key in the docker-compose file is a service subsection called watch inside the develop section for whichever service (container) you want to be watched. Below is a simple example.

I want watch to update the valuesapi container if I change any of the API code. I’ve added a minimal develop section in my docker-compose.yml file to support that in the API service. You can learn more about the various attributes in the develop specification doc (https://docs.docker.com/compose/compose-file/develop).

    develop:
     watch:
        - action: rebuild
          path: .

Here is the full compose file so you can see where this section sits within the service.

services:
  valuesapi:
    image: ${DOCKER_REGISTRY-}
    build:
      context: .
      dockerfile: Dockerfile
    ports:
      - 5114:5114
    develop:
      watch:
        - action: rebuild
          path: .

Lesson Number One: Control Autosave Settings

I have always had autosave enabled with the “afterDelay” option in Visual Studio Code. And I’ve just allowed the default timing afterDelay at 1000 milliseconds. I quickly learned that AutoSave was a big problem as I was working on some edits and Docker kept updating the container over and over again as I was typing and thinking. Not a favorable situation.

The other options are

  • onFocusChange (when the editor loses focus)
  • onWindowChange (when the window loses focus)
  • off

I initially just completely disabled AutoSave with off, but that is also dangerous since I’m so used to relying on it. Instead I changed the setting to onFocusChange which seemed most reasonable to me. I still find myself needing to explicitly save but expect I’ll get used to it.

How Quickly is the Container Updated?

Before I discuss the docker compose syntax, I do want to give you a sense of how quickly Docker updates a container.

I’m only using the docker compose watch command for the tests in this section.

Obviously, everyone’s performance will be different with respect to their setup so YMMV. But the results should be relative.

To begin with, calling docker compose watch takes no more time than docker compose up.

Keep in mind that a change to my dotnet web app means that dotnet needs to rebuild the app. If it’s just code, that’s simple.

I noticed that the first change I made that triggered Docker to recreate the build and publish image layers.

=> [valuesaapi build 7/7] RUN dotnet build "ValuesTest.csproj" 11.0s
=> [valuesaapi publish 1/1] RUN dotnet publish "ValuesTest.cspro 3.4s

The entire rebuild was 15.2 seconds before the API reflected the change.

Yet on subsequent changes, the rebuild was only 0.5 seconds and those two layers came from the cache.

=> CACHED [valuesaapi build 7/7] RUN dotnet build "ValuesTest.cs 0.0s
=> CACHED [valuesaapi publish 1/1] RUN dotnet publish "ValuesTes 0.0s

I have no idea how this is working (how the change is getting to the container layer) because the change was, indeed, reflected in the output from the API.   I can’t explain this difference but will be asking about it for sure! (Then will come back to edit this post.)

Here is a look at the docker log for the rebuild of the version of the app, where you can see how it reuses most of the cached layers. This was the first rebuild which spent more time on those two layers noted above.

Rebuilding service "valuesaapi" after changes were detected...
[+] Building 15.2s (20/20) FINISHED docker:default
=> [valuesaapi internal] load build definition from Dockerfile 0.0s
=> => transferring dockerfile: 1.25kB 0.0s
=> [valuesaapi internal] load metadata for mcr.microsoft.com/dot 0.3s
=> [valuesaapi internal] load metadata for mcr.microsoft.com/dot 0.2s
=> [valuesaapi internal] load .dockerignore 0.0s
=> => transferring context: 383B 0.0s
=> [valuesaapi build 1/7] FROM mcr.microsoft.com/dotnet/sdk:8.0- 0.0s
=> [valuesaapi internal] load build context 0.0s
=> => transferring context: 1.74kB 0.0s
=> [valuesaapi base 1/4] FROM mcr.microsoft.com/dotnet/aspnet:8. 0.0s
=> CACHED [valuesaapi build 2/7] WORKDIR /src 0.0s
=> CACHED [valuesaapi build 3/7] COPY [API/ValuesTest.csproj, AP 0.0s
=> CACHED [valuesaapi build 4/7] RUN dotnet restore "API/ValuesT 0.0s
=> [valuesaapi build 5/7] COPY . . 0.1s
=> [valuesaapi build 6/7] WORKDIR /src/API 0.1s
=> [valuesaapi build 7/7] RUN dotnet build "ValuesTest.csproj" 11.0s
=> [valuesaapi publish 1/1] RUN dotnet publish "ValuesTest.cspro 3.4s
=> CACHED [valuesaapi base 2/4] WORKDIR /app 0.0s
=> CACHED [valuesaapi base 3/4] RUN apk add --no-cache icu-libs 0.0s
=> CACHED [valuesaapi base 4/4] RUN adduser -u 5678 --disabled-p 0.0s
=> CACHED [valuesaapi final 1/2] WORKDIR /app 0.0s
=> [valuesaapi final 2/2] COPY --from=publish /app/publish . 0.1s
=> [valuesaapi] exporting to image 0.1s
=> => exporting layers 0.1s
=> => writing image sha256:454f1258e665324777310e3df67674407b73e 0.0s
=> => naming to docker.io/library/api 0.0s
service "valuesaapi" successfully built

Also note that the pre-existence of the container may not be relevant. It is all about the build cache. So you may remove the container then run compose watch again and it will spin up very quickly. There are so many factors at play that as many times as you experiment, you may realize slightly different behavior. I have played with this many many times in order to come to a decent comprehension of what is going on (though not quite “how” …I’ll just chalk that up to Docker developer genius for now.)

But what if I do something like introduce a new package in my csproj file? (I’ll let you translate that question to the facets of your chosen coding stack.)

Adding a new Nuget package to the API’s csproj was, as expected, more expensive at about 50 seconds total. Here is the output from that change. Looking at the timing for each step, the bulk was restoring the newly added Nuget package over my SLOW internet! I could have run dotnet restore in advance, of course. Then it also required a rebuild of the project that could not rely on the cache.  That was over 13 seconds and another 3.7 to create the publish image.

Rebuilding service "valuesaapi" after changes were detected...
[+] Building 51.5s (20/20) FINISHED docker:default
=> [valuesaapi internal] load build definition from Dockerfile 0.0s
=> => transferring dockerfile: 1.25kB 0.0s
=> [valuesaapi internal] load metadata for mcr.microsoft.com/dot 0.5s
=> [valuesaapi internal] load .dockerignore 0.0s
=> => transferring context: 383B 0.0s
=> [valuesaapi build 1/7] FROM mcr.microsoft.com/dotnet/sdk:8.0- 0.0s
=> [valuesaapi base 1/4] FROM mcr.microsoft.com/dotnet/aspnet:8. 0.0s
=> [valuesaapi internal] load build context 0.0s
=> => transferring context: 1.47kB 0.0s
=> CACHED [valuesaapi build 2/7] WORKDIR /src 0.0s
=> [valuesaapi build 3/7] COPY [API/ValuesTest.csproj, API/] 0.0s
=> [valuesaapi build 4/7] RUN dotnet restore "API/ValuesTest.cs 32.8s
=> [valuesaapi build 5/7] COPY . . 0.1s
=> [valuesaapi build 6/7] WORKDIR /src/API 0.0s
=> [valuesaapi build 7/7] RUN dotnet build "ValuesTest.csproj" 13.5s
=> [valuesaapi publish 1/1] RUN dotnet publish "ValuesTest.cspro 3.7s
=> CACHED [valuesaapi base 2/4] WORKDIR /app 0.0s
=> CACHED [valuesaapi base 3/4] RUN apk add --no-cache icu-libs 0.0s
=> CACHED [valuesaapi base 4/4] RUN adduser -u 5678 --disabled-p 0.0s
=> CACHED [valuesaapi final 1/2] WORKDIR /app 0.0s
=> [valuesaapi final 2/2] COPY --from=publish /app/publish . 0.2s
=> [valuesaapi] exporting to image 0.3s
=> => exporting layers 0.3s
=> => writing image sha256:a5f16fef8705421b73499f2393cf7e790b958 0.0s
=> => naming to docker.io/library/api 0.0s
service "valuesaapi" successfully built

Removing the Nuget package forced another  expensive restore:

 => [valuesaapi build 4/7] RUN dotnet restore "API/ValuesTest.cs 10.0s

And re-building the layered images took about the same time as before.

=> [valuesaapi build 7/7] RUN dotnet build "ValuesTest.csproj" 11.1s
=> [valuesaapi publish 1/1] RUN dotnet publish "ValuesTest.cspro 3.4s

Lesson Number 2, compose syntax impacts your experience

With the develop/watch section in place in docker-compose, you can then trigger the watch with docker compose in two ways:

docker compose watch or

docker compose up –watch.

But the two ways have different effects and it took me some experimenting to understand the effects. Below I will lay out the various syntaxes for comparison so that you can avoid some of the confusion I encountered as I was learning.

compose up variations 

docker compose up

If you run docker compose up without the –watch flag, the Docker extension will give you the option to watch the source with the w key. If you do that, code changes trigger rebuild and you’ll get an updated API.

The CLI terminal (in my case, zsh) gets replaced with a docker terminal.

All info goes to this terminal including output debug / log info from dotnet.

If you enabled watch, then the rebuild details (as above) will also be displayed in this terminal window.

CTRL-C stops the containers, closes the docker terminal, returns to zsh terminal and prompt. Containers are still there, just stopped, not running.

If you want to remove the containers, you’ll have to use  docker compose down command or by right clicking the container in the docker extension explorer and choosing remove or right clicking the docker-compose file in the explorer and choosing compose down.

docker compose up -d or docker compose up -d watch

If you want Docker to watch, this is not your friend!

Running compose up in interactive mode, that is with the -d (detached) flag, will never work with watch. It won’t activate because Docker releases control back to you and therefore is not able to keep an eye on code changes. If you don’t add the –watch attribute, you will not get the prompt to start watch with the “w” key. If you do add the –watch attribute, watch will simply not activate. But there is no warning and was confused until I realized what was going on. Having learned this the hard way, I hope this will help you avoid the same confusion.

Another detriment to interactive/detached mode with or without the watch is that dotnet debug/log output is not displayed in the terminal. Or in any of the windows. You’ll have to force it to another target in your code.

Why so much focus on detached mode? In the Docker extension, if you right click a compose file and choose compose up from the extension’s context menu, the default command executed includes the -d. You can override those commands in the settings if you want.

In order to stop/remove containers ,you need to use the CLI or the tooling to trigger the CLI command e.g. docker compose down. CTRL-C will not have any effect. 

Using compose watch command instead of compose up command

 docker compose watch

Note there isn’t even a detached option available with watch because it’s totally irrelevant.

The terminal will tell you that watch is enabled when compose is finished spinning up the containers. As we are not interactive, you will not be released to a terminal prompt. Logs and message from the app will display in the Docker terminal as well as notifications from Docker. Code changes trigger rebuild (visible in terminal) and the app gets updated.

CTRL-C closes the Docker terminal and brings you back to a prompt and Docker stops watching. The containers are still running, however. But if you make code changes, they will not be updated because watch was no longer active. Now that the Docker terminal is gone, dotnet logs and other message coming from within the container are NOT output anywhere.

In this state (containers running, watch disabled, docker terminal gone and a recent change made to the code) I ran docker compose watch again from the prompt. Even though the containers were still running, keep in mind that the code change I made wasn’t handled. So the dotnet app had to be rebuilt and the API container updated. The dotnet build command took about 15 seconds and the entire composition was about 20 seconds.

Don’t Overlook compose watch!

After 30+ years coding, I still always tend to fear change in my tools .. worried that it will make me confused and feel stupid. (It usually does for a few minutes ..or perhaps longer…but then you figure it out It and feel like a million bucks!). It took me a long time before I looked at compose watch (with some encouragement) and in my typical fashion I had to try out what happens if I do this?  what happens if I do that? until I had a good idea of how its works and how incredibly useful it is! Don’t be shy…. it is an incredibly useful feature if you are developing with Docker.

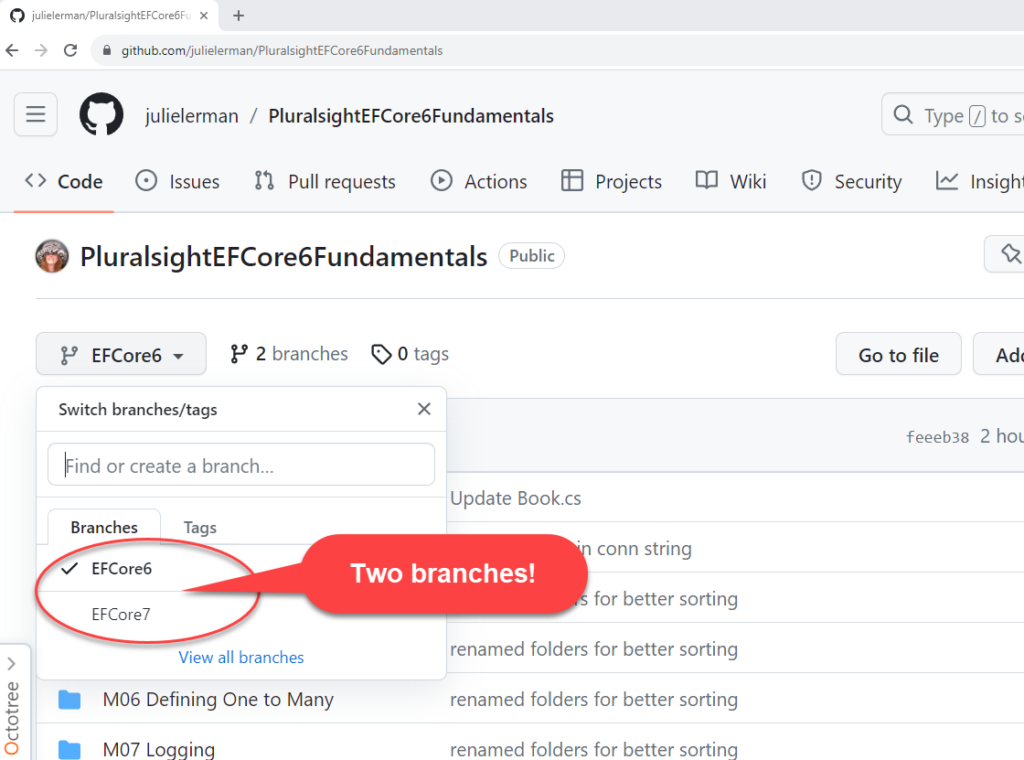


EF Core Fundamentals for EF Core 7 (Pluralsight)

Last spring Pluralsight published my 7.5 hour EF Core Fundamentals course. I hope that given my history with EF, EF Core , my books, talks and courses that you will already know that it’s a very good and in-depth course. And the response to the course has been great!

Unfortunately the course has the version number in it: It is really called EF Core 6 Fundamentals which I believe causes devs using the current version (EF Core 7) to hesitate watching the course.

These fundamentals do not really change from one version to the next. It is the advanced features that the EF Core team is evolving.  The course is still totally relevant for EF Core 7 and you can use EF Core 7 to work through the course.

There are new features you should be aware of that I covered in the EF Core 7: It Just Keeps Getting Better article in Code Magazine’s, Code Focus issue on .NET 7 such as bulk updates and deletes, mapping stored procedures and more (some of which I would consider “fundamental”, others a bit more advanced).  But the basics  continue to work just as they do in EF Core 6. 

There’s no need to shy away from either of these courses or any of the others on the EF Core 6 track  on Pluralsight if you are using EF Core 7.

In fact, I have updated every single project from the course to EF Core 7 and except for one small tweak (not even related to EF Core) in the API Testing demo (from Module 13), every demo ran exactly the same in EF Core 7 as it does in EF Core 6.

All of the updated projects are in a new branch in the PluralsightEFCore6Fundamentals GItHub repo dedicated to the source code for the course.

Because of the course length and the fact that EF Core 7 is not a Long-Term Support (LTS) version, Pluralsight and I decided not to update this course. Many of the EF Core and ASP.NET core courses went the same way.

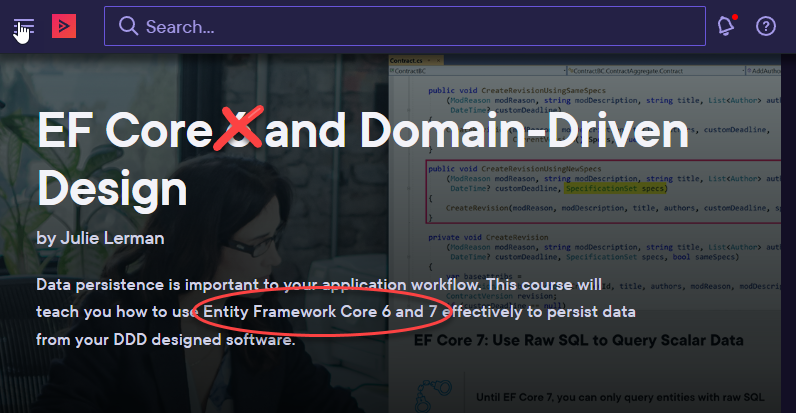
I also created a much more advanced course called EF Core 6 and Domain-Driven Design. While I was forced to put “6” in this course title and defaulted to EF Core 6 for all of the lessons, anywhere that EF Core 7 features or behaviors were different, I called them out in that course.

So there’s no need to shy away from either of these courses or any of the others on the EF Core 6 track  on Pluralsight if you are using EF Core 7.

Follow My Explorations into AWS for .NET Developers

Earlier this year, a friend who is a dev advocate for .NET on AWS reached out to me to see if I had any awareness at all about the support Amazon Web Services has for .NET developers and .NET applications. My answer was a definite no. I’m an Azure fan girl and had never even thought about .NET on AWS. When he started rattling off some of what’s available, APIs, tooling and a dedicated team, I was surprised.

And curious.

So I have spent quite a bit of time sating that curiosity. I’ve written two articles that were published in Code Magazine this summer and recently published a course on Pluralsight. I still love Azure (and all my friends who work on Azure), but I’m glad to have deeper familiarity of other options. This makes me a better developer as well as a better consultant to my clients.

My focus has not been on deep DevOps or comparisons to Azure. I just wanted to see how things work and try it out. And I was definitely impressed.

I did all of the work in Visual Studio on my Windows machine because there is a very feature rich extension called AWS Toolkit for Visual Studio. There are also extension for VS Code, JetBrains’ Rider and other IDEs (not just for .NET). The ones for VS Code and Rider are more focused on serverless apps so they don’t have all of the features of the one for Visual Studio.

Since I’ve already created so much content, I’m not going to reiterate it all here but I wanted to be sure you are aware of the articles and the course and…the fact that there is such a thing as .NET on AWS. Whether, like me, you are curious, or like others, you are a .NET developer who has been tasked to learn about using AWS, I hope you find them interesting. Here’s what I’ve created thus far:

Discovering AWS for .NET Developers
Article, May/June 2020 Code Magazine

This is about first foray. Creating an account, installing the toolkit into Visual Studio, creating a SQL Server database (on AWS), pointing a .NET Core 3.1 App with EF Core to use that database, then (using the AWS toolkit), publishing the application to AWS.

Transform Your ASP.NET Core API into AWS Lambda Functions
Article. July/August 2020 Code Magazine

This is the next foray. I took the application from the first article, transformed it into an AWS serverless application (mostly by adding a few files provided by a project template), then publishing it to AWS. In the end, AWS creates a Lambda serverless function in front of the API, which means you get the benefit of the billing that is only based on calls coming through function. That compares to the cost of having the application running and waiting for requests 24/7. 

Fundamentals of Building .NET Applications on AWS
Pluralsight course, 2.5 hours. Published Aug 7, 2020

The course leans on what I learned through the articles but also allowed me to spend more time explaining and teaching additional information. In the course, I walk through creating an account, installing the toolkit, creating the SQL Server database, publishing the .NET Core/EF Core app and publishing the serverless app. There is an additional lesson which is about publishing the application as docker containers, fully managed by AWS via a service called Fargate. There’s a lot more detail than the articles and I’m really walking you through  step by step from start to end for each task.

I hope you’ll find the articles and course helpful and interesting, especially, if like me, you had no idea all of this support for .NET devs exist from AWS. 

Building C# Project-based Azure Functions in Visual Studio Code

I’ve been using the Azure Functions for Visual Studio Code for some time now and they continue to evolve in great ways. The latest shift threw me for a loop so I thought I would document some of it for those who may not have started yet. I should also state that for the past year or so I have focused on writing my functions with JavaScript just because I like to mix things up a bit and it also makes it easier to share Azure Functions with devs who are not .NET focused.

I’ve also written about creating Azure Functions with VS Code in MSDN Magazine but again, this has changed since I wrote about it. I’ve been using the version 2 APIs for a while so I’m not talking (well, writing) about that change from v1 to v2 here but the change in the experience using the Azure Functions extension.

Also notable is that the Azure Functions team actually recommends using Visual Studio for building C# based apps and VS Code for JavaScript. But I’m so often on my MacBook and love using VS Code so I am going down this path with C# anyway.

Having revisited the docs enough times to finally notice some key information, I realize why the experience has changed with the extension working with C#. Previously, I’d worked with C# script functions (.csx) which is the same as what you use when you work directly in the portal. But the extension templates now drive you to C# project functions and there’s a big difference. C# script functions are more like the javascript functions. They depend on a manually created function.json file to define the bindings and can install the appropriate extension packages based on the bindings. The csx files are compiled at run time. With a C# class library, you develop as you would other C# class libraries – installing the relevant packages and then using attributes to identify methods as Azure Functions as well as trigger, input and output bindings. When you compile the library, the Azure Functions tooling will generate a function.json file for you that gets deployed.

Because I was used to creating functions with JavaScript or the C# script path, the new default for the Azure Function extension that uses C# class libraries instead really threw me for a loop. So I decided to document walking through this workflow as I has to learn it. I think I still prefer the lighter weight C# script (.csx) or JavaScript flow but that might align with my preference in many scenarios for VS Code over Visual Studio.

Preparing Visual Studio Code

So first things first: you’ll need to install the Azure Functions and Azure Account extensions into VS Code, Azure Functions extension relies on the Azure Functions Core Tools. The extension installation instructions will help  you get all that you need and the extension does check for updates and prompt you to update those tools as needed. In fact, I got this prompt last night.2019-01-16_09-28-10.png

With the extensions installed, it is time to create a function app project. You should already have a folder created to house your project and you might as well have it open in VS Code. Mine is named AzureFunctionProj.

Then you can click on the “Create New Project” icon on the function bar (the icons show up when you hover over the bar) to create a new Function App project inside your folder.

2019-01-17_18-11-39.png

This part of the workflow has not changed.

  1. It will ask you to point to a folder and the open folder should be there as a default to select.
  2. It will then have you select a language you’ll use in your app. From the options (C#, JavaScript, Python (still a preview) and Java (also a preview), I’ll choose C#.

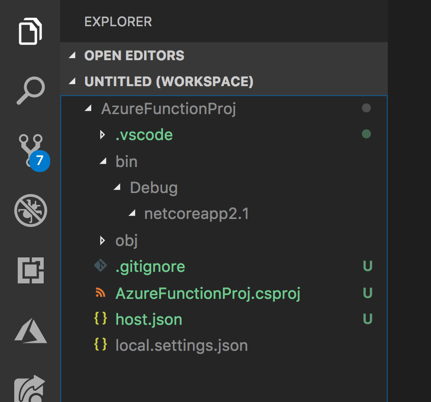
As a result a new .NET Core project will be created using the template and you’ll see the following in the folder explorer:

2019-01-17_18-19-58.png

All of these files inside AzureFunctionProj folder were created by the template. Most importantly the csproj file where I’ve highlighted some of the most relevant settings.

<Project Sdk="Microsoft.NET.Sdk">
  <PropertyGroup>
    <TargetFramework>netcoreapp2.1</TargetFramework>
    <AzureFunctionsVersion>v2</AzureFunctionsVersion>
  </PropertyGroup>
  <ItemGroup>
   <PackageReference Include="Microsoft.NET.Sdk.Functions"
                     Version="1.0.24" />
  </ItemGroup>
  <ItemGroup>
    <None Update="host.json">
      <CopyToOutputDirectory>PreserveNewest</CopyToOutputDirectory>
    </None>
    <None Update="local.settings.json">
     <CopyToOutputDirectory>PreserveNewest</CopyToOutputDirectory>
     <CopyToPublishDirectory>Never</CopyToPublishDirectory>
    </None>
  </ItemGroup>
</Project>

Creating a function in the function app is where things are quite a bit different.

You begin as always with the “add a function” icon2019-01-17_18-11-39 copy.png

The first step is familiar, selecting which folder has the function app that the function should be in:

2019-01-17_22-06-37.png

I’ll choose AzureFunctionProj.

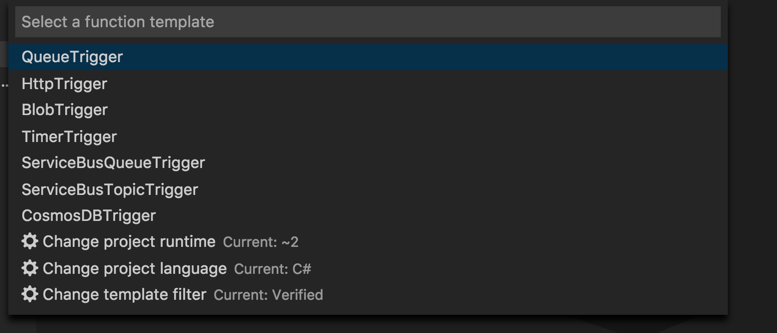
Then there are a number of trigger templates to choose from which is nice but more interesting are the three options at the bottom:

2019-01-17_16-42-25.pngFirst is the project runtime and I definitely want v2 (“~2”). You can use different languages for different functions in the function app. This is showing the default I chose already: C#. And finally, the list of trigger templates is filtered to “Verified”.
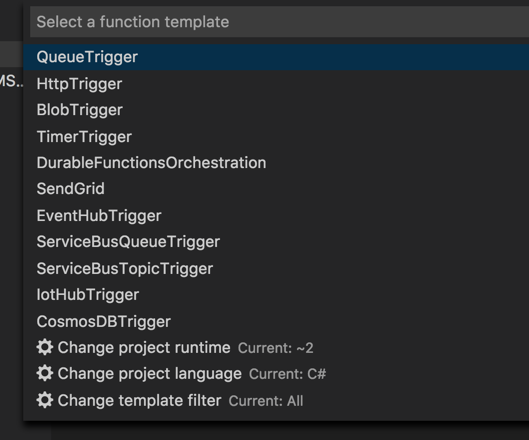
You can change these options by clicking on them.

The filter options are Verified, Core and All. Core and All currently reveal the same list, which includes a few extra preview triggers: DurableFunctionsOrchestration, SendGrid, EventHubTrigger and IotHubTrigger.

2019-01-17_16-43-20.png

Now in the past I was creating JavaScript functions inside my .NET Core Function App but now I am going to continue with C# because this is where things really surprised me. I’ll choose  HttpTrigger and am then prompted to provide a name. I’ll just leave the default: HttpTriggerCSharp. I’m then asked to provide a namespace name for the class that will be created. Default is “Company.Project”. I’ll change it to FunctionTests.HttpTest1. The final bit of info to be collected is that you need to choose the security for the function. Of the options, I will select Anonymous because its a demo and I don’t want to have to deal with credentials.

That’s it. The function is created.

Some More Class Library Project Differences

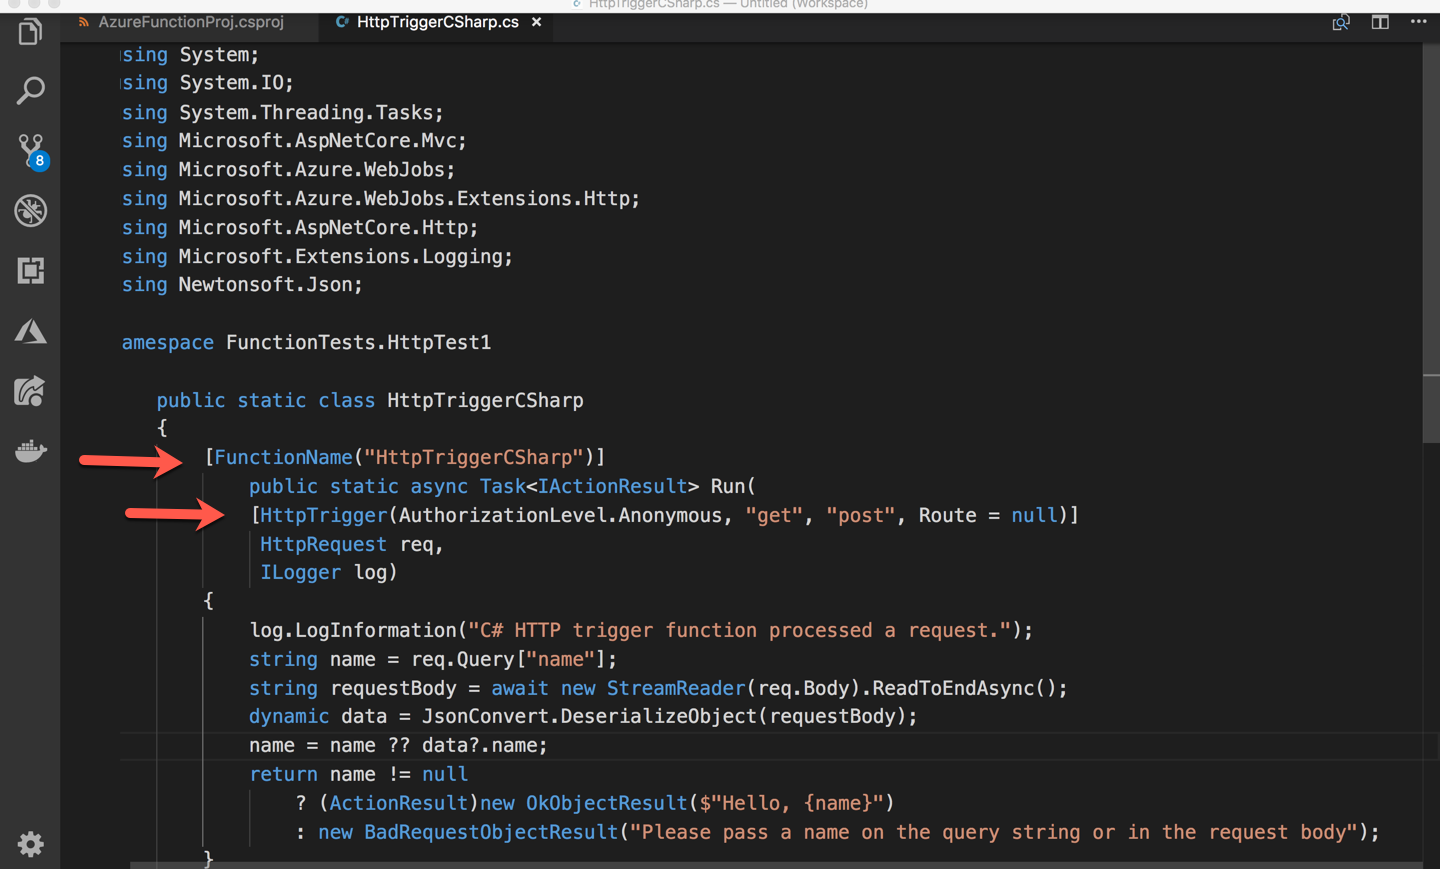
My past experience gave me the expectation that a new folder is created inside the app function folder with the name of the function and inside there, would be a class file for the function and a function.json file to contain the binding configurations. the class file was there (though not in its own folder). But there was no function.json file. Also  interesting and new to me were the FunctionName attribute on the Run method and  the HttpTrigger attribute on the HttpRequest in the Run method’s signature. Also, I’m not used to having all of those using statements when using csx script.2019-01-19_15-16-45.png

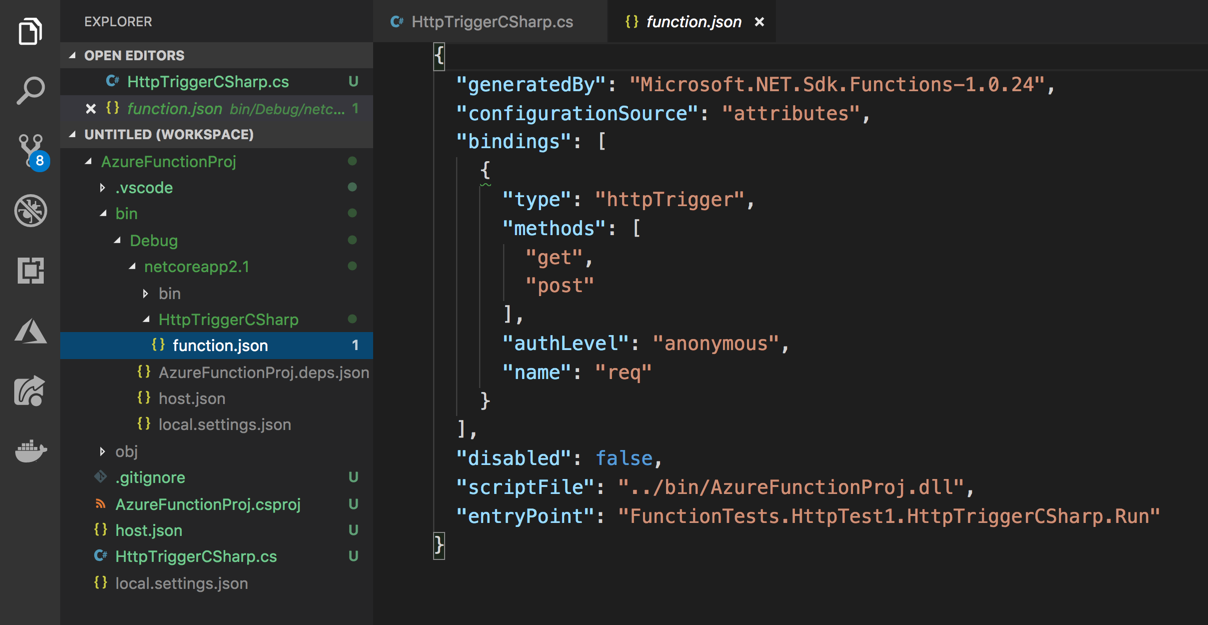
When building the project, .NET Core reads that attribute and builds a function.json that goes in the bin folder for deployment. 2019-01-17_22-38-03.png

But it’s more than just the familiar bindings. Notice the generatedBy , configurationSource , scriptFile and entryPoint tags.

So the first binding, the httpTrigger binding, looks familiar to me. The function will respond to httpTrigger.

You can test out this default either by running or debugging. To run, you can use VS Code’s CTRL-F5 keyboard combo or, if you prefer using the CLI, you use Azure Function CLI command:

func host start

That will run the function and provide a url to try out. The template “stake-in-the-ground” method is written to accept either a query parameter or JSON in the body. I’ll just use a query parameter:

http://localhost:7071/api/HttpTriggerCSharp?name=Julie

And the browser outputs

2019-01-19_15-57-04.png

Adding an Output Binding to
Azure Cosmos DB

What if I wanted to add an output binding? I’m used to doing that by editing function.json. But since I’m on this path of attribute defined bindings, I will add the binding that way. Let’s add an output binding for Azure Cosmos DB. That way this function will respond to an HTTP Request and insert some data into a Cosmos DB database. I already have an Azure Cosmos DB account, so I will define this to target a new collection in a new database in the existing account.

In order to use work with a Azure Cosmos DB binding, I need to add the relevant package to my project. Because I’m building my function using a C# class library, I can just do this as I would for any other Nuget package…by adding it directly to csproj or adding the package with the dotnet core CLI:

But now I’m just writing a C# class library so I can add the package either with the dotnet CLI or just add it manually into .csproj. I’ll use the CLI:

dotnet add package Microsoft.Azure.WebJobs.Extensions.CosmosDB --version 3.0.3

Note that if I were building the function with JavaScript or  C# script, I would need to register the package using the tools CLI (func extensions install -p packagename).

Now the package is in csproj:

<ItemGroup>
  <PackageReference 
    Include="Microsoft.Azure.WebJobs.Extensions.CosmosDb"
    Version="3.0.3"/>
  <PackageReference
    Include="Microsoft.NET.Sdk.Functions"
    Version="1.0.24"/>
</ItemGroup>
After restoring, I can add the output binding. Currently the default function is asynchronous and you can’t add out parameters to an async method. Return values are one option. See https://docs.microsoft.com/en-us/azure/azure-functions/functions-triggers-bindings#using-the-function-return-value for details. ICollector or IAsyncCollector is another (https://docs.microsoft.com/en-us/azure/azure-functions/functions-dotnet-class-library#writing-multiple-output-values).
But I’m going to  just make the Run method synchronous and create an output parameter instead. Like the trigger binding parameter, I’ll need to add an attribute to the output parameter to specify the binding. I’m also supplying parameters for the database and collection names, the name of the setting that has the connection string to the database account and one last setting to ensure the database and collection get created if needed.
[FunctionName("HttpTriggerCSharp")]
public static ActionResult Run(
   [HttpTrigger(AuthorizationLevel.Anonymous, "get", "post",                 Route = null)]
   HttpRequest req,
   [CosmosDB(databaseName: "CSharpDatabase",
             collectionName: "CSharpCollection",
             ConnectionStringSetting = "MyCosmosDBConnection",
             CreateIfNotExists=true)] out dynamic document,
   ILogger log)
I added the MyCosmosDBConnection is defined in the local.settings.json file:
{
  "IsEncrypted": false,
  "Values": {
     "AzureWebJobsStorage": "",
     "FUNCTIONS_WORKER_RUNTIME": "dotnet",
     "MyCosmosDBConnection": "this is where my connection string goes",
   }
}
Note that if you were creating a new function with an Azure Cosmos DB trigger, the tooling would prompt you for all of the relevant database information, include that an attribute in the function code and add them to the function.json.
Now there is just one last puzzle piece. The function expects me to provide a value to the document variable which the binding will then insert into the database. The full class listing is below and in there the single line for populating the document with a Name and Added property is highlighted in red. The function and the binding will do all of the rest.
using System;
using Microsoft.AspNetCore.Mvc;
using Microsoft.Azure.WebJobs;
using Microsoft.Azure.WebJobs.Extensions.Http;
using Microsoft.AspNetCore.Http;
using Microsoft.Extensions.Logging;

namespace FunctionTests.HttpTest1
{
  public static class HttpTriggerCSharp
  {
    [FunctionName("HttpTriggerCSharp")]
    public static ActionResult Run(
      [HttpTrigger(AuthorizationLevel.Anonymous, "get", "post", Route = null)]
      HttpRequest req, 
      [CosmosDB(databaseName: "CSharpDatabase",
                collectionName: "CSharpCollection",
                ConnectionStringSetting = "MyCosmosDBConnection",
                CreateIfNotExists=true)] out dynamic document,   
      ILogger log)
    {
      log.LogInformation("C# HTTP trigger function processed a request.");
      string name = req.Query["name"];
      document=new { Name = name, Added = DateTime.Now };
      return name != null
        ? (ActionResult)new OkObjectResult($"Hello, {name}")
        : new BadRequestObjectResult("Please pass a name on the query string");
     }
  }
}
Based on my previous experience of manually configuring function.json, I expected after building, the function.json in the bin folder to include the CosmosDB output binding information but it didn’t. Again, this is due to the differences between JavaScript/C# script functions and C# library functions.
Within VS Code I can run or debug the function. Debug is F5 or the debug icon. To run, without debugging, you can use CTRL-F5 or  the tools CLI command:
func host start
When using the CLI command, I found in my testing that the version I’m using seems to require me to run dotnet clean first for it to succeed. CTRL-F5 does that step for you . I made a note of this in a pre-existing GitHub issue. You can read that here.
There is a lot of useful info in the official docs. Two that I leaned on are:

First Foray into .NET Core 2.0

I have to start somewhere so I started wtih super baby steps. Downloading the .NET Core 2 nightly build and trying to create a simple console app. Right away I failed miserably. The reason? The nightly builds have already jumped the shark! They are working on 2.1.0 and I accidentally grabbed that. And that was a little too bleeding edge for me.

There is a docker image that you can use quite easily but I wanted to try CLI, VS Code and Visual Studio. Therefore I wanted to just install the bits right on my machine.

What I’ll show you are  my first tests I did on macOS and on Windows 10. I like to do this just to make sure things are actually running properly. Note that on macOS, I just installed this new version directly on my machine where I have other versions of .NET Core. Key is that there is no production work on there dependent on other versions, so I won’t mess up anything important. The versions can live side by side. It’s just that for someone like me who “knows enough to be dangerous”, it’s easy to get tangled up with the versions even though I know tricks like creating a local nuget.config file and also specifying a version in global.json. On Windows, however, I am using a clean VM that has no other versions of .NET on it. That’s the smart way anyway. Although I did try the not smart way of installig it on my machine that already has all kinds of versions of all kinds of frameworks on it and even with my versioning tricks, I could not get 2.0.0 to do a restore or build.

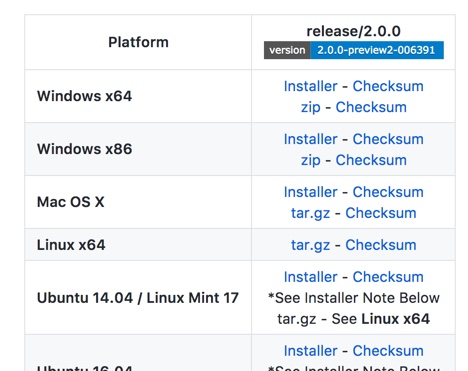
I mentioned above that I originally downloaded the wrong version of the SDK. (Note that the typical SDK install also includes the runtime….so I got the wrong versoins of both. You can read the gory details of that in this GitHub issue which I kept updating as I sorted the problem out.) I want to stick with .NET Core 2.0.0. The installer for that is tucked away in a branch of github.com/dotnet/cli rather than grabbing the absolute latest from the master. Instead go to https://github.com/dotnet/cli/tree/release/2.0.0. There is a solid 2.0.0 version — 2.0.0-preview2-006391. That’s the one I’m using on Windows and macOS.

2017-06-11_12-23-16.jpg

Make Sure NuGet Knows Where to Find Packages

You can update your global NuGet.Config before creating projects. Alternatively, you can create a project and then add a local NuGet.config file to it.

On Mac, the global config file at [user]/.nuget/NuGet. Here s a screenshot if like me, macOS is not your primary platform and you still struggle with these things.

2017-06-11_12-32-15.jpg

In Windows, it’s at %APPDATA%\NuGet\.

I keep a link to the “Configuring NuGet behavior” doc handy for when I forget where to find that.

I added these two keys to my PackageSources section:

<add key="nuget.org" value="https://api.nuget.org/v3/index.json" protocolVersion="3" />

<add key="dotnet-core" value="https://dotnet.myget.org/F/dotnet-core/api/v3/index.json"/>

 Now it’s time to create a project

I’m on the Mac, so, to Terminal we will go.

I’ve created a new folder called EFCore20 – I know this is .NET Core, but eventually I plan to add in EF Core 2.0 as well.
My plan is to create a .NET Core console app (this will rely on netcoreapp2.0) and a library. The libray will be based on the netstandard2.0 library . That means its a library I’ll be able to use from a huge variety of apps, including .NET 4.6.1 based apps. EF Core 2.0 will also rely on .NET Standard 2.0, so any app or API that can consume netstandard, can also consume EF Core 2.0. Read more about that in this EF Core 2.0 announcement on GitHub.

I created one folder for each inside the EFCore20 folder:

netcore2console
netstandard2lib

Then I cd’d into the netcore2console app to create that app with the command:

dotnet new console.
That’s all it takes. This creates a tiny little Hello World app. The dotnet new command will also perform a dotnet restore after creating the files. This is the first moment you will see if things are wokring again. If the restore fails, it will tell you immediately.
This is the message I got when had things misaligned:
Error message: error MSB4236: The SDK ‘Microsoft.NET.Sdk’ specified could not be found.
The “specified” SDK is the currently installed version of whatever SDK you are referencing. In my case, the default for dotnet enw console is “dotnetcore” with the version being whatever version is installed.
Most likely the problem is that  you haven’t provided the correct URI for dotnet to find the proper NuGet packages.
If you don’t want to mess with the global config, you can create a local NuGet.config file in the folder with the app. In it’s entirety, it would look like:
<?xml version="1.0" encoding="utf-8"?>
 <configuration>
  <packageSources>
   <addkey="nuget.org"value="https://api.nuget.org/v3/index.json"protocolVersion="3"/>
   <addkey="dotnet-core"value="https://dotnet.myget.org/F/dotnet-core/api/v3/index.json"/>
  </packageSources>
</configuration>
Even though dotnet new will call restore, I like to call
dotnet restore
explicitly. (Control freak)
If it restored correctly, then the next step for validation is
dotnet build
And hopefully that gives you no errors as well. It shouldn’t.
Finally,
dotnet run
should result in spitting out
Hello World!
And now I know it’s working. Silly little bit but I want to verify this before I waste my time writing a bunh of code that isn’t going to run because I don’t even have .NET Core installed properly.
Another point of interest is what files were created by dotnet new console.
It’s easier to see them if I open them up in Visual Studio Code which I can do by typing
code .
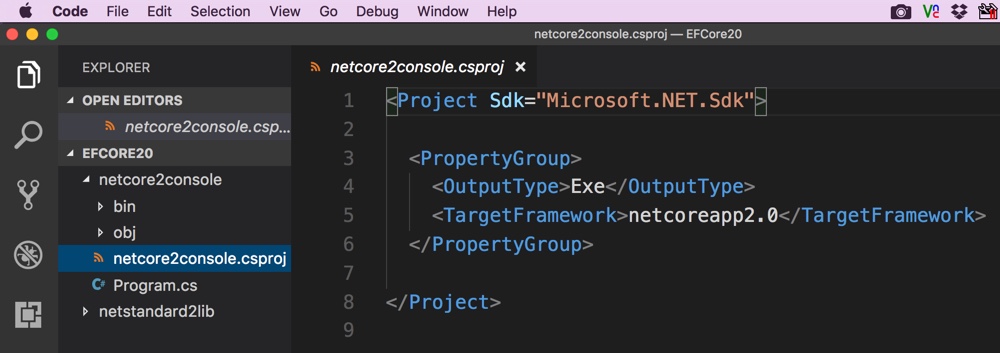
There are only 2 files. The csproj with the project metadata and a program file.  The csproj file says that the target framework is netcoreapp2.0.

2017-06-11_14-09-46

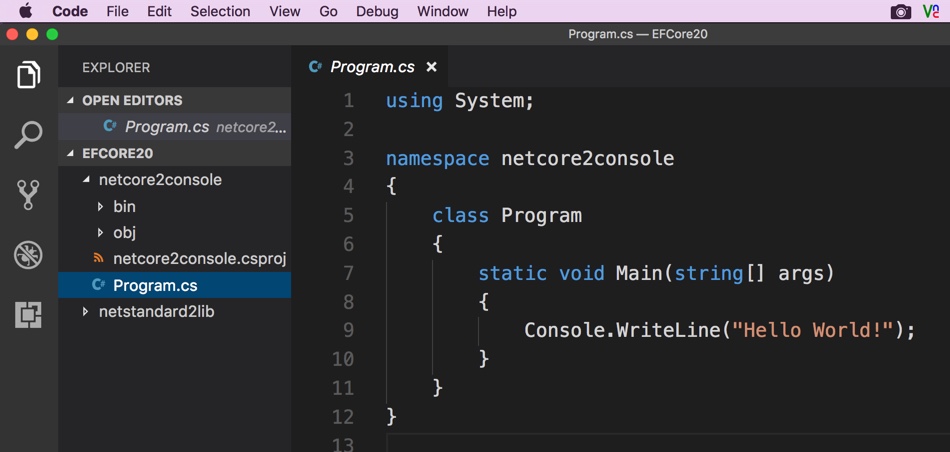
The program file just spits out Hello World when it starts up.
2017-06-11_14-10-17
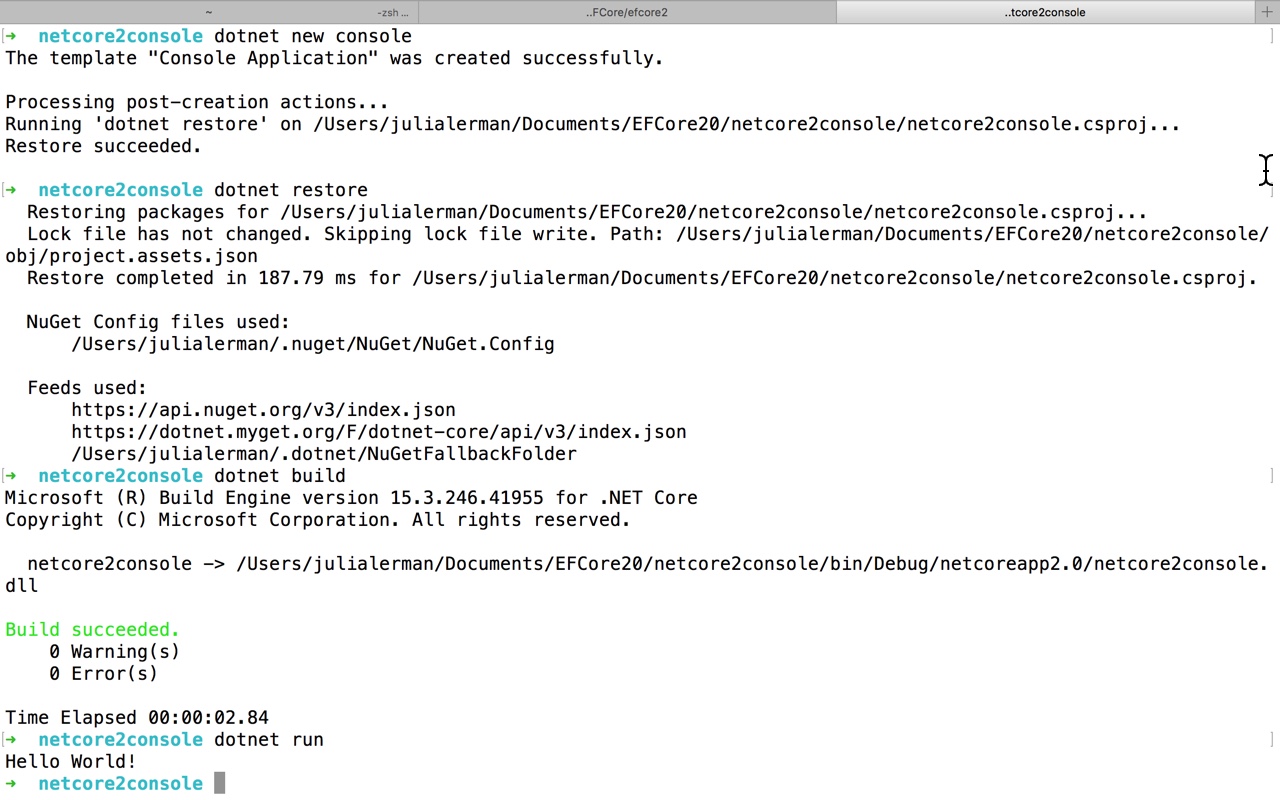
Here is a screenshot of all of the steps at the command line from dotnet new console to the Hello World! output including my extra dotnet restore. Another thing I like about the explicit restore is that it’s showing me more detailed info about the restore.
2017-06-11_14-03-19
Next I want to make sure I can get a .NET Standard library also working.
Still in the terminal (or console or PS if you’re on Windows), I now get into the 2nd sub folder, EF Core2/netstandardlibrary. dotnet new library defaults to using netstandard for the library. So that makes it easy.
dotnet new library
The library is created and the packages it needs are restored.
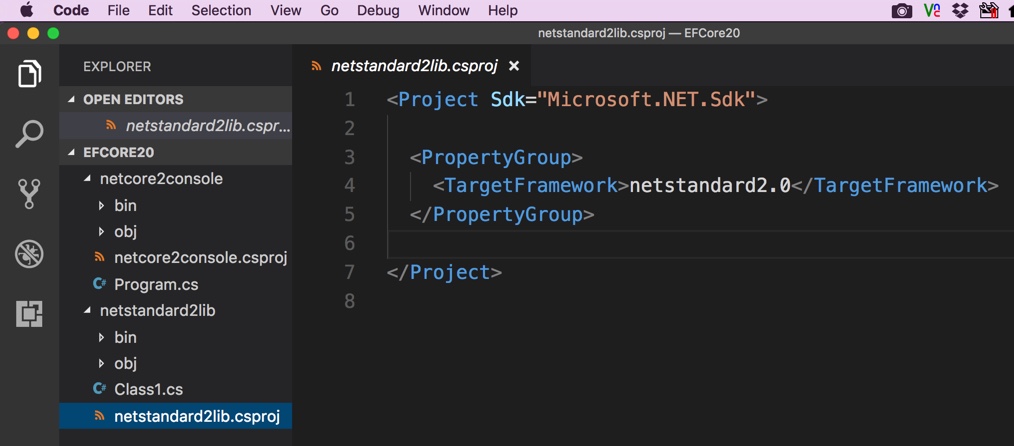
Here are the default contents of this new library, again, shown in VS Code.
Ntice that its csproj says the target framework is netstandard2.0.2017-06-11_14-16-09
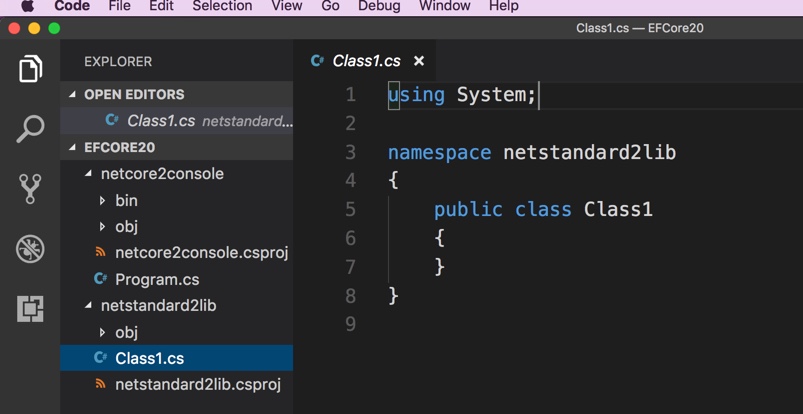
And there’s an empty class file.
2017-06-11_14-18-12
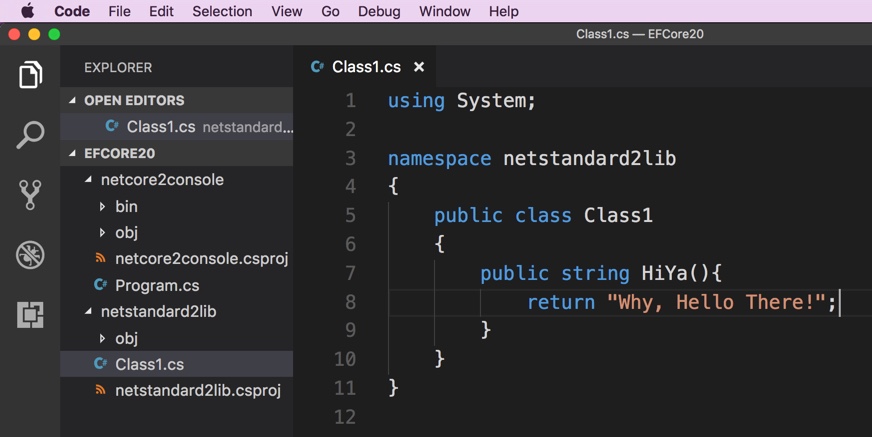
I’ll modify the class to add a public method that returns a string: “Why, Hello There!”.
2017-06-11_14-22-01

Now I’ll go into the csproj for the console app and give it a project reference to the library. The intellisense does not (yet?) help me with this and my memory sucks*, so I head to Nate McMaster’s handy project.json to csproj mind mapper aka Project.json to MSBuild conversion guide to remind myself the syntax of a project reference. I add this below the property group section in the console app’s csproj file


<ItemGroup>
  <ProjectReference Include="..\netstandard2lib\netstandard2lib.csproj"/>
</ItemGroup>
Running dotnet restore and dotnet build again will help identify if you’ve got a typo in there. I often do.
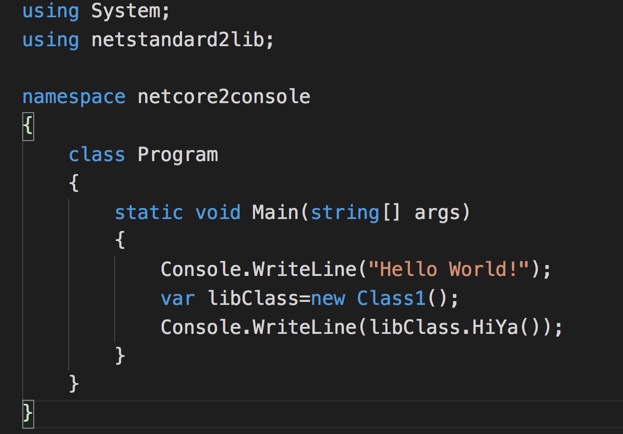
Now I’ll modify the Program.cs file to also call output the resultls of caling the HiYa method from my library:
2017-06-11_14-31-39

And then back out to my terminal window (though I can also do it inside VS Code’s built-in terminal). I dotnet build the library and then change to the console folder. Rebuild that and run it and …voila

  netcore2console dotnet run

Hello World!

Why, Hello There!

  netcore2console

So now I know that .NET Core 2 (preview from a nightly build) is running properly on my machine and that I can create and use a .NET Standard 2.0 library. That means I can go ahead and confidently start creating a .NET Standard 2.0 library to host some EF Core 2.0 logic.

I also repeated this entire thing on my Windows machine. Not only does that let me know I can use this version of .NET Core there, but I will also do some work from within Visual Studio with the .NET Core 2.0 preview.

*(duh, I should just make myself a snippet in VS Code!)

DotNet Core Version Confusion

I see people scratching their heads over this a lot so am dropping it here even though I’m sure it’s stated in many places already.

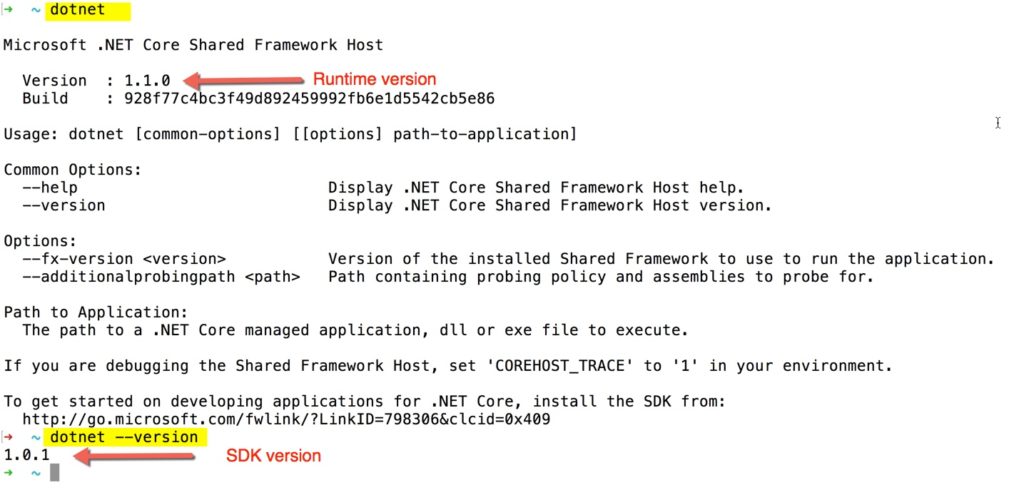
When you are at the dotnet command line (aka the CLI aka Command Line Interface) and type ‘dotnet’ you will be shown the version of the runtime.

When you add the version parameter (‘dotnet –version’) that will return the version of the SDK (aka CLI aka Command Line Interface) that you are working with.

Here’s an example:

If you are confused, you’re not alone. There’s a good discussion/debate on GitHub about how to alleviate this confusion at  What should dotnet –version display?


Changes to EF Core With the RTM of VS2017 and Tools

When Visual Studio 2017 released today a few other things happened that are relevant to Entity Framework Core.

For more on EF Core, watch my EF Core: Getting Started course on Pluralsight.

EF Core Migrations Tools Release

First – something we were prepared for – the .NET Core SDK was also released. The last stable version was 1.0.0-preview2-1-003137. It’s now simply 1.0.0. Along with this, its dependent tooling, including EF Core Tools for PowerShell and dotnet were also released. As the .NET Core support evolved from project.json to msbuild, the EF Core tools split . We have been using 1.0.0-preview4 (for .NET and project.json) and 1.0.0-msbuild3 for msbuild/csproj support.

Now the tool packages are 1.1.0 (Tools) and 1.0.0 (Tools.DotNet)

For PowerShell support: Microsoft.EntityFrameworkCore.Tools 1.1.0
For dotnet CLI support: Microsoft.EntityFrameworkCore.Tools.DotNet 1.0.0

In Visual Studio 2015 (for full .NET projects) and Visual Studio 2017 (shown here, for full .NET or .NET Core projects), the Package Manager will show the RTM versions:

image

Notice that I do not have “Include prerelease” checked.

If using PMC to install, it’s just

install-package Microsoft.EntityFrameworkCore.Tools

That’s for the PowerShell tools, otherwise, add .DotNet to the name.

But notice that you no longer need to add the –pre.

When using the CLI version of the tools, the command

dotnet ef –version

results in

Entity Framework Core .NET Command Line Tools 1.0.0-rtm-10308

Changes to Migrations Commands

As the tools evolved through the previews, some details changed for example, the scaffolding command got smarter.

But one change that is notable is with respect to EF Core in class libraries. You still need to point to an executable project (exe or test) to run most of the commands, but now you can at least just use “dotnet ef” to get the help file without having to set the –startup-project parameter. There are a few other commands that will run without knowledge of the startup project. You can read more about this in this GitHub thread. Check some of the later comments by Brice Lambson as he worked on evolving the commands.

EF Core 1.1.1 – Patch

This was a more subtle part of the release. Even though the 1.1.1 milestone on GitHub had 30 bug fixes that are all closed , there hadn’t been any mention that this was going to get pushed out and the milestone had no target date on it. Though I had my suspicions! Here’s a screenshot I happened to take on March 5.

image

And yes, the newest version of the EF Core packages is now 1.1.1. These are bug fixes …as the increment suggests.  Most of them are edge cases, but regardless, you should definitely update your EF Core packages to ensure you have these latest fixes. If you’re creating new projects, 1.1.1 is what you’ll see available from NuGet.

Note: there was a regression introduced in EF Core 1.1.1 that is targeted to get fixed with the next patch. You can read about this issue here: http://stackoverflow.com/questions/42708522/loading-related-data-aspnet-core-1-1

You can learn much more about EF Core in my EF Core: Getting Started course on Pluralsight.