Tag Archives: vscode

Exploring docker compose watch in Visual Studio Code

Docker’s compose watch feature was first released in Sept 2023 as part of docker compose v 2.22.0 (https://docs.docker.com/compose/release-notes/#2220)

Here are some tips and behaviors to be aware of when using compose watch in Visual Studio Code as well as how they relate to compose up.

While it shouldn’t make a difference, note that I’m using MacOS Monterey, latest VS Code (1.90.2) and latest (official Microsoft) Docker extension for VS Code (v1.29.1).

My app is a tiny dotnet web app using a minimal API. I’ve also performed the same experiments using a more complex app (with a database and FlywayDB containers and using controllers instead of minimal API). In the minimal API,  one of the mapgets is defined in the program.cs file, the other is in a endpoints file and connected using a method to add those to the API. I did this to see if that made a difference in recompiling. More on that further on.

With a combination of “instructions” in your docker-compose file and the watch command, Docker will keep an eye out for code changes in the relevant container(s) that you have specified for watching , then update and rebuild the container on-the-fly. It’s an incredible improvement over having to explicitly take down the container (whether you stop or remove) then spin it up again to try out the changes. And thanks to the efficient caching in docker compose (the v2 compose, not the older docker-compose command) it can do so very quickly. Sounds magical, right?

Container updates? What?

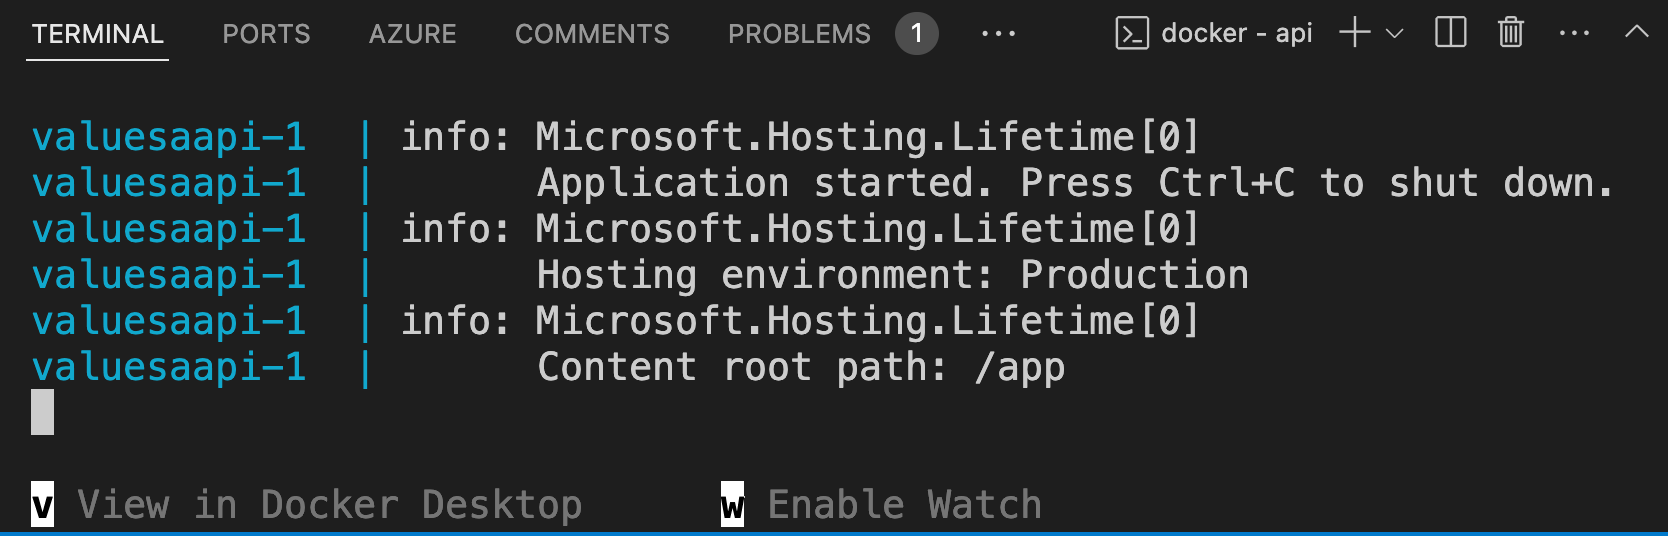
How do I know the container with my app got updated? Two ways. The docker terminal in VS Code outputs all of the rebuild details and  I leave the web page open after calling my API Get the first time and refresh the page after the container is rebuilt to see the new response data.

The Repo

The solution I’m using for testing can be found at https://github.com/julielerman/DockerComposeWatchDemoMinimalAPI.

Setting up docker-compose for watching

The key in the docker-compose file is a service subsection called watch inside the develop section for whichever service (container) you want to be watched. Below is a simple example.

I want watch to update the valuesapi container if I change any of the API code. I’ve added a minimal develop section in my docker-compose.yml file to support that in the API service. You can learn more about the various attributes in the develop specification doc (https://docs.docker.com/compose/compose-file/develop).

    develop:
     watch:
        - action: rebuild
          path: .

Here is the full compose file so you can see where this section sits within the service.

services:
  valuesapi:
    image: ${DOCKER_REGISTRY-}
    build:
      context: .
      dockerfile: Dockerfile
    ports:
      - 5114:5114
    develop:
      watch:
        - action: rebuild
          path: .

Lesson Number One: Control Autosave Settings

I have always had autosave enabled with the “afterDelay” option in Visual Studio Code. And I’ve just allowed the default timing afterDelay at 1000 milliseconds. I quickly learned that AutoSave was a big problem as I was working on some edits and Docker kept updating the container over and over again as I was typing and thinking. Not a favorable situation.

The other options are

  • onFocusChange (when the editor loses focus)
  • onWindowChange (when the window loses focus)
  • off

I initially just completely disabled AutoSave with off, but that is also dangerous since I’m so used to relying on it. Instead I changed the setting to onFocusChange which seemed most reasonable to me. I still find myself needing to explicitly save but expect I’ll get used to it.

How Quickly is the Container Updated?

Before I discuss the docker compose syntax, I do want to give you a sense of how quickly Docker updates a container.

I’m only using the docker compose watch command for the tests in this section.

Obviously, everyone’s performance will be different with respect to their setup so YMMV. But the results should be relative.

To begin with, calling docker compose watch takes no more time than docker compose up.

Keep in mind that a change to my dotnet web app means that dotnet needs to rebuild the app. If it’s just code, that’s simple.

I noticed that the first change I made that triggered Docker to recreate the build and publish image layers.

=> [valuesaapi build 7/7] RUN dotnet build "ValuesTest.csproj" 11.0s
=> [valuesaapi publish 1/1] RUN dotnet publish "ValuesTest.cspro 3.4s

The entire rebuild was 15.2 seconds before the API reflected the change.

Yet on subsequent changes, the rebuild was only 0.5 seconds and those two layers came from the cache.

=> CACHED [valuesaapi build 7/7] RUN dotnet build "ValuesTest.cs 0.0s
=> CACHED [valuesaapi publish 1/1] RUN dotnet publish "ValuesTes 0.0s

I have no idea how this is working (how the change is getting to the container layer) because the change was, indeed, reflected in the output from the API.   I can’t explain this difference but will be asking about it for sure! (Then will come back to edit this post.)

Here is a look at the docker log for the rebuild of the version of the app, where you can see how it reuses most of the cached layers. This was the first rebuild which spent more time on those two layers noted above.

Rebuilding service "valuesaapi" after changes were detected...
[+] Building 15.2s (20/20) FINISHED docker:default
=> [valuesaapi internal] load build definition from Dockerfile 0.0s
=> => transferring dockerfile: 1.25kB 0.0s
=> [valuesaapi internal] load metadata for mcr.microsoft.com/dot 0.3s
=> [valuesaapi internal] load metadata for mcr.microsoft.com/dot 0.2s
=> [valuesaapi internal] load .dockerignore 0.0s
=> => transferring context: 383B 0.0s
=> [valuesaapi build 1/7] FROM mcr.microsoft.com/dotnet/sdk:8.0- 0.0s
=> [valuesaapi internal] load build context 0.0s
=> => transferring context: 1.74kB 0.0s
=> [valuesaapi base 1/4] FROM mcr.microsoft.com/dotnet/aspnet:8. 0.0s
=> CACHED [valuesaapi build 2/7] WORKDIR /src 0.0s
=> CACHED [valuesaapi build 3/7] COPY [API/ValuesTest.csproj, AP 0.0s
=> CACHED [valuesaapi build 4/7] RUN dotnet restore "API/ValuesT 0.0s
=> [valuesaapi build 5/7] COPY . . 0.1s
=> [valuesaapi build 6/7] WORKDIR /src/API 0.1s
=> [valuesaapi build 7/7] RUN dotnet build "ValuesTest.csproj" 11.0s
=> [valuesaapi publish 1/1] RUN dotnet publish "ValuesTest.cspro 3.4s
=> CACHED [valuesaapi base 2/4] WORKDIR /app 0.0s
=> CACHED [valuesaapi base 3/4] RUN apk add --no-cache icu-libs 0.0s
=> CACHED [valuesaapi base 4/4] RUN adduser -u 5678 --disabled-p 0.0s
=> CACHED [valuesaapi final 1/2] WORKDIR /app 0.0s
=> [valuesaapi final 2/2] COPY --from=publish /app/publish . 0.1s
=> [valuesaapi] exporting to image 0.1s
=> => exporting layers 0.1s
=> => writing image sha256:454f1258e665324777310e3df67674407b73e 0.0s
=> => naming to docker.io/library/api 0.0s
service "valuesaapi" successfully built

Also note that the pre-existence of the container may not be relevant. It is all about the build cache. So you may remove the container then run compose watch again and it will spin up very quickly. There are so many factors at play that as many times as you experiment, you may realize slightly different behavior. I have played with this many many times in order to come to a decent comprehension of what is going on (though not quite “how” …I’ll just chalk that up to Docker developer genius for now.)

But what if I do something like introduce a new package in my csproj file? (I’ll let you translate that question to the facets of your chosen coding stack.)

Adding a new Nuget package to the API’s csproj was, as expected, more expensive at about 50 seconds total. Here is the output from that change. Looking at the timing for each step, the bulk was restoring the newly added Nuget package over my SLOW internet! I could have run dotnet restore in advance, of course. Then it also required a rebuild of the project that could not rely on the cache.  That was over 13 seconds and another 3.7 to create the publish image.

Rebuilding service "valuesaapi" after changes were detected...
[+] Building 51.5s (20/20) FINISHED docker:default
=> [valuesaapi internal] load build definition from Dockerfile 0.0s
=> => transferring dockerfile: 1.25kB 0.0s
=> [valuesaapi internal] load metadata for mcr.microsoft.com/dot 0.5s
=> [valuesaapi internal] load .dockerignore 0.0s
=> => transferring context: 383B 0.0s
=> [valuesaapi build 1/7] FROM mcr.microsoft.com/dotnet/sdk:8.0- 0.0s
=> [valuesaapi base 1/4] FROM mcr.microsoft.com/dotnet/aspnet:8. 0.0s
=> [valuesaapi internal] load build context 0.0s
=> => transferring context: 1.47kB 0.0s
=> CACHED [valuesaapi build 2/7] WORKDIR /src 0.0s
=> [valuesaapi build 3/7] COPY [API/ValuesTest.csproj, API/] 0.0s
=> [valuesaapi build 4/7] RUN dotnet restore "API/ValuesTest.cs 32.8s
=> [valuesaapi build 5/7] COPY . . 0.1s
=> [valuesaapi build 6/7] WORKDIR /src/API 0.0s
=> [valuesaapi build 7/7] RUN dotnet build "ValuesTest.csproj" 13.5s
=> [valuesaapi publish 1/1] RUN dotnet publish "ValuesTest.cspro 3.7s
=> CACHED [valuesaapi base 2/4] WORKDIR /app 0.0s
=> CACHED [valuesaapi base 3/4] RUN apk add --no-cache icu-libs 0.0s
=> CACHED [valuesaapi base 4/4] RUN adduser -u 5678 --disabled-p 0.0s
=> CACHED [valuesaapi final 1/2] WORKDIR /app 0.0s
=> [valuesaapi final 2/2] COPY --from=publish /app/publish . 0.2s
=> [valuesaapi] exporting to image 0.3s
=> => exporting layers 0.3s
=> => writing image sha256:a5f16fef8705421b73499f2393cf7e790b958 0.0s
=> => naming to docker.io/library/api 0.0s
service "valuesaapi" successfully built

Removing the Nuget package forced another  expensive restore:

 => [valuesaapi build 4/7] RUN dotnet restore "API/ValuesTest.cs 10.0s

And re-building the layered images took about the same time as before.

=> [valuesaapi build 7/7] RUN dotnet build "ValuesTest.csproj" 11.1s
=> [valuesaapi publish 1/1] RUN dotnet publish "ValuesTest.cspro 3.4s

Lesson Number 2, compose syntax impacts your experience

With the develop/watch section in place in docker-compose, you can then trigger the watch with docker compose in two ways:

docker compose watch or

docker compose up –watch.

But the two ways have different effects and it took me some experimenting to understand the effects. Below I will lay out the various syntaxes for comparison so that you can avoid some of the confusion I encountered as I was learning.

compose up variations 

docker compose up

If you run docker compose up without the –watch flag, the Docker extension will give you the option to watch the source with the w key. If you do that, code changes trigger rebuild and you’ll get an updated API.

The CLI terminal (in my case, zsh) gets replaced with a docker terminal.

All info goes to this terminal including output debug / log info from dotnet.

If you enabled watch, then the rebuild details (as above) will also be displayed in this terminal window.

CTRL-C stops the containers, closes the docker terminal, returns to zsh terminal and prompt. Containers are still there, just stopped, not running.

If you want to remove the containers, you’ll have to use  docker compose down command or by right clicking the container in the docker extension explorer and choosing remove or right clicking the docker-compose file in the explorer and choosing compose down.

docker compose up -d or docker compose up -d watch

If you want Docker to watch, this is not your friend!

Running compose up in interactive mode, that is with the -d (detached) flag, will never work with watch. It won’t activate because Docker releases control back to you and therefore is not able to keep an eye on code changes. If you don’t add the –watch attribute, you will not get the prompt to start watch with the “w” key. If you do add the –watch attribute, watch will simply not activate. But there is no warning and was confused until I realized what was going on. Having learned this the hard way, I hope this will help you avoid the same confusion.

Another detriment to interactive/detached mode with or without the watch is that dotnet debug/log output is not displayed in the terminal. Or in any of the windows. You’ll have to force it to another target in your code.

Why so much focus on detached mode? In the Docker extension, if you right click a compose file and choose compose up from the extension’s context menu, the default command executed includes the -d. You can override those commands in the settings if you want.

In order to stop/remove containers ,you need to use the CLI or the tooling to trigger the CLI command e.g. docker compose down. CTRL-C will not have any effect. 

Using compose watch command instead of compose up command

 docker compose watch

Note there isn’t even a detached option available with watch because it’s totally irrelevant.

The terminal will tell you that watch is enabled when compose is finished spinning up the containers. As we are not interactive, you will not be released to a terminal prompt. Logs and message from the app will display in the Docker terminal as well as notifications from Docker. Code changes trigger rebuild (visible in terminal) and the app gets updated.

CTRL-C closes the Docker terminal and brings you back to a prompt and Docker stops watching. The containers are still running, however. But if you make code changes, they will not be updated because watch was no longer active. Now that the Docker terminal is gone, dotnet logs and other message coming from within the container are NOT output anywhere.

In this state (containers running, watch disabled, docker terminal gone and a recent change made to the code) I ran docker compose watch again from the prompt. Even though the containers were still running, keep in mind that the code change I made wasn’t handled. So the dotnet app had to be rebuilt and the API container updated. The dotnet build command took about 15 seconds and the entire composition was about 20 seconds.

Don’t Overlook compose watch!

After 30+ years coding, I still always tend to fear change in my tools .. worried that it will make me confused and feel stupid. (It usually does for a few minutes ..or perhaps longer…but then you figure it out It and feel like a million bucks!). It took me a long time before I looked at compose watch (with some encouragement) and in my typical fashion I had to try out what happens if I do this?  what happens if I do that? until I had a good idea of how its works and how incredibly useful it is! Don’t be shy…. it is an incredibly useful feature if you are developing with Docker.


New Pluralsight Course: Interacting with SQL Server data in Visual Studio Code on Win, Mac, Linux

imageMy latest course on Pluralsight, Cross-platform SQL Server Management for Developers using VS Code, went live earlier this month (just as I was about to hop on a plane for 2 weeks of conference travel!)

This is a course on a Visual Studio Code extension that I enjoy using so much that I wanted to share it with you. It is the mssql extension which lets you interact with SQL Server in a fairly rich way that belies the lightness of the IDE which it extends. Because VS Code is cross-platform, so are all of its extensions. So you can use this while you are coding on Windows, Mac or Linux and want to do some basic interaction with a SQL Server database.

As SQL Server examples, I used SQL Server LocalDb on Windows, SQL Server for Linux in a Docker container on a Mac and Azure SQL in the cloud. The course starts not only y showing you how to install VS Code (and some VS Code basics) and the extension but also by walking you through how to set up each of the database servers. That means it also has a lesson on Docker , installing and running an image as well as a quick start on creating a new SQL database in the Azure portal.

Once everything is set up, I dig through the features and functionality of the mssql extension. And I turned over ever possible stone to make sure you don’t miss helpful features which is the norm if you just start using such a tool without any preparation.

The course is mostly demos and very light on Powerpoint slides and I do work in Windows, on my Macbook and even in a Linux virtual machine.

imageWhat I’m also proud about this course is that if you’ve never used VS Code before, you’ll learn how to get around this amazing editor. If you’ve never used Docker before, I provide a really helpful and gentle introduction and you’ll be able to work with it. I had some great support from the team responsible for this extension as they were so happy to have this kind of attention paid to it.

So whatever language you code in, whatever O/S you work on, if you are using SQL Server (or interested in using it), this course should be a great help in mastering this very handy extension!

Below is the Table of Contents for the course.

If you need a 30-day free trial to the Pluralsight library so that you can watch this, send me a note!


Module 1: Introducing and Installing VS Code and the mssql Extension

In this module you’ll get a short introduction to the cross-platform and free developer IDE, Visual Studio Code and its mssql extension, The extension allow you to perform some key interactions with a SQL Server database without leaving the IDE. You’ll also walk through installing both the IDE and the extension on Windows and macOS

  • Module and Course Overview
  • Introducing Visual Studio Code and the mssql Extension
  • Installing Visual Studio Code on Windows
  • Installing Visual Studio Code on macOS
  • Introducing Visual Studio Code’s Coding Super Powers
  • Installing the mssql Extension in VS Code


Module 2: Preparing SQL Server for Any Platform, Locally and in the Cloud

In this module, you’ll learn how to set up a variety of SQL Servers. All of them are quick to install. You’ll learn to install SQL Server LocalDb on Windows, create an Azure SQL Database in the cloud and use a Docker image of SQL Server for Linux to quickly spin up SQL Server in a container on macOS. This will ensure that you have a SQL Server database to interact with in the rest of the course.

  • SQL Server LocalDB: The Simplest SQL Server
  • Setting Up an Azure SQL Database in the Cloud
  • Verifying the New Azure SQL Database
  • Setting Up the Last Details of Your Azure SQL Database
  • Using a Docker Container to Host SQL Server for Linux on Any O/S
  • Installing Docker and Getting the SQL Server Container Running
  • Verifying the Containerized Database
  • Understanding Persistence and Lack of Persistence in Containers
  • Pulling a Custom Image with the Sample Database in Place


Module 3: Connecting to the Various SQL Servers From Various Platforms

In this module, you’ll learn the ins and outs of connecting to a variety of local, cloud and containerized SQL Servers with the mssql extension. You’ll learn how to use the commands and shortcuts, how connection profiles and passwords are stored and even how to create a handy shortcut for getting mssql started.

  • mssql’s Commands and Execution Engine
  • Connecting to LocalDB While Learning More About mssql Connections
  • Connecting to Azure SQL from Windows and macOS
  • Demonstrating How mssql Securely Stores Your Passwords
  • Using ADO.NET Connection Strings to Connect
  • Connecting to the Database in the Docker Container
  • Connection Keyboard and Status Bar Shortcuts
  • Creating a Keyboard Shortcut to Start up mssql and Connect

Module 4 : Learning the mssql Basics to Connect, Query and Create

In this module you’ll start interacting with the database, executing queries and commands, and exploring  result sets. You’ll learn about the snippets and also learn about attaching to existing database files and creating new databases from scratch. Most importantly  you’ll learn about the great SQL editor and result view support that the mssql extension brings to you.

  • Attaching an Existing Database File
  • Interacting with the Results of Your First Query
  • The Intelligent Editor Window
  • Using Snippets to Speed Up Command Building
  • Exploring Multiple Result Sets Further
  • Using Snippets to See Database Metadata
  • Creating Databases, Tables and Data

Module 5: Leveraging Advanced Tips & Tricks

This module will dig deeper into mssql and provide tips that take advantage not just of mssql features, but also capabilities of Visual Studio Code to make using mssql easier.

  • Exporting Results to CSV, JSON or Excel
  • Localization of mssql’s Messages
  • Controlling Behavior Through VS Code’s Settings
  • Formatting Code in the Editor Window
  • Results Window Tricks, Shortcuts & Settings
  • Checking Out the Last Few Settings
  • Creating Your Own SQL Snippets in VS Code
  • Looking Ahead to Integrated Authentication on Mac and Linux

Mashup: SQL Server on Linux in Docker on a Mac with Visual Studio Code

I’ve been having a lot of fun with the new mssql extension for Visual Studio Code. I have an article coming in MSDN Magazine and am planning more fun as well. My latest experiment was doing a big mashup taking advantage of the fact that there is now a Linux version of SQL Server. So we are no longer limited to hosting it on Windows or Azure. The most lightweight way to host SQL Server on Linux is in a Docker container. While I am sitting in front of a MacBook typing this I’m by no means working towards abandoning my Windows development or Windows machines. I’m just happy to have more options at my disposal as well as have the ability to share what I am learning work beyond the world of Windows developers.

Containers are not stateful. There are ways around that (I’ll show you below) but I only know enough to be dangerous here. This is a great way to use SQL Server at design time. Using this for production is a totally different story and you need to do a lot more research and soul-searching before using that option.

On the other hand, there are those who do have that particular goal:

I had to go through a number of documents to do this and of course I got stuck even with those resources at my disposal. So I will share the full path of how I got this setup working.

Pre-Requisite

I already have Docker for Mac installed on my MacBook. Here is the installation link if you need to perform that step. Keep in mind that you can’t do this on a VM. I tried as I wanted to repeat this with a clean setup.

Be sure that Docker is set to use at least 4GB of memory.

2017-04-07_13-55-27.jpg

Getting the SQL Server Docker Image

This is what makes the whole thing so easy! Microsoft has created an official docker image with SQL Server for Linux already on it.

In the terminal window, you can pull and install the official image with

 sudo docker pull microsoft/mssql-server-linux

Once it’s installed, the ‘docker images’ command will show you that the image is now available on your machine.

2017-04-07_14-10-55

Although I just installed it today, you can see that the image I’m using — which is the latest version — was created by Microsoft 3 weeks ago.

Spinning Up a Container (or Two) From the Image

Now that Docker is aware of the image, you can create a container from it — which is running instance of the image.

Because we’re on a Mac and awaiting for a “bug” to get fixed, we will actually create two containers.

Depending on your familiarity with Docker, you may or may not be aware that containers are not stateful. Once you delete a container, it’s all gone! If you have persisted data in that container, it, too, is all gone. However, Docker has a feature called “Volumes” which are a way to retain state between docker instances. So when one instance is shut down, the state is stored in a Volume. When another container instance is spun up, that volume provides the container with the state from the previous instance. This is how it’s possible to use containers for databases.

Here’s a great tutorial on volumes: https://rominirani.com/docker-tutorial-series-part-7-data-volumes-93073a1b5b72
And the official docker doc:  https://docs.docker.com/engine/tutorials/dockervolumes/#/creating-and-mounting-a-data-volume-container

However there’s an issue (which looks like the resolution is around the corner) with Docker on Mac hosting the sql-server-linux image. This prevents us from using a volume for persistence in the simple way. So instead, we’ll create a separate container that is a “data volume container”, then we will point the container that will run SQL Server to the data volume container.

Creating the volume container

I’ll name mine mssqldata. Here’s the command to create it. (Don’t miss the full length of the command!)

docker create -v /var/opt/mssql --name mssqldata  microsoft/mssql-server-linux /bin/true

This volume container still uses the image as its base. But we won’t be running SQL Server from this instance.

Creating the SQL Server container

Now you can create an container where you will run SQL Server and that container will use the data volume container for the persisted data.

docker run -e 'ACCEPT_EULA=Y' -e 'SA_PASSWORD=Passw0rd' -p 1433:1433 --volumes-from mssqldata -d --name sql-server microsoft/mssql-server-linux

The two environment variables (accept_eula and sa_password) are required. The userid is (gulp) ‘sa’. The password requirements are: “At least 8 characters including uppercase, lowercase letters, base-10 digits and/or non-alphanumeric symbols.”. Mine’s really fancy!

Once these exist,

docker ps

will only show you the regular container. The volume container is hidden so you need

docker ps -a

to see it.

2017-04-07_16-07-49.jpgNotice that the container I will run SQL Server on is on a port whereas the data volume container has a different status “Created”, and is not exposed on a port.

Test the Connection From the SQL Command Line

You don’t have to do this but it made me happy and it was fun. Did you know that you can interact with SQL Server from the command line? The tools are installed inside the container but that’s a messy way to use them. It’s easier to just install them on your computer directly. The command lines tools for Mac are sql-cli.

Note: On May 16th, Microsoft released the macOS version of sqlcmd and bcp (bulk copy). Good to know if you are already familiar with sqlcmd. Here’s their blog post with more details.

You can install that with:

npm install -g sql-cli

Start it up with the mssql command.

To minimum you need connect is to identify the server (which is at localhost by default, you don’t need to specify the port) and the password. It will presume sa for userid.

mssql -s localhost -p Passw0rd

If it’s successful, you’ll get some information followed by a new prompt, mssql.

Connecting to localhost...done

sql-cli version 0.4.14
Enter ".help" for usage hints.
mssql> 

 Enough of that. Now I get to use my new favorite tool. The mssql extension in Visual Studio Code.

Connect in Visual Studio Code

Once you have mssql installed in VS Code, you can begin by creating a new sql file. Either via the commands (F1 for the command pallete, MS SQL to see the commands and then New Query. This will prompt you for a connection – one parameter at a time. YOu can also start with the MS SQL Connect command (⇧⌘C). The extension will prompt you for each parameter.

Server name:  localhost
Database name: (enter)
User name: sa
Password: Passw0rd
Save Password (yes or no)
Profile name: [your choice]

If you enter everything correctly, not only will it connect, but the details will get stored as a connection profile in the VS Code settings and be available for subsequent connections.

You can see the connection status as it is connecting and then when connected in the lower right hand corner of the IDE.

2017-04-07_18-19-37.jpg

In the SQL file open in the editor, you can type SQL and see some existing snippets as well as get help from Intellisense whicih has read the schema of the data on the server. So far there’s not much.

Selecting the  sqlListDatabases snippet and then executing it (right click for Execute Query on the context menu or ⇧⌘E) displays the databases:

2017-04-07_18-22-45.jpg

Now you can use TSQL to create databases, database objects, query data. In the results pane you will see data as a grid similar to what you might see in SSMS. You can also export results to CSV or JSON. I’ve recently written an article about all of the cool things you can do with mssql which will be in teh June 2017 MSDN Magazine. But that connects to a SQL Azure database. In the meantime you can just go to the docs for the extension (aka.ms/mssql-marketplace).

Creating a Database and a Table

I let some more snippets help me to create a database and a table.

The first was the sqlCreateDatabase where I changed the snippet’s database name placholder to create a new database called LinuxReally then executed that with ⇧⌘E.

Re-running the select name from sys.databases command showed that the new database was now in the list.

Next I leveraged the sqlCreateTable snippet to help me create a new table. I named teh table DatabasesIKnow and gave it three columns

CREATE TABLE dbo.DatabasesIKnow
(
  Id INT NOT NULL PRIMARY KEY, -- primary key column
  DatabaseName [NVARCHAR](50) NOT NULL,
  KnowIt [Bit]
);

For some reason, the intellisense cache did not automatically refresh when I created this. Possibly becuse it was a new database. Even the mssql extension’s Refresh Intellisense Cache command did not kick it in. I got it working by disconnecting and reconnecting this time choosing the LinuxReally database rather than letting the extension connect to master by default. When I did that, I could see the message “Updating Intellisense…” in the status bar. After I had done this, the intellisense did auto refresh any time I modified the database schema.

Once i had the new database, I could execute “select * from dbo.DatabasesIKnow” and see the proper results. In my case, since I haven’t added data, there were no rows. But clearly it was reading from my table.

2017-04-08_09-04-55.jpg

Taking Down the sql-server Container

Now come the big docker volume tests. I first disconnected from the database inside of VS Code with⇧⌘E. Then I stopped and removed the sql-server container with the two commands:

docker stop sql-server
docker rm sql-server

But I left the data volume container (mssqldata) running.

I then created a new container instance using the same command as earlier:

docker run -e 'ACCEPT_EULA=Y' -e 'SA_PASSWORD=Passw0rd' -p 1433:1433 --volumes-from mssqldata -d --name sql-server microsoft/mssql-server-linux

In VS Code, I think reconnect to the server and my new database which was easy since it had been stored in the connection profiles . It’s the first one, localhost: LinuxReally.

2017-04-08_09-11-50.jpg

The connection was successful and listing databases showed my new DatabasesIKnow database . Select * from that database showed the schema. So my database was persisted in the data volume container even though I had killed and recreated the sql server container.

Next test: take down both containers.

Now it was time to see what happens when I stop and remove both containers!

docker stop sql-server
docker rm sql-server 
docker stop mssqldata
docker rm mssqldata

Next I use the same command I used previously to restart the sql-server container with the parameter to use the (not running) mssqldata volume container.

docker run -e 'ACCEPT_EULA=Y' -e 'SA_PASSWORD=Passw0rd' -p 1433:1433 --volumes-from mssqldata -d --name sql-server microsoft/mssql-server-linux

That fails. I need to first run the data volume container. Unfortunately, I re-ran the create command for that and overwrote the existing container, so all was lost. GOOD LESSON THERE! 🙂

So I started from scratch. In the brand new data volume container I recreated my database and table.

After more experiments, I realized that I had misunderstood the Docker documentation on volumes. You can create copies of data volume containers and remove those. But you need to be more of a docker ninja. While you can make all kinds of copies of the container, once you RM all of the related volumes, it is gone gone. This blog post does clarify some of the info I was still confused about wrt creating/backing up/restoring data volume containers: tricksofthetrades.net/2016/03/14/docker-data-volumes/.

So the bottom line is you need to leave the Data Volume Container running in some format (the original or some flavor of copy). (I’m still finding it hard to believe that it doesn’t somehow get stored as a file you can re-run so I will update this as soon as someone corrects me!)

Windows, Mac, Linux, Azure and Anwhere You Can Host a Docker Container

And if you think this is only somehting to do on OS X (because that’s where I’m doing it) .. no no no! Did you know there is now Docker for Windows? And that VS Code is cross platform? This is such a great way to quickly get SQL Server up and running in your development environment.

2017-04-08_10-49-59.jpg

And as I said on twitter, comparing the experience of pulling the docker image and spinning up a container to the experience of installing SQL Server  on windows is something like this:

EF Core, Postgres and the Camel-Cased Identity Tables

PostgreSQL doesn’t really like camel-case too much. I’m no expert but I know that at least.

I was doing yet another exploration of  EF Core in Visual Studio Code on my MacBook. Usually I use JetBrain’s DataGrip (database IDE) to check out the actual data. But this time I wanted to play with  the Visual Studio Code extension called “vscode-database” which lets you interact with MySQL and PostgreSQL right in the IDE.

There are a bunch of database extensions in fact:

image

I’ve already been using the mssql extension to muck about with SQL Server data inside of VS Code:

As I was using a default web app from the template, ASP.NET Identity was involved and the context to manage identity inherits from Microsoft.AspNetCore.Identity.EntityFrameworkCore.IdentityDbContext

And IdentityDbContext has fluent API code to explicitly map table names which are not the same as the entity’s they are mapping. And it makes those names all camel-cased.

DataGrip did not mind the camel cased identity table names but vscode-database didn’t comprehend the table names when it was reading the database to build Intellisense for the tooling. It’s anticipating lowercase and throwing exceptions when it hits the camelcased names. Shay Rojansky, who maintains the npgsql PostgreSQL providers for EF & EF Core, explained to me that if the tool simply placed quotes around the names, it would be okay.

Update: The vscode-database maintainers have fixed the problem and you can now easily use the identity tables …just remember to put quotes around the camel-cased database objects when typing SQL. Although right now the installer hasn’t been updated with the new bits yet. I just fixed up the extension files manually for the time being.

If you prefer not to have to do that and do want the identity tables etc to be all lower case, then you may still find my hack to be useful.

For a temporary workaround,  I wanted to just change them to lower case so I could reap the benefits of vscode-database extension.

Since the IdentityDbContext class creates the table names in its OnModelCreating override, I needed to change those names to lower case after the fact.

It’s easy enough to do if you know the right path through the APIs.

Here’s my DbContext class that handles Identity in my ASP.NET Core app. I’ve added the foreach clause to lower case the name after the base class (IdentityDbContext) has already changed the names.

I’m grabbing the ToTable name that was specified by ApplicationDbContext and then re-applying the name as lower case.

using Microsoft.AspNetCore.Identity.EntityFrameworkCore;
using Microsoft.EntityFrameworkCore;
using WebApplication.Models;

namespace WebApplication.Data {

  public class ApplicationDbContext : IdentityDbContext<ApplicationUser>
  {
    public ApplicationDbContext(DbContextOptions<ApplicationDbContext> options)
        : base(options) {
    }

    protected override void OnModelCreating(ModelBuilder builder) {
      base.OnModelCreating(builder);
      // Customize the ASP.NET Identity model and override the defaults if needed.
      // For example, you can rename the ASP.NET Identity table names and more.
      // Add your customizations after calling base.OnModelCreating(builder);
      //quick and dirty takes care of my entities not all scenarios
      foreach (var entity in builder.Model.GetEntityTypes()) {
        var currentTableName = builder.Entity(entity.Name).Metadata.Relational().TableName;
        builder.Entity(entity.Name).ToTable(currentTableName.ToLower());
      }
    }
  }
}

vscode-database has some cool features with Intellisense. It has some UX issues to work on (or maybe I need some training and I’ll raise an issue just in case) but it’s free and let’s you execute queries and commands on the database for those times you don’t need the bells and whistles of a full IDE .

Visual Studio Code Snippets to Make Coding EF Core a Little Simpler

I’ve been using the user snippet feature of Visual Studio Code to make it easier to get some of the code I commonly use for EF Core into my files. For example I have C# snippets for DbContext to create a constructor overload that takes in a DbContextOptions parameter, OnConfiguring or OnModeling . I have json snippets to add in the EFCore Commands dependency and the Tools section with EF Core tools.

github.com/julielerman/EFCoreSnippetsForVSCode

I finally created a github repository to share them. Since you’ll need to add the csharp snippets into your existing csharp snippets and the same with the json, i have put them into separate csharp.json and json.json files from which you can copy and past my snippets into your own.

Although the instructions are on the user defined snippets page I just linked to, the TL;DR is:

From menu, choose Code, Preferences then User Snippets

2016-10-30_11-56-58

That will open a list of snippet files. Choose C# for the C# snippets and Json for the Json snippets. Paste in my snippets!

2016-10-30_11-57-25