All posts by Julie Lerman

Exploring docker compose watch in Visual Studio Code

Docker’s compose watch feature was first released in Sept 2023 as part of docker compose v 2.22.0 (https://docs.docker.com/compose/release-notes/#2220)

Here are some tips and behaviors to be aware of when using compose watch in Visual Studio Code as well as how they relate to compose up.

While it shouldn’t make a difference, note that I’m using MacOS Monterey, latest VS Code (1.90.2) and latest (official Microsoft) Docker extension for VS Code (v1.29.1).

My app is a tiny dotnet web app using a minimal API. I’ve also performed the same experiments using a more complex app (with a database and FlywayDB containers and using controllers instead of minimal API). In the minimal API,  one of the mapgets is defined in the program.cs file, the other is in a endpoints file and connected using a method to add those to the API. I did this to see if that made a difference in recompiling. More on that further on.

With a combination of “instructions” in your docker-compose file and the watch command, Docker will keep an eye out for code changes in the relevant container(s) that you have specified for watching , then update and rebuild the container on-the-fly. It’s an incredible improvement over having to explicitly take down the container (whether you stop or remove) then spin it up again to try out the changes. And thanks to the efficient caching in docker compose (the v2 compose, not the older docker-compose command) it can do so very quickly. Sounds magical, right?

Container updates? What?

How do I know the container with my app got updated? Two ways. The docker terminal in VS Code outputs all of the rebuild details and  I leave the web page open after calling my API Get the first time and refresh the page after the container is rebuilt to see the new response data.

The Repo

The solution I’m using for testing can be found at https://github.com/julielerman/DockerComposeWatchDemoMinimalAPI.

Setting up docker-compose for watching

The key in the docker-compose file is a service subsection called watch inside the develop section for whichever service (container) you want to be watched. Below is a simple example.

I want watch to update the valuesapi container if I change any of the API code. I’ve added a minimal develop section in my docker-compose.yml file to support that in the API service. You can learn more about the various attributes in the develop specification doc (https://docs.docker.com/compose/compose-file/develop).

    develop:
     watch:
        - action: rebuild
          path: .

Here is the full compose file so you can see where this section sits within the service.

services:
  valuesapi:
    image: ${DOCKER_REGISTRY-}
    build:
      context: .
      dockerfile: Dockerfile
    ports:
      - 5114:5114
    develop:
      watch:
        - action: rebuild
          path: .

Lesson Number One: Control Autosave Settings

I have always had autosave enabled with the “afterDelay” option in Visual Studio Code. And I’ve just allowed the default timing afterDelay at 1000 milliseconds. I quickly learned that AutoSave was a big problem as I was working on some edits and Docker kept updating the container over and over again as I was typing and thinking. Not a favorable situation.

The other options are

  • onFocusChange (when the editor loses focus)
  • onWindowChange (when the window loses focus)
  • off

I initially just completely disabled AutoSave with off, but that is also dangerous since I’m so used to relying on it. Instead I changed the setting to onFocusChange which seemed most reasonable to me. I still find myself needing to explicitly save but expect I’ll get used to it.

How Quickly is the Container Updated?

Before I discuss the docker compose syntax, I do want to give you a sense of how quickly Docker updates a container.

I’m only using the docker compose watch command for the tests in this section.

Obviously, everyone’s performance will be different with respect to their setup so YMMV. But the results should be relative.

To begin with, calling docker compose watch takes no more time than docker compose up.

Keep in mind that a change to my dotnet web app means that dotnet needs to rebuild the app. If it’s just code, that’s simple.

I noticed that the first change I made that triggered Docker to recreate the build and publish image layers.

=> [valuesaapi build 7/7] RUN dotnet build "ValuesTest.csproj" 11.0s
=> [valuesaapi publish 1/1] RUN dotnet publish "ValuesTest.cspro 3.4s

The entire rebuild was 15.2 seconds before the API reflected the change.

Yet on subsequent changes, the rebuild was only 0.5 seconds and those two layers came from the cache.

=> CACHED [valuesaapi build 7/7] RUN dotnet build "ValuesTest.cs 0.0s
=> CACHED [valuesaapi publish 1/1] RUN dotnet publish "ValuesTes 0.0s

I have no idea how this is working (how the change is getting to the container layer) because the change was, indeed, reflected in the output from the API.   I can’t explain this difference but will be asking about it for sure! (Then will come back to edit this post.)

Here is a look at the docker log for the rebuild of the version of the app, where you can see how it reuses most of the cached layers. This was the first rebuild which spent more time on those two layers noted above.

Rebuilding service "valuesaapi" after changes were detected...
[+] Building 15.2s (20/20) FINISHED docker:default
=> [valuesaapi internal] load build definition from Dockerfile 0.0s
=> => transferring dockerfile: 1.25kB 0.0s
=> [valuesaapi internal] load metadata for mcr.microsoft.com/dot 0.3s
=> [valuesaapi internal] load metadata for mcr.microsoft.com/dot 0.2s
=> [valuesaapi internal] load .dockerignore 0.0s
=> => transferring context: 383B 0.0s
=> [valuesaapi build 1/7] FROM mcr.microsoft.com/dotnet/sdk:8.0- 0.0s
=> [valuesaapi internal] load build context 0.0s
=> => transferring context: 1.74kB 0.0s
=> [valuesaapi base 1/4] FROM mcr.microsoft.com/dotnet/aspnet:8. 0.0s
=> CACHED [valuesaapi build 2/7] WORKDIR /src 0.0s
=> CACHED [valuesaapi build 3/7] COPY [API/ValuesTest.csproj, AP 0.0s
=> CACHED [valuesaapi build 4/7] RUN dotnet restore "API/ValuesT 0.0s
=> [valuesaapi build 5/7] COPY . . 0.1s
=> [valuesaapi build 6/7] WORKDIR /src/API 0.1s
=> [valuesaapi build 7/7] RUN dotnet build "ValuesTest.csproj" 11.0s
=> [valuesaapi publish 1/1] RUN dotnet publish "ValuesTest.cspro 3.4s
=> CACHED [valuesaapi base 2/4] WORKDIR /app 0.0s
=> CACHED [valuesaapi base 3/4] RUN apk add --no-cache icu-libs 0.0s
=> CACHED [valuesaapi base 4/4] RUN adduser -u 5678 --disabled-p 0.0s
=> CACHED [valuesaapi final 1/2] WORKDIR /app 0.0s
=> [valuesaapi final 2/2] COPY --from=publish /app/publish . 0.1s
=> [valuesaapi] exporting to image 0.1s
=> => exporting layers 0.1s
=> => writing image sha256:454f1258e665324777310e3df67674407b73e 0.0s
=> => naming to docker.io/library/api 0.0s
service "valuesaapi" successfully built

Also note that the pre-existence of the container may not be relevant. It is all about the build cache. So you may remove the container then run compose watch again and it will spin up very quickly. There are so many factors at play that as many times as you experiment, you may realize slightly different behavior. I have played with this many many times in order to come to a decent comprehension of what is going on (though not quite “how” …I’ll just chalk that up to Docker developer genius for now.)

But what if I do something like introduce a new package in my csproj file? (I’ll let you translate that question to the facets of your chosen coding stack.)

Adding a new Nuget package to the API’s csproj was, as expected, more expensive at about 50 seconds total. Here is the output from that change. Looking at the timing for each step, the bulk was restoring the newly added Nuget package over my SLOW internet! I could have run dotnet restore in advance, of course. Then it also required a rebuild of the project that could not rely on the cache.  That was over 13 seconds and another 3.7 to create the publish image.

Rebuilding service "valuesaapi" after changes were detected...
[+] Building 51.5s (20/20) FINISHED docker:default
=> [valuesaapi internal] load build definition from Dockerfile 0.0s
=> => transferring dockerfile: 1.25kB 0.0s
=> [valuesaapi internal] load metadata for mcr.microsoft.com/dot 0.5s
=> [valuesaapi internal] load .dockerignore 0.0s
=> => transferring context: 383B 0.0s
=> [valuesaapi build 1/7] FROM mcr.microsoft.com/dotnet/sdk:8.0- 0.0s
=> [valuesaapi base 1/4] FROM mcr.microsoft.com/dotnet/aspnet:8. 0.0s
=> [valuesaapi internal] load build context 0.0s
=> => transferring context: 1.47kB 0.0s
=> CACHED [valuesaapi build 2/7] WORKDIR /src 0.0s
=> [valuesaapi build 3/7] COPY [API/ValuesTest.csproj, API/] 0.0s
=> [valuesaapi build 4/7] RUN dotnet restore "API/ValuesTest.cs 32.8s
=> [valuesaapi build 5/7] COPY . . 0.1s
=> [valuesaapi build 6/7] WORKDIR /src/API 0.0s
=> [valuesaapi build 7/7] RUN dotnet build "ValuesTest.csproj" 13.5s
=> [valuesaapi publish 1/1] RUN dotnet publish "ValuesTest.cspro 3.7s
=> CACHED [valuesaapi base 2/4] WORKDIR /app 0.0s
=> CACHED [valuesaapi base 3/4] RUN apk add --no-cache icu-libs 0.0s
=> CACHED [valuesaapi base 4/4] RUN adduser -u 5678 --disabled-p 0.0s
=> CACHED [valuesaapi final 1/2] WORKDIR /app 0.0s
=> [valuesaapi final 2/2] COPY --from=publish /app/publish . 0.2s
=> [valuesaapi] exporting to image 0.3s
=> => exporting layers 0.3s
=> => writing image sha256:a5f16fef8705421b73499f2393cf7e790b958 0.0s
=> => naming to docker.io/library/api 0.0s
service "valuesaapi" successfully built

Removing the Nuget package forced another  expensive restore:

 => [valuesaapi build 4/7] RUN dotnet restore "API/ValuesTest.cs 10.0s

And re-building the layered images took about the same time as before.

=> [valuesaapi build 7/7] RUN dotnet build "ValuesTest.csproj" 11.1s
=> [valuesaapi publish 1/1] RUN dotnet publish "ValuesTest.cspro 3.4s

Lesson Number 2, compose syntax impacts your experience

With the develop/watch section in place in docker-compose, you can then trigger the watch with docker compose in two ways:

docker compose watch or

docker compose up –watch.

But the two ways have different effects and it took me some experimenting to understand the effects. Below I will lay out the various syntaxes for comparison so that you can avoid some of the confusion I encountered as I was learning.

compose up variations 

docker compose up

If you run docker compose up without the –watch flag, the Docker extension will give you the option to watch the source with the w key. If you do that, code changes trigger rebuild and you’ll get an updated API.

The CLI terminal (in my case, zsh) gets replaced with a docker terminal.

All info goes to this terminal including output debug / log info from dotnet.

If you enabled watch, then the rebuild details (as above) will also be displayed in this terminal window.

CTRL-C stops the containers, closes the docker terminal, returns to zsh terminal and prompt. Containers are still there, just stopped, not running.

If you want to remove the containers, you’ll have to use  docker compose down command or by right clicking the container in the docker extension explorer and choosing remove or right clicking the docker-compose file in the explorer and choosing compose down.

docker compose up -d or docker compose up -d watch

If you want Docker to watch, this is not your friend!

Running compose up in interactive mode, that is with the -d (detached) flag, will never work with watch. It won’t activate because Docker releases control back to you and therefore is not able to keep an eye on code changes. If you don’t add the –watch attribute, you will not get the prompt to start watch with the “w” key. If you do add the –watch attribute, watch will simply not activate. But there is no warning and was confused until I realized what was going on. Having learned this the hard way, I hope this will help you avoid the same confusion.

Another detriment to interactive/detached mode with or without the watch is that dotnet debug/log output is not displayed in the terminal. Or in any of the windows. You’ll have to force it to another target in your code.

Why so much focus on detached mode? In the Docker extension, if you right click a compose file and choose compose up from the extension’s context menu, the default command executed includes the -d. You can override those commands in the settings if you want.

In order to stop/remove containers ,you need to use the CLI or the tooling to trigger the CLI command e.g. docker compose down. CTRL-C will not have any effect. 

Using compose watch command instead of compose up command

 docker compose watch

Note there isn’t even a detached option available with watch because it’s totally irrelevant.

The terminal will tell you that watch is enabled when compose is finished spinning up the containers. As we are not interactive, you will not be released to a terminal prompt. Logs and message from the app will display in the Docker terminal as well as notifications from Docker. Code changes trigger rebuild (visible in terminal) and the app gets updated.

CTRL-C closes the Docker terminal and brings you back to a prompt and Docker stops watching. The containers are still running, however. But if you make code changes, they will not be updated because watch was no longer active. Now that the Docker terminal is gone, dotnet logs and other message coming from within the container are NOT output anywhere.

In this state (containers running, watch disabled, docker terminal gone and a recent change made to the code) I ran docker compose watch again from the prompt. Even though the containers were still running, keep in mind that the code change I made wasn’t handled. So the dotnet app had to be rebuilt and the API container updated. The dotnet build command took about 15 seconds and the entire composition was about 20 seconds.

Don’t Overlook compose watch!

After 30+ years coding, I still always tend to fear change in my tools .. worried that it will make me confused and feel stupid. (It usually does for a few minutes ..or perhaps longer…but then you figure it out It and feel like a million bucks!). It took me a long time before I looked at compose watch (with some encouragement) and in my typical fashion I had to try out what happens if I do this?  what happens if I do that? until I had a good idea of how its works and how incredibly useful it is! Don’t be shy…. it is an incredibly useful feature if you are developing with Docker.


EF Core 8 Courses are Live on Pluralsight

I spent much of the fall and winter updating my three EF Core courses.
EF Core 8 Fundamentals is a brand new version of the course. The EF Core 6 Fundamentals and earlier versions remain as separate courses always available.

EF Core and Domain-Driven Design has also been updated to EF Core 8. This is what Pluralsight calls an “in-place” update. There is no longer a separate EF Core 6 and DDD course, but the new course , while focusing on EF Core 8, calls out important differences you may encounter if you are using EF Core 6 or 7.

EF Core: The Big Picture. This now uses EF Core 8 although it is relevant to previous versions again with shout outs to important differences.

You can find all of my courses, including “retired” courses like EF Core 5 Getting Started, on my Pluralsight author page.

Other courses in Pluralsight’s EF Core 6 path (there are multiple authors) are also getting updated to EF Core 8.

Docker Init for ASP.NET Core Compared to VS or VS Code Extensions

Docker began introducing a new CLI command, docker init, allowing us to easily build stake-in-the-ground Dockerfile, docker-compose and .dockerignore files for a project. As the documentation says, these are “sensible files”. That is because init comes with templates to build these files based on your language.

docker init is a plug-in that, because it is a developer tool, is installed with Docker Desktop.

Early on, there were templates for HP, Python, Rust and other languages that I don’t code in. Finally the ASP.NET Core template arrived and it was time for me to start trying it out.

But I already had ways to create ASP.NET focused Dockerfiles and docker-compose files. The Visual Studio Code Docker extension allows you to add those to existing projects. Visual Studio can infer Dockerfile when you are creating a new project using a template or add that and compose after the fact.

Curious as to how these all differ, I explored the variations and will share those with you here. I will first do so with an ASP.NET Web API generated from a template and then open up an existing multi-project API that interacts with a database and see if that has any impact on the generated files.

JetBrains Rider also has Docker support but I did not include that in my already lengthy investigation. You can learn more about that support in their docs: https://www.jetbrains.com/help/rider/Docker_tools_for_net_projects.html#docker_support.

The solutions I created in this article are shared at https://github.com/julielerman/DockerInitComparison

Setting up Test 1: docker init with a dotnet new webapi

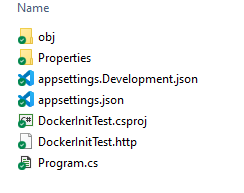
At the command line, in a new folder I’ve named dockerinittest, I’m just running dotnet new webapi.

This creates my little API, using the folder name as the default projet name.

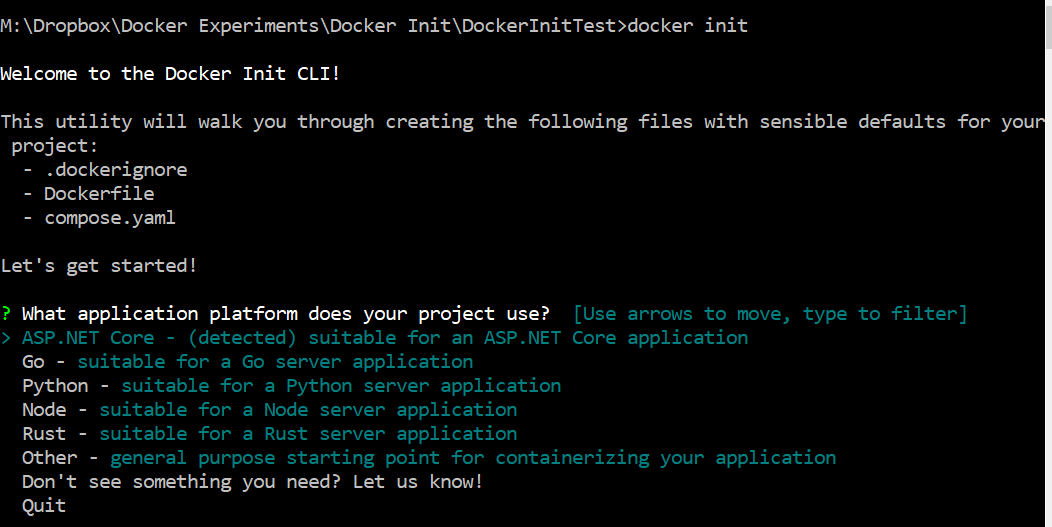
Once that little bitty app is created, I then type in docker init. The command will gather a few bits of info and use what it has discovered in your folder to seed the responses which you can change.

  • App platform
  • Name of main project
  • Version of .NET
  • Local port which will default to 8080.

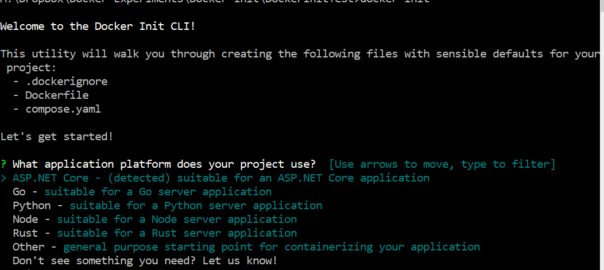
Here’s how that looks:

I love the “Don’t see something you need? Let us know!”. If you select that option, it will open up Google Form for you to share your ideas with dev team.

Notice that ASP.NET Core is already selected (notice the arrow to its left) because it was detected in the folder. So I just hit enter to get those sensible defaults created.

The tool then asks for the rest of the options with prompts based on my project:

? What application platform does your project use? ASP.NET Core

? What’s the name of your solution’s main project? DockerInitTest

? What version of .NET do you want to use? 8.0

After the final response, init then creates the sensible files (sorry, I just can’t resist) and provides a bit of guidance for running the API in Docker.

CREATED: .dockerignore
CREATED: Dockerfile
CREATED: compose.yaml
CREATED: README.Docker.md
✔ Your Docker files are ready!

Take a moment to review them and tailor them to your application.

When you’re ready, start your application by running: docker compose up –build

Your application will be available at http://localhost:8080

Consult README.Docker.md for more information about using the generated files.

Setting up Test 2: VS Code extension with a dotnet new webapi

For the second test, I have a new folder called VSCodeCreate. In there, I again use the dotnet cli to create a new web API project. Then I open that project in Visual Studio Code with “code .” at the command line which is the easy way in Windows.

I already have the Docker extension (created by Microsoft) installed in VS Code, so after opening the command palette with F1, I can choose “Docker: Add Docker files to workspace” . Like docker init, it presents me with some options.

  • Application platform: In my case .NET: ASP.NET Core is on the top because it was my most recently used option and I select that again.
  • Operating system: Windows or Linux. I choose Linux. I have no need for a Windows container.
  • In fact, it helpful asks: “What port(s) does your app listen on? Enter a comma-separated list, or empty for no exposed port.” Today it is defaulting to 5063 and I choose that.
  • Include optional Docker Compose file? I don’t really need this for the single project solution, but for the sake of comparison, I will say Yes.

That’s the end of the options and the extension creates a Dockerfile, a pair of compose files: docker-compose and docker-compose.debug, and a .dockerignore file. The debug file is really handy and it makes sense that VS Code can use that since it’s an IDE where you can debug your code. docker init , a command line tool, doesn’t have any guarantees that you’ll be debugging your code and therefore it didn’t really make sense for it to create such a file.

Setting up Test 3: Visual Studio with a new ASP.NET Web API

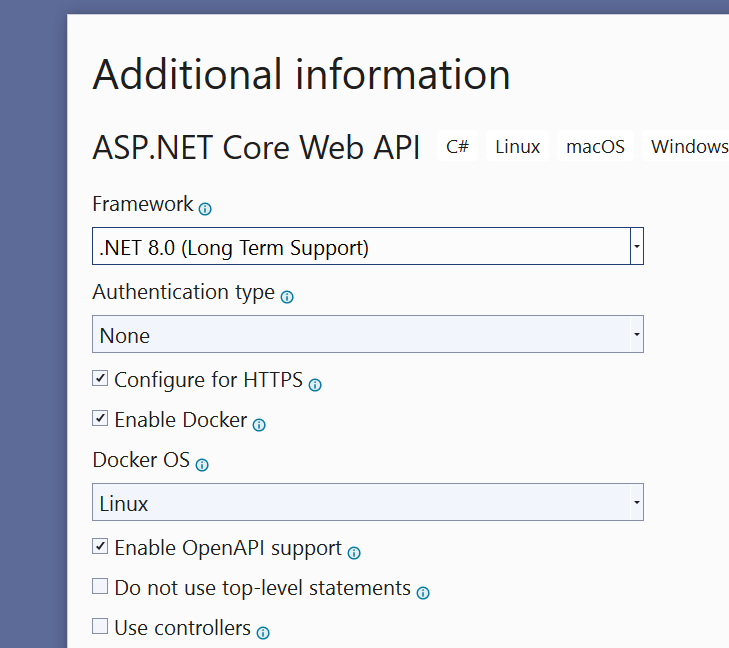
In Visual Studio, I use the ASP.NET Core Web API template to create a new project. The template’s wizard has prompts for enabling Docker and choosing which OS the container should be created for.

The Web API project is created with a Dockerfile and a .dockerignore file.

What about a docker-compose file? That gets added as a separate step. However, an interesting bug (https://github.com/MicrosoftDocs/visualstudio-docs/issues/9789) prevents me from adding it because my VSCreateFiles.sln file and VSCreateFiles.csproj are in the same folder! That’s what you get for creating demoware mindlessly.

I’ll restart and be sure to uncheck “place solution and project in same folder” in the wizard. I’m still letting it create the Dockerfile. With this, Container Orchestration support is an option. After specifying that it should target a Linux container, the compose assets are created.

That’s a comparison of the experience. Now let’s look at what gets created by each option.

A Handy Readme From docker init

docker init adds a Readme markdown file that provides some intro level guidance on running the app in the container, deploying the container, publishing the container and provides links to additional resources. Super helpful information.

Comparing the .dockerignore files

Next is the .dockerignore file. I’ve listed the contents of each in the table below. They all have the same core set of files which in fact is the entirety of what the VS Code extension has included. docker init has added one extra, .DS_Store which is short for Desktop Services Store, a file related to MacOS.  I created this on Windows, but the docker init is generic so it’s covering its bases. Visual Studio added an Azure specific yaml file (in the middle) as well as some additional git files (listed at the end). The outliers are in red.

Docker init dockerignore VS Code extension Visual Studio
**/.DS_Store
**/.classpath
**/.dockerignore
**/.env
**/.git
**/.gitignore
**/.project
**/.settings
**/.toolstarget
**/.vs
**/.vscode
**/*.*proj.user
**/*.dbmdl
**/*.jfm**/bin
**/charts
**/docker-compose*
**/compose*
**/Dockerfile*
**/node_modules
**/npm-debug.log
**/obj
**/secrets.dev.yaml
**/values.dev.yaml
LICENSE
README.md

**/.classpath

**/.dockerignore
**/.env
**/.git
**/.gitignore
**/.project
**/.settings
**/.toolstarget
**/.vs
**/.vscode
**/*.*proj.user
**/*.dbmdl
**/*.jfm
**/azds.yaml
**/bin

**/charts
**/docker-compose***/Dockerfile*
**/node_modules
**/npm-debug.log
**/obj
**/secrets.dev.yaml
**/values.dev.yaml
LICENSE
README.md
!**/.gitignore
!.git/HEAD
!.git/config
!.git/packed-refs
!.git/refs/heads/**

Comparing the Dockerfiles

Now let’s look at the Dockerfiles created for each variation.

Via docker init

Like the readme file, the Dockerfile created by docker init is filled with instructional comments describing what each line of code is for. It also provides hints of common changes you might want to make and why and links to more information. Removing the comments, here is the actual code in the file.

FROM –platform=$BUILDPLATFORM mcr.microsoft.com/dotnet/sdk:8.0-alpine AS build
ARG TARGETARCH
COPY . /source
WORKDIR /source
RUN –mount=type=cache,id=nuget,
target=/root/.nuget/packages \

  dotnet publish -a ${TARGETARCH/amd64/x64}
–use-current-runtime

self-contained false -o /app
FROM mcr.microsoft.com/dotnet/aspnet:8.0-alpine AS final
WORKDIR /app
USER $APP_UID
ENTRYPOINT [“dotnet”, “DockerInitTest.dll”]

This is doing a staged build of the image. Starting with a base of the dotnet SDK(first FROM), copying in the source and compiling the application (RUN).

Then it takes that compiled application and copies it into a smaller image that’s based on only the ASPNET core runtime (second FROM) as it no longer requires the larger SDK to build. With that image, it finally defines a user and entry point for when you build a container from this image.

Via VS Code Extension

Now let’s see what the Docker extension for VS Code built. Theres a lot more code here and no comments.

I remember being overwhelmed years ago the first time I saw what this extension created. But the ASPNET docs provide a detailed explanation, which I had to read through numerous times, and so my learning journey began.

This, too, creates a staged build named “build”. But while the previous Dockerfile built two stages, this one uses four. The first is that it’s creating an image (“base”) from the aspne core image and setting it aside. Then like above, it creates an image based on the SDK and pulls in the needed files. The steps here are more explicit about file names than the previous Dockerfile. Next it explicitly restores the Nuget packages, rather than just letting that happen during the build.  If you look closely at the complex RUN command from the first Dockerfile, you’ll see that it is compressing these steps into that single command.

The third stage publishes the application into a new image (“publish”) from the SDK-based “build” image and publishes the file into a folder on this new image. Again, notice that publish is part of the RUN command from the docker init generated file.

Finally, we return to the set-aside “base” image and create our fourth and final image, named “final”, into which the published application files are copied. This is the image that containers will be built from and therefore defines the entry point.

One other point is that this Dockerfile specifies the port (5063) on which the app will be exposed by any container created from the image.

FROM mcr.microsoft.com/dotnet/aspnet:8.0 AS base
WORKDIR /app
EXPOSE 5063

ENV ASPNETCORE_URLS=http://+:5063

USER app
FROM –platform=$BUILDPLATFORM mcr.microsoft.com/dotnet/sdk:8.0
AS build
ARG configuration=Release
WORKDIR /src
COPY [“VSCodeTest.csproj”, “./”]
RUN dotnet restore “VSCodeTest.csproj”
COPY . .
WORKDIR “/src/.”
RUN dotnet build “VSCodeTest.csproj” -c $configuration -o /app/build

FROM build AS publish
ARG configuration=Release
RUN dotnet publish “VSCodeTest.csproj” -c $configuration -o /app/publish /p:UseAppHost=false

FROM base AS final
WORKDIR /app
COPY –from=publish /app/publish .
ENTRYPOINT [“dotnet”, “VSCodeTest.dll”]

Whew!

Via Visual Studio

Now for the Dockerfile created by Visual Studio as part of the ASP.NET Core project template. It is nearly the same as the one created by the VS Code extension. This isn’t a surprise to me as they are both defined by Microsoft and likely by teams that are collaborating. I won’t bother listing the entire thing.

The most significant difference is that it exposes two ports, 8080 and 8081, the latter to be used as the https target.

EXPOSE 8080
EXPOSE 8081

In the long run, the Visual Studio Code and VS generated Dockerfiles are clearer to read but achieve the same result as the docker init version which is minimal image that contains the app and is not bloated with the SDK. docker init does it in fewer passes. On my system, any differences between the resources used and time taken were not noticeable although I did not perform any serious benchmarking.

Comparing the Compose Files

This is where you’ll find the most significant differences between the three.

As a reminder, docker init and VS Code’s Docker extension create the docker compose file along with Dockerfile and VS requires you to explicitly create compose.

Consider the fact that in all three cases, I have only a single project and am not involving a database or other resources that might require additional images. In all three cases, compose isn’t really necessary as I have no need to orchestrate multiple images. docker run using the single image will work.

docker init’s compose

The docker init generated file is simply named compose.yml and its actual code is simple as well. It will create one container named services based on the image named final generated by Dockerfile. And it will expose  the service on the host computer’s port 8080 and internally on the container’s port 8080.

services:
  server:
    build:
      context: .
      target: final
    ports:
      – 8080:8080

But I referred to this as the “actual code”. That’s because the file is filled with comments that provide further guidance and links to documentation, especially helpful for those new to Docker. And it also provides a commented example of running a second container to supply a PostgreSQL database via the official postgres image. That is very handy because otherwise it’s off to google, or github.com/docker/awesome-compose or other existing projects to copy and paste the same. I also would like to say that with this project open in VS Code, I tested out GitHub Copilot in the yaml file.

Here is my prompt:

#create a service using Microsoft SQL server docker image

And here is what it generated, ignoring the fact that the server service already exists, but also very likely having read the code already in the file:

services:
  server:
    build:
      context: .
      target: final
    ports:
      – 8080:8080
  db:
    image: mcr.microsoft.com/mssql/server
    restart: always
    environment:
      – ACCEPT_EULA=Y
      – SA_PASSWORD=YourStrongPassword
    ports:
      – 1433:1433


This made me very happy, knowing what I went through back in my early Docker days to comprehend and achieve the same.

The original example in the yaml file for postgres is more extensive and you can see it in my GitHub repo.

VS Code’s Compose

Now let’s take a look at what the VS Code extension created.

Recall that above I said that this created two files: docker-compose.yml and docker-compose-debug.yml.

The docker-compose.yml file does have one comment which I’ll include the full listing:

# Please refer https://aka.ms/HTTPSinContainer on how to setup
# an https developer certificate for your ASP.NET Core service.
version: ‘3.4’
services:
  vscodetest:
    image: vscodetest
    build:
      context: .
      dockerfile: ./Dockerfile
    ports:
      – 5063:5063

This is a bit more explicit than what docker init created. It specifies the version and names the container using the name of the project and image. Also, rather than specifying it should build form a particular image, it says to leverage the contents of the Dockerfile to learn what it needs. Finally, it exposes both ports on 5063 as per the Dockerfile specification.

Interestingly, the same GitHub Copilot prompt results in the following in this file:

 #create a service using Microsoft SQL server docker image
    sqlserver:
      image: “mcr.microsoft.com/mssql/server:2019-latest”
      environment:
        SA_PASSWORD: “Password123”    

This is missing some important details like the ACCEPT_EULA attribute and ports for the image.

I know this because I’m not relying on Copilot for 100% knowledge, but just to do some quick typing for me. Especially for the URL of the image! Who memorizes that stuff?

I cannot explain why it is so different from what it generated in the other project although someone with more expertise with Copilot might be able to.

The second compose file allows you to debug the code when it’s running in the container which is a glorious capability in VS Code. VS can do it, too. It uses the same image created from the Dockerfile but applies some additional parameters. It also uses a volume which, from my research, is where the source code remains accessible to the debugger. However, I could not see evidence of a volume in either the Docker Explorer in VS Code or in Docker Desktop. Again, brighter minds than mine might be able to explain.

# Please refer https://aka.ms/HTTPSinContainer on how to setup an https developer certificate for your ASP.NET Core service.
version: ‘3.4’
services:
  vscodetest:
    image: vscodetest
    build:
      context: .
      dockerfile: ./Dockerfile
      args:
        – configuration=Debug
    ports:
      – 5063:5063
    environment:
      – ASPNETCORE_ENVIRONMENT=Development
    volumes:
      – ~/.vsdbg:/remote_debugger:rw
With or without that volume showing itself to me, running compose up on that yml file does indeed allow me to set breakpoints and perform all the normal debugging tasks even though it’s all executing inside a container.

Visual Studio’s Compose

Now let’s turn our attention to the compose file created in Visual Studio using the “Container Orchestration support” menu option.

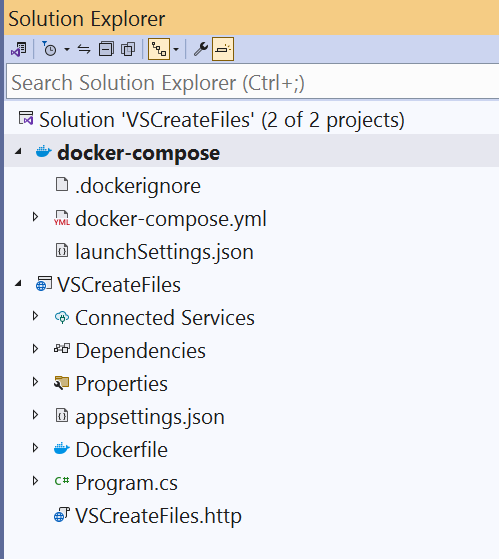
First of all, it’s important to know that the compose files are in the solution but not in the project which makes perfect sense. In the other scenarios, everything was contained in the single folder for the project. If you added more folders, it is up to you to move the compose files outside of the folders.

Here is how that looks in the Solution Explorer:

The heading is a special type of project file with a dcproj extension, whose contents describe the files included and various attributes about the container. It’s interesting and I recommend looking at it in the repository.

The compose file is a bit different than the one created by the VS Code extension:

  • It does not specify ports.
  • It will dynamically find the vscreatefiles image
  • It knows that the Dockerfile is in a different folder.

version: ‘3.4’

services:
  vscreatefiles:
    image: ${DOCKER_REGISTRY-}vscreatefiles
    build:
      context: .
      dockerfile: VSCreateFiles/Dockerfile

Notice that there is no explicit debug compose file. Instead, the wizard created an additional configuration in launchsetting.json for running or debugging via Docker Compose and that is one of the options for running with or without debugging, i.e. CTRL-F5 or just F5.

Conclusions

I have definitely sated my curiosity and feel that each of these options are equally sufficient for whichever development environment you are working in. That is, in my opinion, the key factor. Are you working at the command line or one of the IDEs? They will each give you a good, working head start.

docker init is going to be much more useful for people who just dive in to Docker with little advance knowledge because there is so much guidance embedded in the comments. The support for Visual Studio and VS Code also provide enough to get your app running but will require some help from Copilot or Dr. Google to satisfy more complex solutions and needs.


EF Core Fundamentals for EF Core 7 (Pluralsight)

Last spring Pluralsight published my 7.5 hour EF Core Fundamentals course. I hope that given my history with EF, EF Core , my books, talks and courses that you will already know that it’s a very good and in-depth course. And the response to the course has been great!

Unfortunately the course has the version number in it: It is really called EF Core 6 Fundamentals which I believe causes devs using the current version (EF Core 7) to hesitate watching the course.

These fundamentals do not really change from one version to the next. It is the advanced features that the EF Core team is evolving.  The course is still totally relevant for EF Core 7 and you can use EF Core 7 to work through the course.

There are new features you should be aware of that I covered in the EF Core 7: It Just Keeps Getting Better article in Code Magazine’s, Code Focus issue on .NET 7 such as bulk updates and deletes, mapping stored procedures and more (some of which I would consider “fundamental”, others a bit more advanced).  But the basics  continue to work just as they do in EF Core 6. 

There’s no need to shy away from either of these courses or any of the others on the EF Core 6 track  on Pluralsight if you are using EF Core 7.

In fact, I have updated every single project from the course to EF Core 7 and except for one small tweak (not even related to EF Core) in the API Testing demo (from Module 13), every demo ran exactly the same in EF Core 7 as it does in EF Core 6.

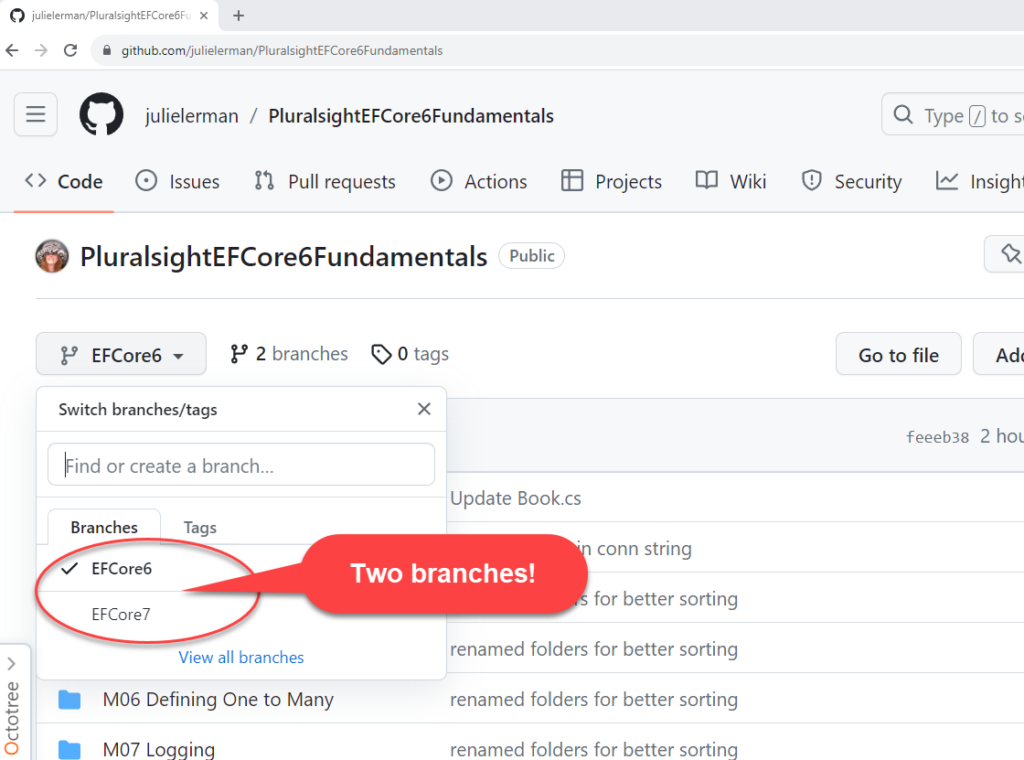
All of the updated projects are in a new branch in the PluralsightEFCore6Fundamentals GItHub repo dedicated to the source code for the course.

Because of the course length and the fact that EF Core 7 is not a Long-Term Support (LTS) version, Pluralsight and I decided not to update this course. Many of the EF Core and ASP.NET core courses went the same way.

I also created a much more advanced course called EF Core 6 and Domain-Driven Design. While I was forced to put “6” in this course title and defaulted to EF Core 6 for all of the lessons, anywhere that EF Core 7 features or behaviors were different, I called them out in that course.

So there’s no need to shy away from either of these courses or any of the others on the EF Core 6 track  on Pluralsight if you are using EF Core 7.

Restarting Outlook Rules When They ALL Stopped Working

Rick Strahl reminded me of a great use for my nearly abandoned blog (especially as Twitter has lost its bloody mind)….memory storage! And I just solved a nagging problem so decided to “log” it here on my blog not only for my own future reference but perhaps to help someone else too.

If I explicitly ran the rules whether online or in the Windows Outlook client, that worked (and was time consuming).  But they stopped automatically being applied on incoming emails.

I found many articles via googling the problem. Many alluded to the rules file being too large. I removed old rules and compressed multiple rules for people at the same company. Still no luck.

There were other suggestions related to local outlook files, but the problem was on the server.

After 4 days of revisiting the problem, reading more and trying again, I finally, by chance, happened upon the solution for MY problem.

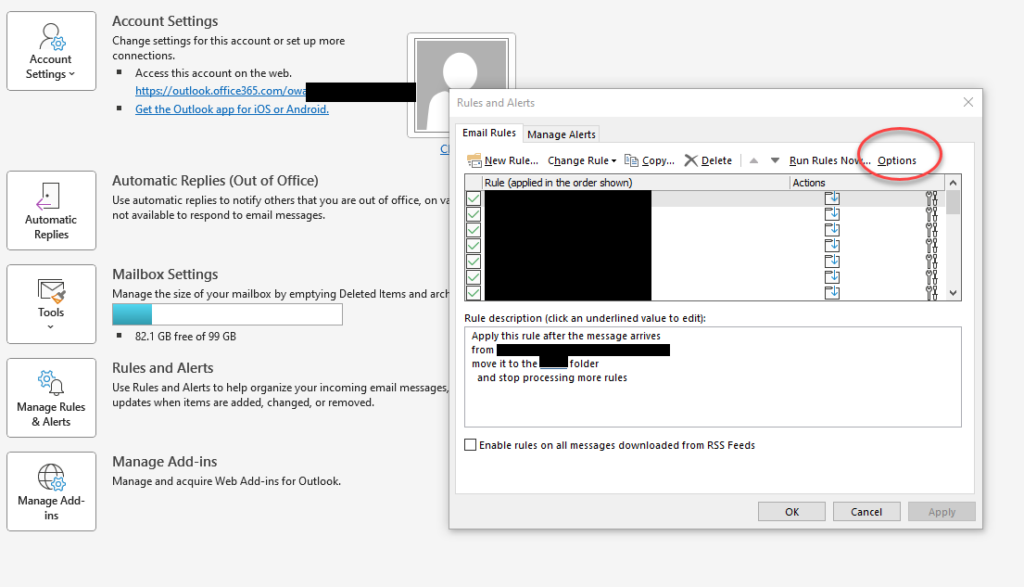
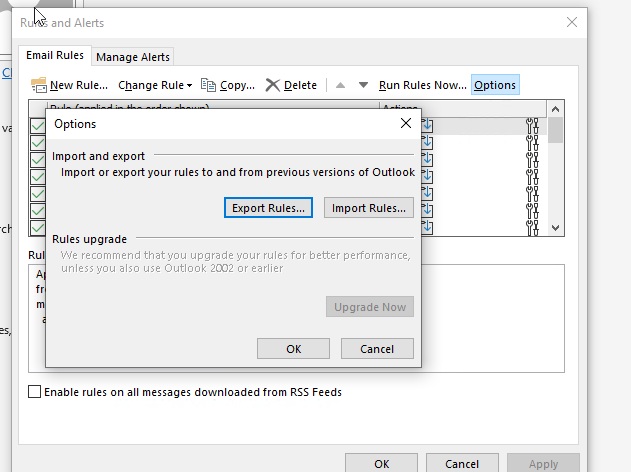
In the Manage Rules & Alerts, I had noticed (and ignored multiple times), under the Options “tab”:

There is an option to import and export.

So I exported the rules, deleted them all from outlook, verified that they were also gone from the online Outlook, then imported the file. 

It didn’t take long to see that the rules were working again. My most used one I think is the rule that any email with the word “unsubscribe” in it that hasn’t already been moved to another folder, goes into one called “Promotional”. 

New EF Core and Domain-Driven Design Course on Pluralsight!

MY NEW Pluralsight COURSE IS OUT! EF Core 6 and Domain-Driven Design. Yippee! I spent 3 months heads down on this (and years preparing for it!)

This happily aligns with a current 50% off sale on annual subscriptions.

Also note that as with *all* PS courses, they are limited to “expanded” library for the first few days but this will be part of the standard library (available to all) hopefully by the end of this week.

Short description
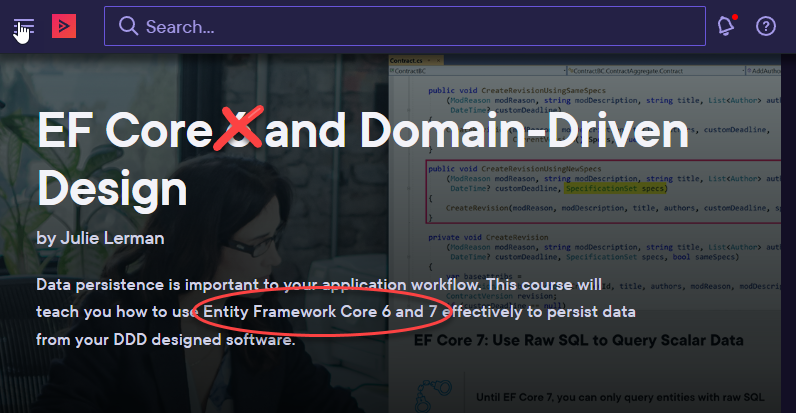
“Data persistence is important to your application workflow. This course will teach you how to use Entity Framework Core 6 and 7 effectively to persist data from your DDD designed software.”

Content
The module titles should give you a better flavor of this course:

  • Understanding Where EF Core 6 Fits Alongside DDD (Includes an overview of DDD)
  • Analyzing and Planning Our Domain (Strategic and tactical design walkthrough)
  • Exploring the Contract Bounded Context Solution
  • Adding the First EF Core DbContext
  • Tuning Default Mappings for the Data Model
  • Using Integration Tests to Validate Persistence
  • Reasoning About Many-to-Many Variations
  • Mapping Aggregates to Azure CosmosDB
  • Organizing Persistence Logic to Support DDD Design (Repositories, services, search and sharing data and events across bounded contexts)

Enjoy!

New on Pluralsight! EF Core 6 Fundamentals!

I’m so excited to share with you that I have a new course on Pluralsight: EF Core 6 Fundamentals. I’ve been working on it for a while and it is the biggest course I’ve ever created. It is 7.5 hours long. It’s a lot more than the breadth of the previous Getting Started courses.  

And there’s an additional bonus. Pluralsight is having a sale on subscriptions right now. 33% off through May 12, 2022.

There are 16 modules if you count the course overview which is just a 1.5 minute “trailer” about the course. This is not just a refresh of the recent EF Core 5 Getting Started course. In fact, I retired the samurais and have introduced a book publisher as the domain this time. Below is the list of module titles for my new course.

I’ve also posted the sample code for the course in this repository on my Github account

  1. Course Overview
  2. Building Your First Application using EF Core
  3. Using EF Core 6 to Query a Database
  4. Tracking and Saving Data with EF Core
  5. Controlling Database Creation and Schema with Migrations
  6. Defining One-to-Many Relationships
  7. Logging EF Core Activity and SQL
  8. Interacting with Related Data
  9. Defining and Using Many-to-Many Relationships
  10. Defining and Using One-to-One Relationships
  11. Working with Views and Stored Procedures and Raw SQL
  12. Using EF Core with ASP.NET Core Apps
  13. Testing with EF Core
  14. Adding Some More Practical Mappings to Your Application
  15. Understanding EF Core’s Database Connectivity
  16. Tapping into EF Core’s Pipeline

I’d also like to give a shout out to my friend and fellow Pluralsight author, Roland Guijt, who acted as tech reviewer as I created this course. His feedback and insights were invaluable as is evident not only in the final version of my course, but in his own courses on ASP.NET Core, C# and more.

DockerCon Live 2021: Docker for Super Beginners Community Room

DockerCon Live 2021 is coming up this Thursay, May 27. New this year, in addition to regular sessions, are a number of community rooms hosted by Docker Captains.
 
I will be co-hosting the Docker for Super Beginners Community Room with fellow Docker Captain, Rachid Zarouali.
 
In order to include links to speaker info and calendar links for each session, I’ve duplicated and enhanced the schedule displayed on the DockerCon website for this community room.
 
Note: The calendar links are working with my google calendar. I’ve heard others say it wasn’t working for theirs. If you know what I did wrong, please let me know!
 
RESOURCES
We will continue to add beginner resources in this section. Feel free to share your favorites by leaving a comment!

11:00 AM  PST / 8pm CET 
Live Panel: Finding Your AHA! Moment with Docker  (Add to your calendar)
Panelists: Julie Lerman, Rachid Zarouali(sevensphere.io), Elton Stoneman (blog.sixeyed.com)

Docker can seem confusing at first. But there could be one single idea that helps you “get it”. Three Docker Captains will talk about their own AHA moments and those they’ve witnessed from others.

12:00 PM PST / 9pm CET
Supercharge your Docker learning with VS Code (Add to your calendar)
SpeakerGuy Barrette (guybarrette.com )

In this session, you will learn how to use the Docker extension for Visual Studio Code to supercharge your Docker learning experience.

1:00 PM PST / 10pm CET
Learning Docker for Smaller Feedback Loops (Add to your calendar)
Speaker: Sean Killeen (seankilleen.com)

A high level journey through one of my Docker “ah-ha” moments and using Docker for smaller feedback loops on my projects.

2:00 PM PST / 11pm CET
Live-code a Dockerfile (Add to your calendar)
Speaker: Rob Richardson (robrich.org)

In this session I’ll begin with an empty folder and a terminal, and live-code everything. I’ll then build and run the container. New to Docker? You’ll learn how here.

3:00 PM PST / 12am CET
Docker – send help, a beginner story (Add to your calendar)
Speaker: Chris Noring (softchris.github.io)

Do you feel like learning Docker seems like a daunting task? All your colleagues swear by it you don’t know why you should feel excited about it? What even is containers? If this feels like you, then this talk is for you. It will cover the basic concepts but also WHY Docker and containers and how it can help you.

Using Azure Active Directory Accounts with a Subscription Tied to a Personal (aka Live) Account

This blog post is about a very particular problem you might have with some Azure services if your Azure subscription is tied to a personal account and not an Office 365 or Microsoft 365 identity. And the set of Azure services is not random. It is a set of Azure services that rely an Azure Active Directory for credential management – referred to as Managed Identity.

I ran into this when working with the Azure Key Vault, but you might hit it with Azure Blob Storage or some other services.

I want to first describe how my Microsoft and Azure accounts are set up and how I encountered the problem then share how I was able to solve it.

I have also written an article on using Azure Key Vault from an ASP.NET Core application but I chose a simpler path for the article which was to use an Azure Subscription that was tied to an Office 365 account. That article is in the Code Magazine May/June 2021 issue. (I’ll share the link when it’s live). In this blog post I am going to focus on the problem of the personal account. You can find details about accessing the Key Vault from the application in the article.

My Microsoft and Azure Accounts

My Azure Subscriber account is my personal Microsoft account that is associated with live.com. It’s not a live.com email address. You see the big difference when you log into a Microsoft property. You enter your email address and then specify that it’s either a work/school account or a personal account. Mine is one of those personal accounts.

I log in to visualstudio.com, my Visual Studio subscription and my Microsoft MVP account with that same personal account.  I’ve been working this way for a very long time.

Working with an Azure Active Directory dependent service: Azure Key Vault

I was writing a small ASP.NET Core app and wanted to store its secrets– some connection strings – in an Azure Key Vault to keep them out of my source code.

I started by creating a key vault in Azure. Key vaults are accessed through an access policy — a combination of an Azure Active Directory user and a selected set of permissions. When you create a new Key Vault and your Azure subscription account is an O365 account, a new access policy will be automatically be created giving the subscriber account’s identity broad access to that key vault.  Because my subscription was not tied to an O365 identity, I had to manually create an access policy for the user that is the subscription owner.

Back in Visual Studio, I wove the Azure.Extensions.Aspnetcore.Configuration.Secrets package into my application to let it  read from the key vault. This also requires referencing the  Azure.Identity NuGet package.

The secrets API asks the identity API to discover any managed identities on your machine if they are not fed directly to the application.

Here’s the critical code for accessing the key vault that I added into my app:

config.AddAzureKeyVault(
   new Uri("https://fourtwentyfive.vault.azure.net"),
   
new DefaultAzureCredential());

This tells my app to communicate with my particular Azure Key Vault and use whatever credentials it can find. In my case, debugging in Visual Studio, that is the credentials I used to log in to Visual studio.

The Error of My Ways

And this is where the problem begins! When the debugger attempts to access the key vault with those credentials it throws an error.                 

Azure.Identity.AuthenticationFailedException: 'SharedTokenCacheCredential authentication failed: AADSTS9002332: Application ‘[application’s id]'(Azure Key Vault) is configured for use by Azure Active Directory users only. Please do not use the /consumers endpoint to serve this request.

That’s because even though the key vault created an access policy with my Live account, it’s a trap. It won’t work. Azure Active Directory cannot manage Live accounts. It can only manage Office 365 or Microsoft 365 accounts. Full stop.

I do have an O365 account. But I didn’t want to change my subscriber account to one of my two identities tied to my O365 account for fear of messing up everything that’s dependent on my old Live login–my MVP access, my visualstudio.com access, etc.

Therefore I needed to add one of my Office 365 identities into my Azure Active directory.

Tying an O365 Identity to my Azure Subscription

I have two identities in my O365 account – julia and jlerman. The jlerman account has the same exact email address as my Live account. Let me help you avoid suffering through another failure. Don’t try to add in an O365 identity that has the same email address as the personal identity. This was the first path I chose. The code failed in the same place but this time I got an HTTP 401 error result — Unauthorized client access.

But I was successful when using my other identity: julia.

How to do this was complicated and I would never have figured it out on my own. I’m grateful for guidance from a fellow Microsoft Regional Director, Joe Homnick, (rd.microsoft.com/en-us/joe-homnick) who is a lot more experienced with Azure security than I ever want to be! In fact, I didn’t understand the problem very well and I’m sure my explanation to him was very misleading, but he was able to figure out what I was trying to describe. Unfortunately, Joe couldn’t just point me to a document because apparently none exists. He documented the steps for me in an email along with screenshots. That’s a pal!

So the rest of this blog post is simply relaying what Joe taught me.

Also, I’m doing this via the Azure portal rather than a lot of mysterious Azure CLI commands. But you can achieve the same using the Azure CLI or PowerShell.

Step 1: Adding the O365 email address as a guest user with Global Administrator privileges

In the portal, go the Azure Active Directory, then Users.

  • Select New guest user
  • Select Create user. (Not “invite user”).
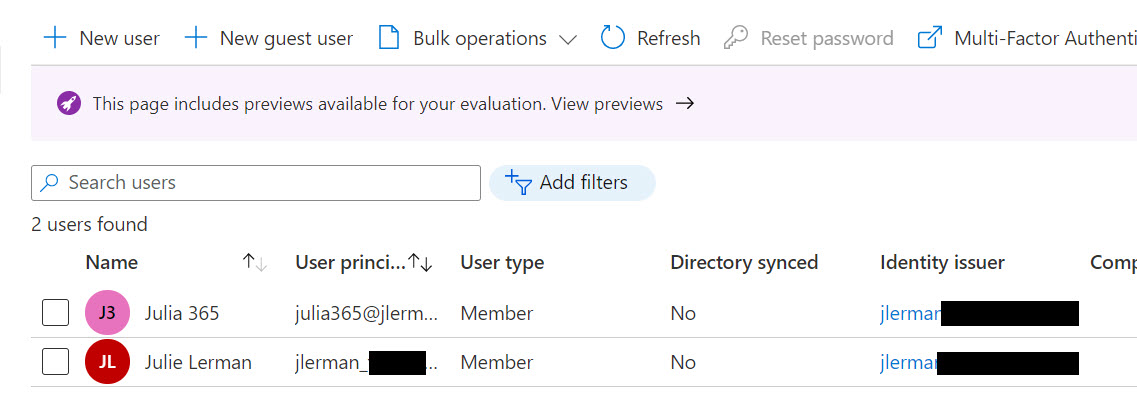
  • Under identity, add a user name. I called mine julia365. Azure will populate the domain name tied to your subscription’s Azure Active Directory.
  • Give your user a name. Mine is “Julia 365”. Xoru5917
  • Set a password for this user. You can let the portal auto-generate or supply your own.
  • The only other task (an important one) on this page is to set a role for this user. Click on User next to Roles and filter on global to select Global Administrator.

Then you can create the user.

The user principal name will be funky looking. It is formatted as an email address with the name of the user (with no spaces) and the domain is a compressed version of the identity for the subscription and then onmicrosoft.com.

So if my subscriber identity is [email protected], the new user’s principal name will be [email protected]. It’s not an email address, just an identity.

The identity issuer is also jlermansomedomain.onmicrosoft.com.


Step 2: Adding the new guest as a secondary subscription owner on the account

Having the user is not enough for the authentication to take place though. The user has to be recognized as a subscription owner. Azure allows you to set up secondary subscription owners.

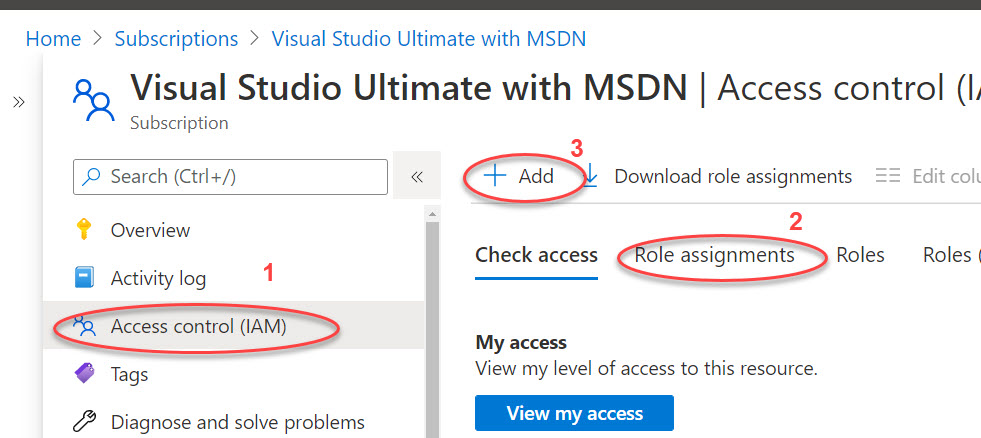
You’ll need to start by going to the subscription properties. You can find Subscriptions in the search bar if needed. If you have multiple subscriptions, be sure to select the one you intend to use for your application. Once in the subscription properties, select the Access control (IAM) option. Then from it’s menu, Role assignments and then Add.

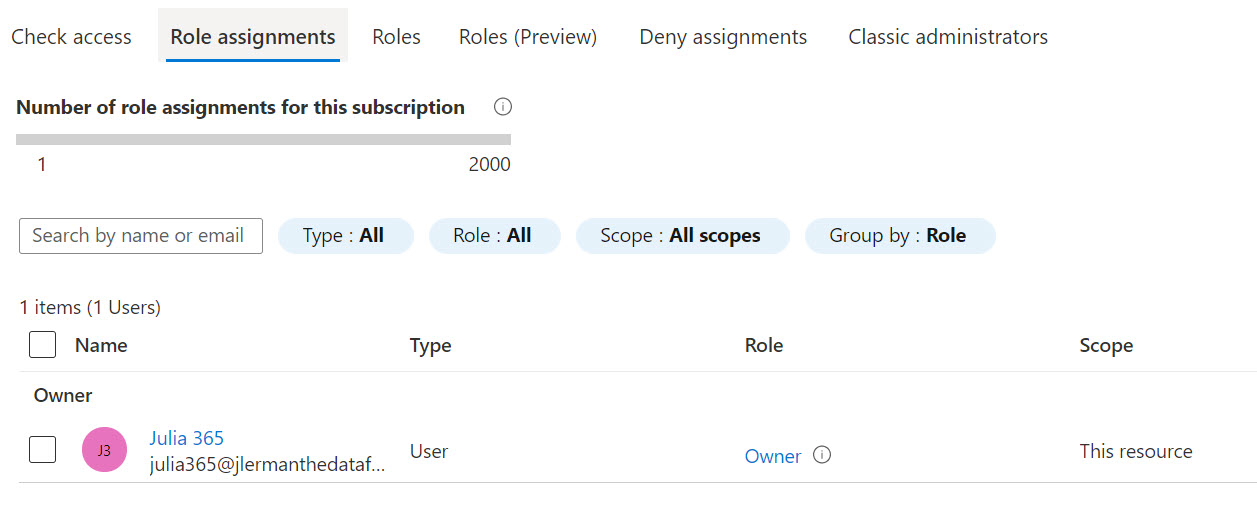
In the Add role assignment form, select Owner from the Role drop-down. Leave the Assign access to option at its default (User, group, or service principal). You’ll see all of the users listed. Select the newly created one and then save. It will get added very quickly.

Step 3: Log in to the portal with the new identity

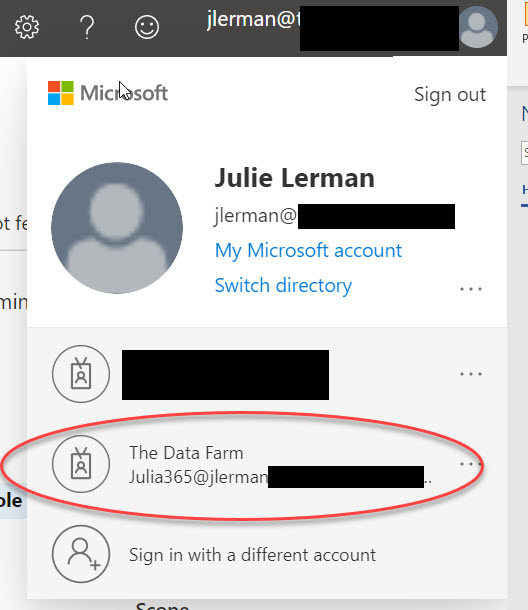
If you click on your login info on the top right corner of the portal, you may already have an easy option available for switching to the new account for logging in.

Otherwise, you’ll need to sign out then sign in with the new credentials.

Step 4: Add the new identity to the service’s access policies.

In my case, I returned to the key vault and created a new access policy for the new identity.

Step 5: Switch Visual Studio user to the new identity in order to run/debug from VS

This is important since remember that when running or debugging from Visual Studio, the Azure Managed Identities API will read that login as a possible credential source. You’ll first need to sign out and then sign in again with the clunky identity you created in AAD. With my example, that would be [email protected].

With these changes, not only did I finally get past that failing line of code, but the app accessed the key vault and read my secrets (a database connection string in my case) and was able to use the secret to connect to the database.

I hope this helps someone else down the road!


Come Join Me Online Next Week!

I’ve got a pile of live on-line engagements next week and it will be fun if you can come join any of them.

EF Core Community Standup, 
March 10, 1pm EST

First up is an AMA (Ask Me Anything) style Q&A with the EF Core team and me .All of the past standups from the team (and guests) are on  YouTube. Here’s the link to the collection: https://aka.ms/efstandups. I believe the team will set up the “stage” for the upcoming standup at the top of that list, but you can always watch past ones and learn so much. 

Docker Community All Hands , March 11 11am EST

First hour will be company and product updates.
Second hour will be a collection of demos, workshops and lightning talks on various channels. I expect to be doing a lightning talk on Docker tooling in Visual Studio and another one on the VS Code Docker extension. Details here

The 425 Show, March 12 , 11am EST

This is a live show focused on Azure Active Directory, a topic I know nothing about! However, the hosts, Christos Matkas and John Patrick Davidson are experts. Together we are going to secure the data access for a web app that I’ve built using EF Core. Should be fun! Here’s the YouTube channel where you can connect